Render Quality
| grandMA3 ユーザマニュアル » パッチとフィクスチャ設定 » Render Quality | Version 2.2 |
Render Quality は、光とフィクスチャのボディーが 3D Viewer どのようにレンダリングされるかを定義します。
すべてのレンダリング設定は、Render Quality プール・オブジェクトに保存され、プールで簡単に選択できます。
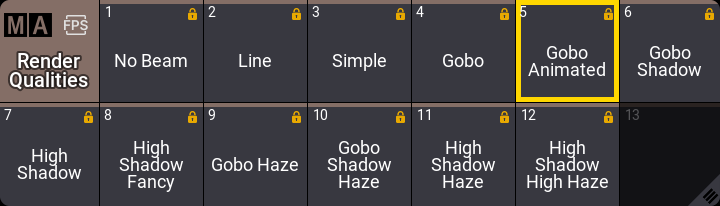
このプールには、定義済みのレンダリング品質がいくつかあり、常にいずれかのオブジェクトが選択されています。3DViewer は、任意のレンダリング品質を用いたり、選択されているプール・オブジェクトにリンクしたりできます。
新しいプール・オブジェクトを作成して、それを編集することでレンダリング設定を変更できます。
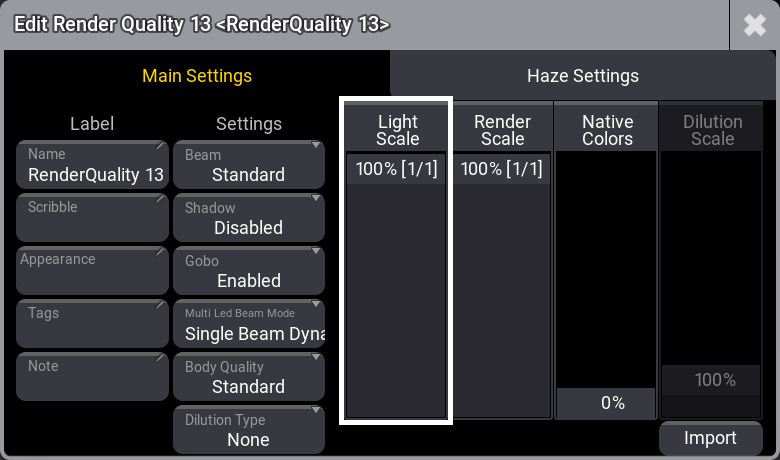
エディタには2つのタブがあります。Main Settings タブでは、レンダリングの詳細度を指定する一般的な設定を行います。
主な設定は次の通りです。
- Name:
プール・オブジェクトの名前です。タップすると名前を変更できます。 - Scribble:
割り当てられているスクリブルです。タップすると、スクリブルを選択したり新規作成したりできます。 - Appearance:
割り当てられているアピアランスです。タップすると、アピアランスを選択したり新規作成したりできます。 - Tags:
レンダリング品質にタグを追加できます。 - Note:
Render Quality に対して注記を追加できます。 - Beam:
ビームを視覚化する際のシミュレーション品質を切り替えます。後のものほど品質が高く、より多くのコンピュータ・リソースを必要とします。- No Beam:
ビームをレンダリングしません。このモードでは、ゴボやスポットのレンダリングが行われません。 - Line:
ビームを1本の単純な線で描きます。このモードでは、ゴボやスポットのレンダリングが行われません。 - Standard:
フィクスチャからのビームを簡略に描きます。 - High:
ビームをよりリアルに描きます。 - High Fancy:
光の散逸をより正確に計算して描きます。
- No Beam:
- Shadow:
他のオブジェクトにビームが当たったときに影ができるかどうかを切り替えます。 そのためには、Patch で3Dオブジェクトの Cast Shadow 設定を有効にし、またフィクスチャの Shadow Quality を None よりも高い値に設定しておく必要があります。詳しくは ショーへのフィクスチャ追加 を参照してください。 - Gobo:
ゴボが、ビームおよびスポット内でレンダリングされるかどうかを指定します。以下の3つの選択肢があります。- Disabled:
ゴボはレンダリングされません。 - Enabled:
ゴボがレンダリングされます。 - Animated:
ゴボに加えて、ゴボシェイクやゴボホイール・スピンなどのアニメーションもレンダリングされます。Enabled では、これらのアニメーションがレンダリングされません。
- Disabled:
- Multi LED Beam Mode:
マルチエミッタ・フィクスチャのビームのレンダリング方法を指定します。以下の選択肢があります。- Separated Beams:
各エミッタのビームがレンダリングされます。 - Single Beam Mean Color:
平均色による単一ビームとしてレンダリングされます。 - Single Beam Dynamic Gobo:
エミッタ出力から「仮想の動的ゴボ」を作成し、単一ビームとしてレンダリングされます。
- Separated Beams:
- Body Quality:
フィクスチャのボディーのレンダリング品質を指定します。以下の選択肢があります。- None:
フィクスチャのメッシュは視覚化されません。ただし、Environment オブジェクトは表示されます。 - Box:
フィクスチャのボディー全体が1つのボックスとして視覚化されます。このボックスはフィクスチャの寸法になります。 - Low:
フィクスチャのすべてのジオメトリがボックスとして視覚化されます。ただし、フィクスチャのメッシュのうちデフォルトの cylinder のものは、そのまま表示されます。 - Simple:
ムービングヘッド(Base - Yoke - Head - Pigtail 付き/なし Lens)の一般的な幾何学的構造を持つフィクスチャは、grandMA3 のデフォルト・メッシュで視覚化されます。他のすべてのフィクスチャは、"Low" モードで視覚化されます。 - Standard:
頂点数が1,200を超えるフィクスチャは、Simple モードで視覚化されます。頂点数が1,200未満のフィクスチャのメッシュは、そのまま表示されます。 - High:
頂点数が10,000を超えるフィクスチャは、Standard モードで視覚化されます。頂点数が10,000未満のフィクスチャのメッシュは、そのまま表示されます。 - Ultra:
頂点数にかかわらず、オリジナルのメッシュでフィクスチャが表示されます。
- None:
- Dilution Type:
ビームやスポットの明るさが距離によってどのように減衰するかを指定します。以下の選択肢があります。- None:
距離が離れても、ビームやスポットの明るさが変わりません。 - Linear:
距離に応じて明るさが直線的に減衰します。 - Correct:
よりリアルな減衰になります。
- None:
- Light Scale:
3D Viewer における光レンダリングの解像度を変更します。100%では、3D Viewer がネイティブ解像度でレンダリングされます。10%では、3D Viewer の光の解像度が、幅と高さについて5で割ったものになります。 - Render Scale:
3D Viewer におけるレンダリング全体の解像度を変更します。100%では、3D Viewer がネイティブ解像度でレンダリングされます。10%では、3D Viewer の解像度が、幅と高さについて5で割ったものになります。 - Native Colors:
ネイティブな色表現と、ビームやスポットのインテンシティとの間を補間します。レンダリングされたビームが区別しやすいように、色とインテンシティを自動的に変更します。値が大きくほど、重なり合う個々のビームが区別できなくなりますが、より色が強く、コントラストが高くなります。 - Dilution Scale:
ビームの明るさが減衰する度合いを指定します。値が大きいほど、ビームの減衰が少なくなり、より遠くまでビームが見えるようになります。
Render Scale と Light Scale は組み合わせて使用できます。両方を1/2に設定すると、3D Viewer 全体がその半分の解像度でレンダリングされ、光は1/4の解像度でレンダリングされます。
Import ボタンによって、エクスポートされた Render Quality オブジェクトの設定をインポートできます。
プール・オブジェクトは、Show Creator メニュー または Export キーワード でエクスポートできます。
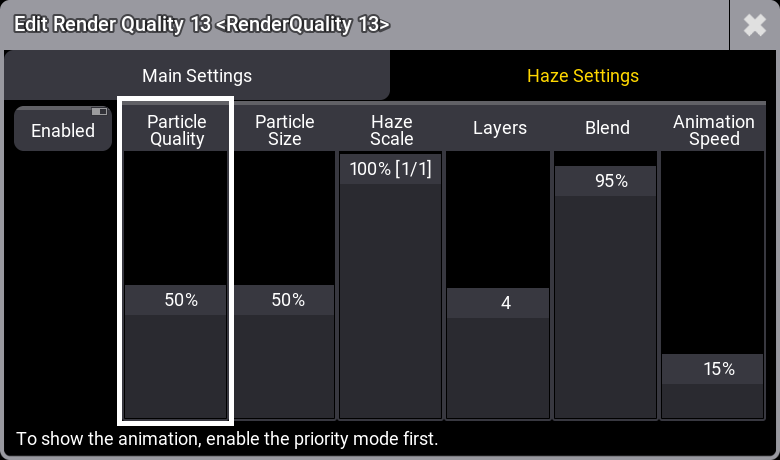
Haze Settings タブは以下のようになります。
これらの設定は、3D Viewer で視覚化できるアニメーション化されたヘイズに関するものです。この機能は、卓のグラフィックボードの想定を超えるグラフィック性能を必要とします。高性能なグラフィックボードを搭載した grandMA3 onPC で使用することをお勧めします。
この機能を使用すると、3D Viewer がよりリアルに見えます。
3D Viewer でヘイズ・アニメーションを視覚化するには、Priority 設定を有効にする必要があります。
Priority 優先モードは、3Dレンダリングを優先するために使用されます。このモードでは、他のUI要素の表示に必要なリソースが削減されます。詳細については、3D Viewer を参照してください。
ヘイズはボリューム空間内に存在します。この空間は、ステージ空間に配置されたパッチの非 Environmental デバイスの位置によって定義されます。
このボリューム・スペースが大きすぎる場合、ヘイズ・レンダリングは無効になります。この場合、3D Viewer の左上に "Haze has been automatically disabled as the maximum volume defined by the non-environmental fixtures is in [size of volume]% overload." という警告が表示されます。ボリューム・スペースを小さくすると、ヘイズ・レンダリングは再び有効になります。これは、ヘイズをレンダリングするかどうかを決定する内部設定です。これによって、後述する "Enable" 設定が変更される場合があります。
ヘイズ・レンダリングには、ショーファイルのデータ制限というもう一つの制限があります。10GBのデータ制限の90%に達すると、ヘイズ・レンダリングは無効になり、3D Viewer に警告テキストが表示されます。
ヘイズ設定は以下の通りです。
- Enable:
ヘイズ・レンダリングを有効にするかどうかを切り替えます。制限によりヘイズ・レンダリングが内部的に無効になる場合があるため、この設定でレンダリングを有効にするかどうかを指定します。 - Particle Quality:
ヘイズの雲がどれだけ正確にレンダリングされるかを指定します。値が高いほど、品質が向上します。 - Particle Size:
ヘイズの粒子の大きさを指定する。値が小さいほどヘイズは雲のような質感になり、値が大きいほどヘイズは濃くなります。 - Haze Scale:
ヘイズ・テクスチャの解像度を変更します。数値が高いほどテクスチャの解像度が高くなり、レンダリングの計算に必要なリソースが増加します。 - Laers:
ヘイズの深さに応じて用いられるレイヤ数を指定します。値が高いほど、ヘイズの空間的な広がりが増します。 - Blend:
ヘイズが空中にブレンドされる度合いを指定します。値が低いほど、空中にブレンドされ、より均一に見えます。値が高いほど、よりリアルに見えます。 - Animation Speed:
ヘイズが移動するスピードです。3D Viewer で Priority が有効になっていない場合、ヘイズはアニメーション化されません。