Partial Show Read (PSR)
|
grandMA3 ユーザマニュアル » Show Creator » Partial Show Read (PSR)
|
Version 2.2 |
Partial Show Read メニューは、オブジェクト、特にフィクスチャ・データを含むオブジェクトを、別のショーから現在読み込まれているショーファイルに転送します。
詳しくは PSR キーワード を参照してください。
| 重要 | |
| PSRを行うショーファイルは、それを行ったステーションで実行中のショーファイルと同じソフトウェア・バージョンに保存されている必要があります。 |
|
|
部分的に読み込まれたショーは、取り消すことができません。PSRを続行する前に、読み込まれたショーファイルの名前を変更することを強くお勧めします。 |
PSR メニューにアクセスするには、以下のようにします。
Menu を押し、Show Creator で PSR をタップしてください。PSR メニューが開きます。
上部にある矢印形状のタブが、さまざまな手順を案内します。
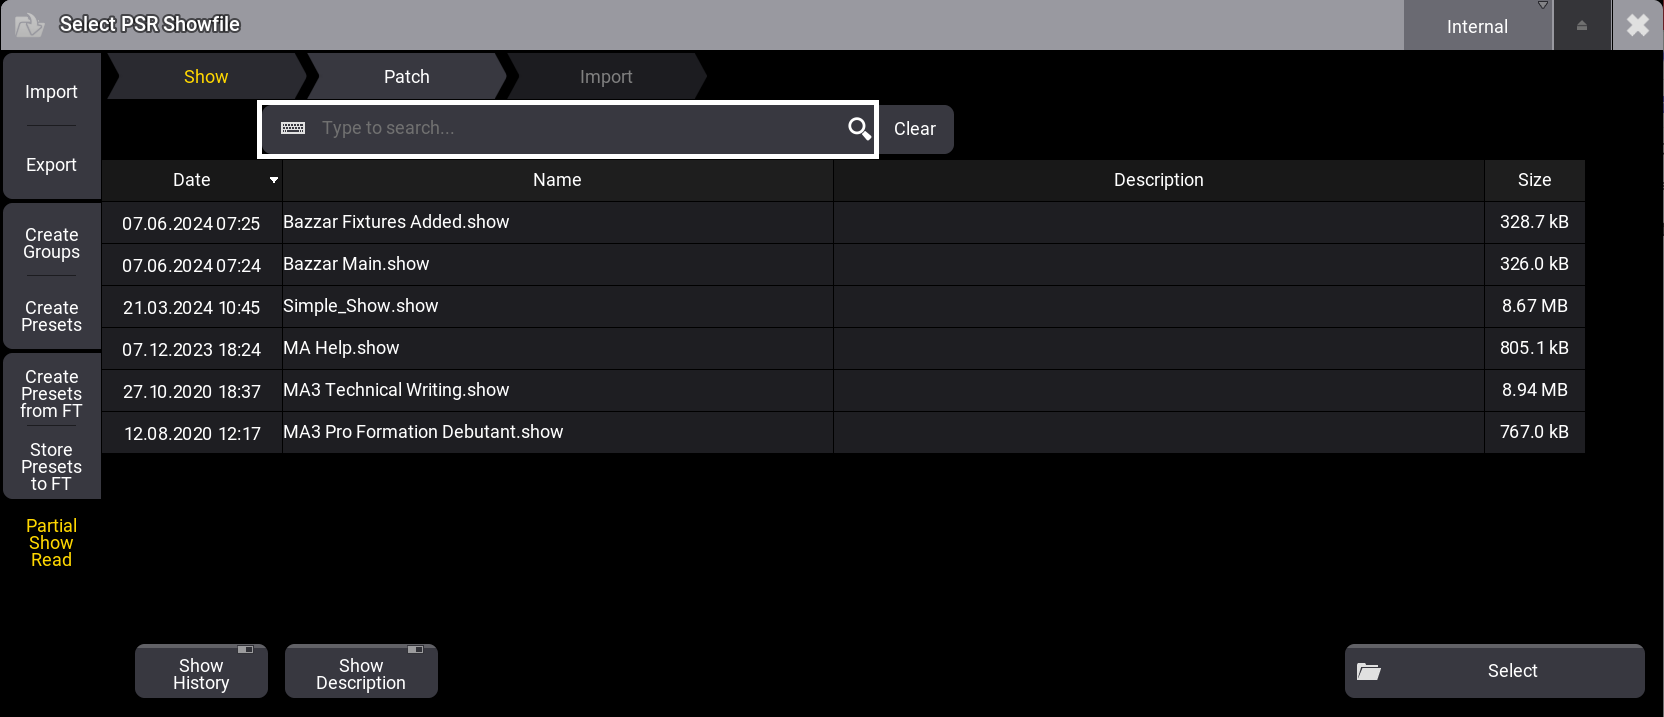
- メニュー上部のバーにある Show タブをタップします。
- タイトルバーの右側で、ドライブを選択します。
- ショーファイルを選択します。
- ウィンドウの下部にある Select をタップするか、上部の矢印形状のタブバーにある Patch をタップします。
Rename Show File ポップアップが開きます。
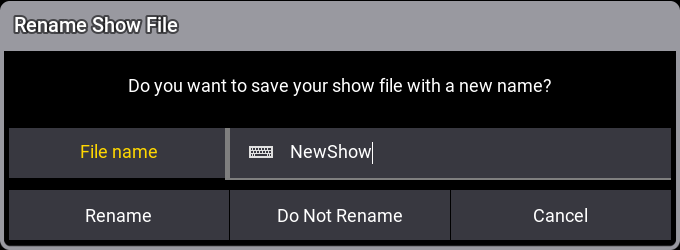
新しい名前を入力し、Rename をタップします。ショーファイルの名前を変更したくない場合は、Do Not Rename をタップしてください。
新しい名前を入力しない場合は、Rename をタップしても、Do Not Rename をタップした場合と同じ結果になります。
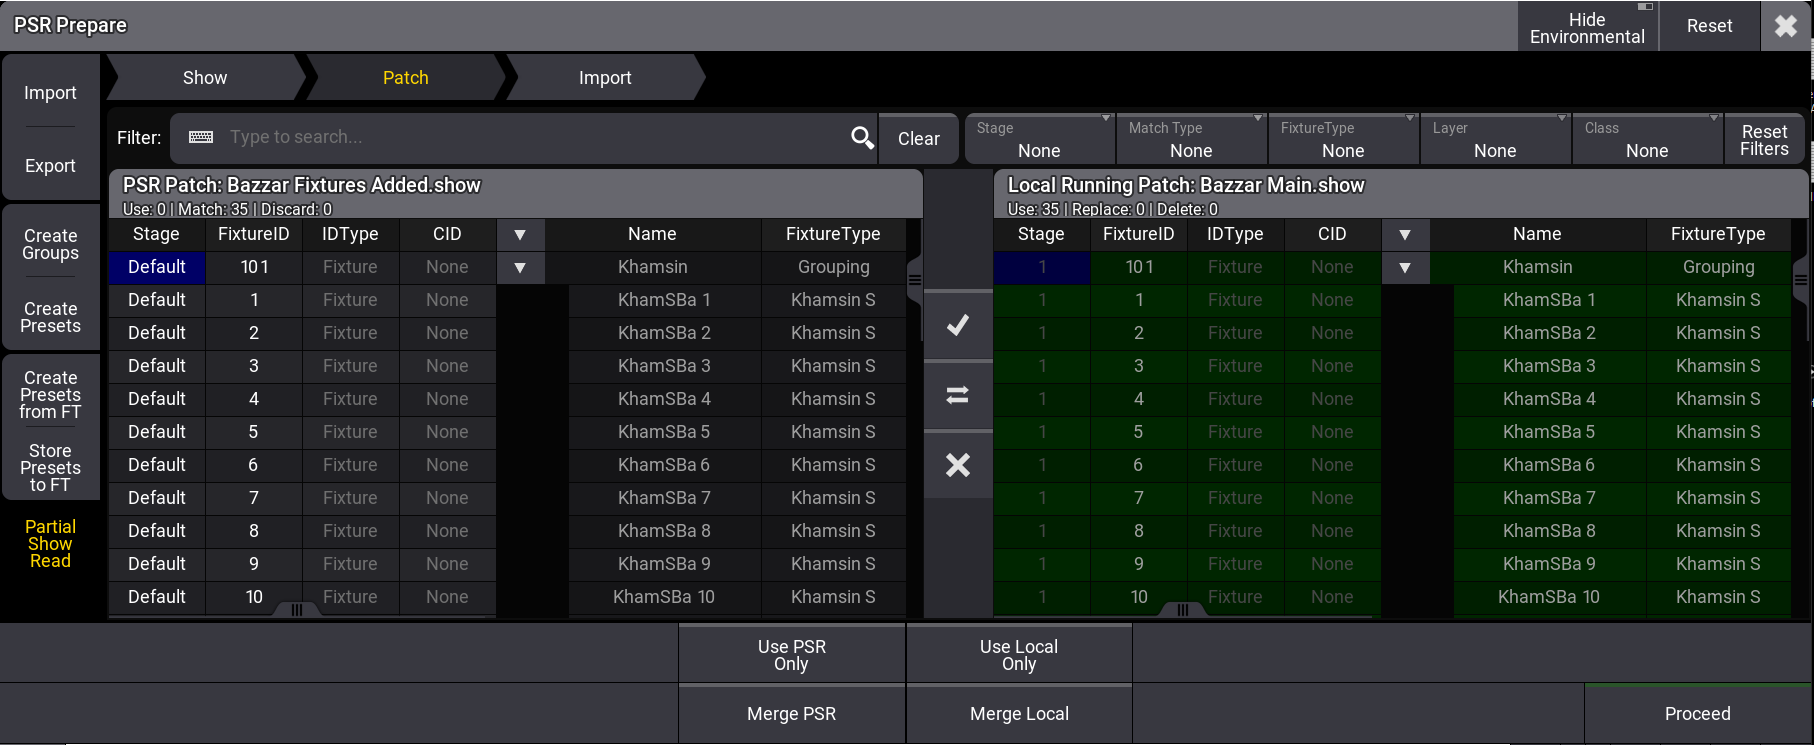
PSR Prepare メニュー
選択したファイルが適切な場合、PSR Prepare メニューが開きます。
PSR Prepare メニューに入ると、ソフトウェアは以下の順序でフィクスチャをマッチさせます。
- Fixture ID
- Channel ID
- Name
- GUID
メニューは、以下の2つの領域に分かれています。
- 左側の PSR Patch には、インポートするショーファイルのパッチとその名前がタイトルバーに表示されます。
- 右側の Local Running Patch には、現在読み込まれているショーファイルとその名前がタイトルバーに表示されます。
PSR Patch の対応するセルを編集することで、Stage、FixtureID、IDType、および CID のプロパティを変更できます。
変更されたプロパティは、シアン色の文字で表示されます。編集できないセルの背景色は暗くなります。
PSR Show で IDType の名前を変更すると、PSR Patch の IDType の1つのセルに2つの名前が表示される場合があります。これらは、PSR Show での名前(Local Show での名前)で表示されます。PSR Show の IDType 名は、Local Show に引き継がれません。
フィクスチャが同じ IDType/CID の組み合わせに設定されていないか、またはフィクスチャIDがない場合、新しい IDType PSR に設定され、連続したCIDが取得されます。
両側に対応するフィクスチャを持つ行は、一致していると見なされます。
両方のパッチ領域間にあるツールを用いて、使用するフィクスチャを指定します。
 結果のパッチで選択したフィクスチャを使用します。
 結果のパッチで反対側のフィクスチャを使用します。
 結果のパッチから選択したフィクスチャを削除します。
マークされたフィクスチャの背景は緑色です。PSR Prepare 処理後、これらのフィクスチャは、現在読み込まれているショーファイルに、それぞれのフィクスチャタイプで保存されます。左右のフィクスチャは異なるものを使用できますが、同じ行にあるフィクスチャは使用できません。
Environmental フィクスチャは、タイトルバーの Hide Environmental をタップすると非表示になります。
検索欄を用いて、フィクスチャ名でパッチをフィルタリングできます。
その他のフィルタも利用可能です。
- Stage: 選択したステージのフィクスチャを表示します。
- Match Type: マッチ状態に応じてフィクスチャを表示します。
- None: フィルタは適用されません。
- Matched: 一致するフィクスチャのペアだけを表示します。
- Unmatched: 一致しないフィクスチャだけを表示します。
- Conflicted: 競合するフィクスチャを表示します。
- Fixture Type: 選択したフィクスチャタイプのフィクスチャだけを表示します。
- Layer: 選択したレイヤのフィクスチャだけを表示します。
- Class: 選択したクラスのフィクスチャだけを表示します。
- Reset Filters: すべてのフィルタをリセットします。
取得するフィクスチャを素早く選択するには、ウィンドウの下部にある4つのボタンのいずれかをタップしてください。
- Use PSR Only: 結果のパッチは、PSR ショーファイルのフィクスチャだけを含んでいます。
- Use Local Only: 結果のパッチは、Local ショーファイルのフィクスチャだけを含んでいます。
- Merge PSR: PSR ショーリストから、マッチしていない、あるいは選択されていないすべてのフィクスチャを、結果のパッチに追加します。
- Merge Local: Local ショーリストから、マッチしていない、または選択されていないすべてのフィクスチャを、結果のパッチに追加します。
すべての変更とフィルタをリセットするには、メニューのタイトルバーにある Reset をタップします。
完了したら、ウィンドウの右下にある Proceed をタップするか、タブバーの Import をタップてください。PSR Patch Summary ポップアップが開きます。
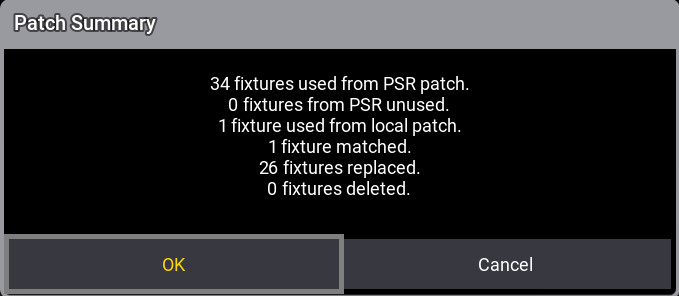
OK をタップして PSR Import メニューに進むか、Cancel をタップします。
PSR Import メニュー
メニューは、以下の3つの領域に分かれています。
- 左側の領域(PSR)には、PSR を行うショーファイルのさまざまなプールが表示され、タイトルバーにはショーファイルの名前が表示されます。オブジェクト・ツリーを移動して、インポートするオブジェクトを選択します。
 をタップして、ツリーのレベルを展開します。チェックボックスをタップして、インポートするオブジェクトをマークします。選択されたオブジェクトには黄色のチェックマークが付き、中央の領域に表示されます。親オブジェクトには、一部の子オブジェクトが選択されていることを示す灰色のチェックマークが付きます。参照を持つオブジェクトを選択すると、その参照もインポート対象としてマークされ、紫色のチェックマークが付きます。チェックボックスの後ろの数字は、オブジェクトの階層レベルを示します。
インジケータバーの色は、以下の状態を示しています。
- 緑: この要素には、ローカル・ショーファイルよりも新しいデータが含まれています。
- オレンジ: この要素の子には、PSRショーファイル内の古いデータと新しいデータが混在しています。
- 赤: この要素には、PSRショーファイル内の古いデータだけが含まれています。
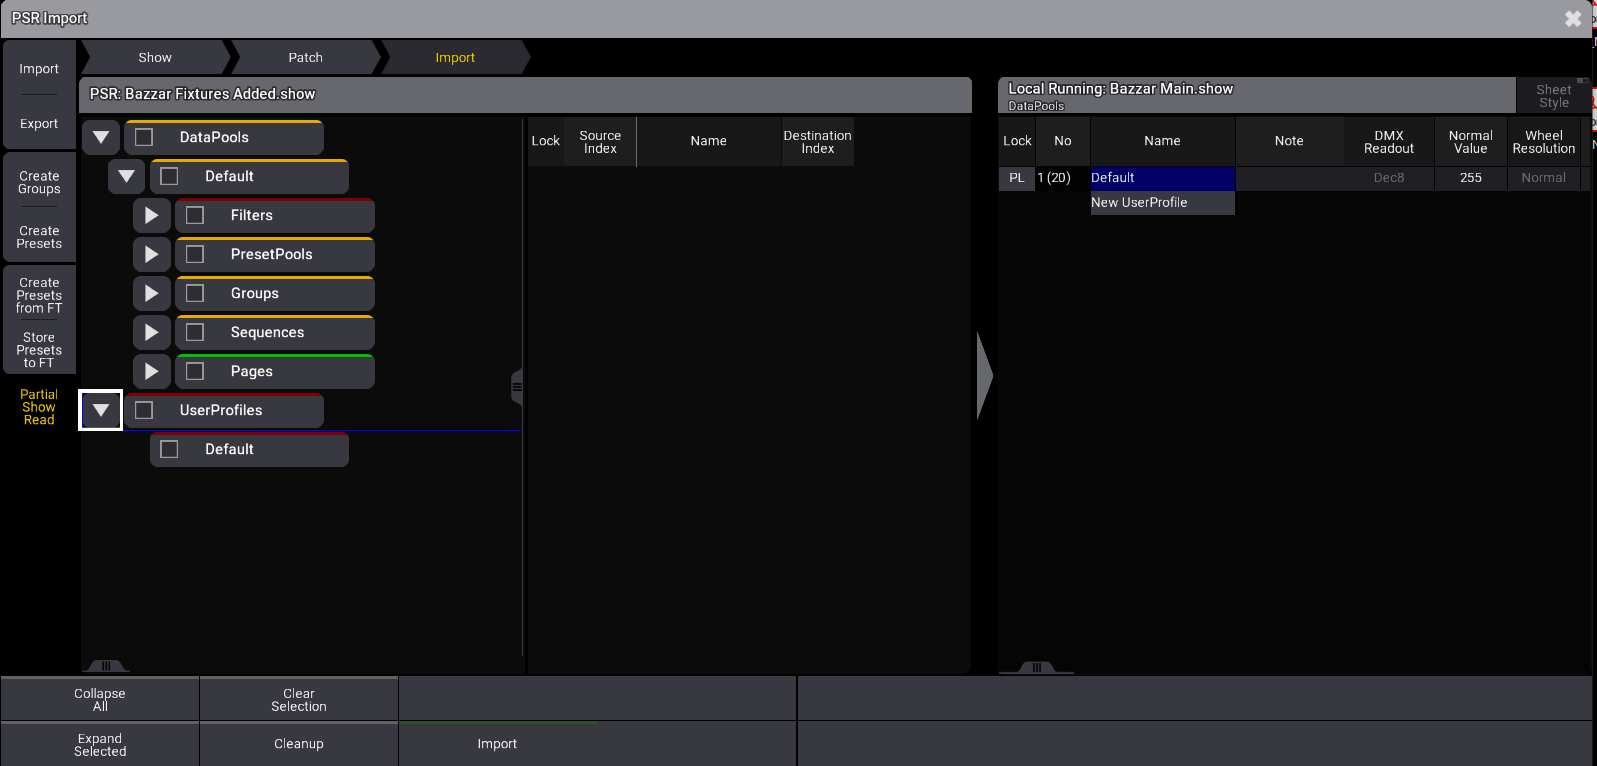
PSR Import メニュー
- 中央領域には、左側領域で最後に選択されたオブジェクト・タイプが表示され、Import Index (プール内のどの位置にインポートするか)を指定できます。Import Index 列のセルを編集するか、右側領域(Local)でプール・オブジェクトをタップします。Import Index が <Auto> に設定されていて、両方のショーファイルに同じオブジェクトが存在している場合、そのオブジェクトはローカルで実行されているショーファイル内の一致するオブジェクトとマージされます。
- 右側の領域(Local Running)には、ローカル・ショーファイル内の対応するプールが表示されます。タイトルバーにはショーファイル名も表示されます。オレンジ色の枠は、オブジェクトのインポート先を示しています。Local Running 領域でプールをタップすると、PSR エリア内で選択されたオブジェクトだけがインポートされます。
デフォルト以外のデータプールをインポートする
デフォルト以外のデータプールをインポートするには、チェックボックスをタップしてそのデータプールを選択します。そして、ツリー構造で参照元の親データプール・オブジェクトをタップしてください。右側の領域(Local Running)にデータプールが表示されます。
右側の領域でツリープール・オブジェクトを選択すると、ポップアップ・ウィンドウが表示されます。

OK をタップして確認します。PSR のデフォルト以外のデータプールを含む新しいデータプールが、ローカルで実行されているショーファイルに作成されます。
Import をタップすると、選択したオブジェクトがローカルのショーファイルに転送されます。インポートされたオブジェクトは、オブジェクトツリーでインポート済みとしてマークされます。
PSR からインポートされた項目を削除するには、Cleanup をタップします。
システムでロックされたオブジェクト(例: ワールド1やフィルタ1)はインポートできません。
データプールが見つからない場合、コマンドラインにエラーメッセージが追加されます。
|
|
既知の制限: |
|
|
|
ヒント |
|
プログラマで PSR キーワードを用いて、IDタイプが PSR のフィクスチャを選択します。詳しくは PSR キーワード を参照してください。 |