インターフェースとIP
| grandMA3 ユーザマニュアル » ネットワーキング » インターフェースとIP | Version 2.2 |
Network Interface メニューは、利用可能なインターフェースを一覧表示するために用いられます。また grandMA3 ハードウェアでは設定の変更が可能です。
Network Interface メニューを開く
- Menu キーを押します。
・Menu ポップアップが開きます。 - Network ボタンをタップします。
・Network メニューが開きます。 - My Interfaces ボタンをタップしてください。
・Network Interfaces ポップアップが開きます。
|
|
制限 |
| "imx6" というインターフェースがある場合、それは卓の内部的な通信のためのものです。このインターフェースを変更しないでください。 |
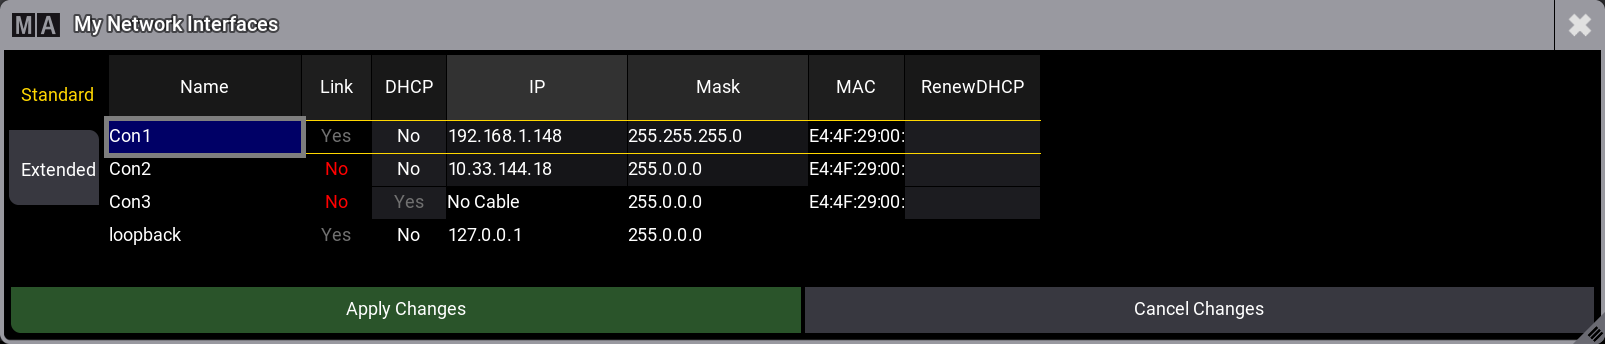
ポップアップの左側には、Standard と Extended という2つのタブがあります。上の画面例は、Standard タブの内容を示しています。Extended タブにはより多くの設定がありますが、それ以外は同じです。
Extended バージョンは以下のようになります。
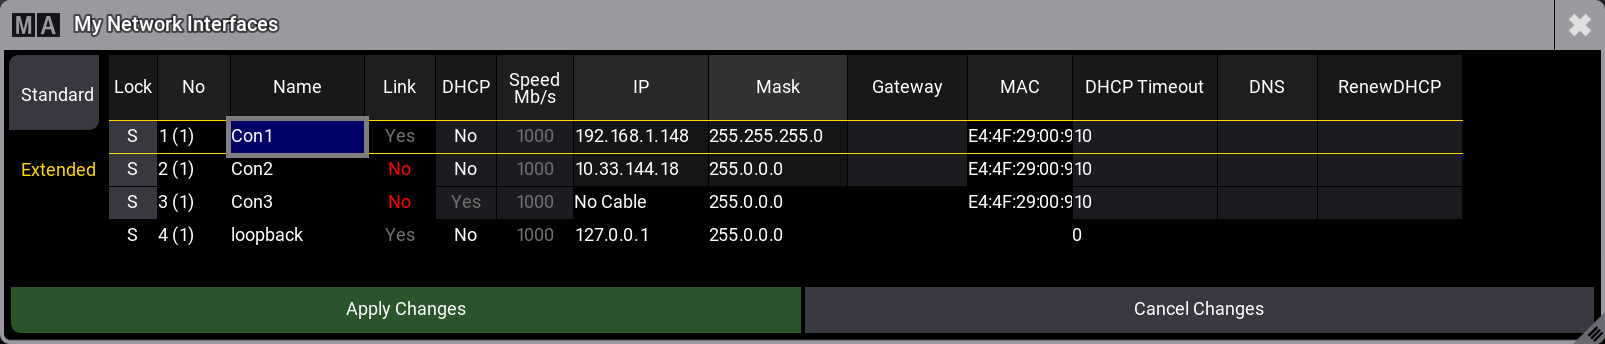
背景が明灰色のセルはすべて編集できます。
grandMA3 卓には3つネットワーク・インターフェースがあり、背面パネルのコネクタによって外部機器と接続できます(イーサネットの接続 を参照)。各コネクタは、Network Interface メニューでは Con1、Con2、および Con3 という名前になっています。
grandMA3 onPC の場合、Network Interface メニューではIPアドレスを変更できません。そのコンピュータのオペレーティングシステムで設定してください。
利用可能な列項目の説明
- Lock:
値を Yes に変更すると、インターフェースが編集されないようにロックされます。 - No:
インターフェース番号です。 - Name:
インターフェースの名前です。 - Link:
そのコネクタにアクティブな接続があると Yes と表示されます。接続がない場合は、No と赤表示されます。 - DHCP:
インターフェースに対してDHCPが有効な場合、このセルに Yes と表示されます。"No" の場合はDHCPがオフになっていて、固定IPアドレスを手動で設定できます。DHCPやアドレス範囲の選択については、後述を参照してください。 - Slow:
検出されたネットワーク速度が1Gbit/s未満の場合、"Yes" と表示されます。 - IP:
インターフェースのIPアドレスです。DHCP が "No" になっている場合、このセルを卓で編集してIPアドレスを変更できます。サブネットマスクを設定するための入力として、CIDR表記も受け付けます。断線していると "No Cable" と表示されます。アドレス範囲の選択については、後述を参照してください。 - Mask:
インターフェースのサブネットマスクです。DHCP が "No" になっている場合、このセルを卓で編集してサブネットマスクを変更できます。 - Gateway:
インターフェースのゲートウェイ・アドレスです。DHCP が "No" になっている場合、このセルを卓で編集してゲートウェイ・アドレスを変更できます。 - MAC:
インターフェースのMACアドレスが表示されます。これは情報を表示しているだけで、編集はできません。 - DHCP Timeout:
ソフトウェアがDHCPサーバからの応答を待つタイムアウトを設定します。 タイムアウトに達すると、ソフトウェアはリンクローカルアドレス・ブロックからIPアドレスを自動的に設定します。DHCPやアドレス範囲の選択については、後述を参照してください。 - DNS:
DNS (Domain Name Server)アドレスです。 - RenewDHCP:
これは "Yes" に設定できます。Apply Changes をクリックしてポップアップを閉じると、ソフトウェアはDHCPサーバに新しいリクエストを送信します。次にポップアップを開いたときには、このフィールドは再び空になります。DHCPやアドレス範囲の選択については、後述を参照してください。
DHCPとは
DHCPとは、サーバによってIPアドレスが割り当てられるシステムです。これがオンの場合(セルに "Yes" と表示)、IPアドレスをローカルで設定することはできません。
卓でDHCPのオン/オフを切り替えるには、このセルを編集してください。
アドレス範囲の選択
使用するIPアドレス範囲については、事前によく検討することをお勧めします。grandMA3 システムは、ワールドサーバと Fixture Share にアクセスするために、適切に設定されたルータを介してインターネットに接続するように構築されています。そのため、プライベート・アドレス空間に該当するIPアドレス範囲を選択することをお勧めします。プライベート・アドレス空間は、ローカルLANネットワークで使用するために予約されているIPアドレス範囲であり、インターネット上でこれらの範囲を使用するサーバは存在してはなりません。プライベートIPアドレス間の通信は通常、インターネットにルーティングされません。
IPv4アドレスはクラス(A、B、C、E、E)に分類できます。最初の3つのクラスには、アドレス設定に使用できるIPアドレスが含まれます。これらの3つのクラスには、それぞれプライベート・アドレス空間があります。
| RFC 1918 Name | IPアドレス範囲 | アドレス数 | 最大CIDRブロック (サブネットマスク) | ホストIDサイズ | マスクビット | クラスフルの説明 |
|---|---|---|---|---|---|---|
| 24ビットブロック | 10.0.0.0 〜 10 .255.255.255 | 16,777,216 | 10.0.0.0/8(255.0.0.0) | 24ビット | 8ビット | 単一のクラスAネットワーク |
| 20ビットブロック | 172.16.0.0 〜 172.31.0.0 | 1,048,576 | 172.16.0.0/12(255.240.0.0) | 20ビット | 12ビット | 連続した16のクラスBネットワーク |
| 16ビットブロック | 192.168.0.0 〜 192.168.255.255 | 65,536 | 192.168.0.0/16 (255.255.0.0) | 16ビット | 16ビット | 連続した256のクラスCネットワーク |
ソース: Wikipedia - Private_network
上述の範囲は、多くの場合さらに制限されます。例えば、24マスクビット(またはサブネットマスク255.255.255.0)を使用する範囲などです。
もう一つの範囲オプションは、リンクローカル範囲を使用することです。有効なIPv4ユニキャスト範囲は、169.254.0.0〜169.254.255.255(または169.254.0.0/16)です。この範囲は自動アドレス割り当てプロセスに最適です。リンクローカル範囲はサブネットマスクの小さい値によって制限されるべきではないため、同一サブネット内に存在するデバイスの数は極めて多くなります(65,536 - 256 - 256 = 65,024)。
静的アドレスが設定されておらず、DHCPサーバからの応答がない場合、ネットワーク・インターフェース・カードはリンクローカル・アドレスを割り当てます。
リンクローカル範囲を使用することもできますが、プライベート・アドレス空間のいずれかの範囲を使用して静的IPアドレスを設定する方がよい場合があります。
|
|
重要 |
| 最も重要な点は、grandMA3 デバイスが相互に通信するには、同じIPアドレス範囲内になければならないということです。 |
卓のIPアドレス設定
|
|
制限 |
| ネットワーク・インターフェース Con1、Con2、Con3 では、IPアドレス範囲の192.168.33.xは使用できません。 |
- Network Interfaces メニューに移ります(上術を参照)。
- ネットワーク・コネクタに対してDHCPがオフになっていることを確認します(セルに "No" と表示、上述を参照)。
- IP セルを編集し、新しいIPアドレスを入力します(IPv4のみ)。その際にCIDR表記を用いると、サブネットマスクを設定できます。例えば、192.168.101.11/24 とすると、サブネットマスクが 255.255.255.0 になります。
- Mask セルを編集して、サブネットマスクを入力します。
- 必要に応じて、Gateway セルにゲートウェイアドレスを設定します。
- 新しい設定を適用するには、Apply Changes をタップしてください。
変更されたIPアドレスは、再起動なしで使用されます。
|
|
ヒント |
| MA-Net Interface の Auto オプションについては、セッション を参照してください。 |