00 クイックスタートガイドへようこそ
| grandMA3 クイックスタートガイド » 00 - ようこそ | Version 2.2 |
このガイドでは、grandMA3 ソフトウェアで最もよく使われる要素について簡単に説明していきます。これは version 2.2.1.1 用に書かれています。別バージョンを使用している場合は、少し異なる点があるかもしれませんが、一般的な機能と原則は同じです。ガイドは、最新バージョンに合わせて更新するよう努めています。
これは、ユーザマニュアルよりも身近で読みやすくなっています。説明されている手順に従って順に進めていくチュートリアル集です。特定のことを行うための簡単な説明を探している場合は、ユーザマニュアルの方が適しています。ガイドでは、手順がより多くの文章で説明されています。どうか、楽しんでお読みください。
このガイドでは、各章を順番に読んでいくことを強くお勧めします。
最新版のガイドはオンラインでお読みください。PDFを作成して印刷することも可能です。また、紙の代わりにPDFをお気に入りの電子デバイス上で読むこともできます。このガイドをヘルプシステムで利用できる卓や onPC では、PDFを作成する必用はありません。
このクイックスタートガイドは初心者向けで、最初から最後まで通読することを前提としています。特定のトピックについて詳しく知りたい場合は、ユーザマニュアルを参照してください。
最良の結果を得るために、書かれていることを正確に行ってください。説明されていない変更を加えると、結果が違ってくる場合があります。
まずは、基本的なフィクスチャで新しいショーを作成します。そして、キュー・シーケンスを作成し、それをより実用的に再生できるように設定していきます。
はじめに
このガイドは、主に grandMA3 onPC の使用を前提に書かれています。これを読む多くのユーザは、onPC プラットフォームを用いていると思われるからです。しかし、grandMA3 卓や grandMA3 onPC command wing についても、このガイドは利用できます。onPC と卓とで操作方法が異なる場合は、その都度説明します。主な違いは、実際のハードウェアでは、仮想的なキーやエクゼキュータのウィンドウを開く必用が無いことです。
マウス/トラックボールの使用を推奨します。このガイドではしばしば、「ボタンをクリックする」などという表現がありますが、これは、卓やタッチ画面におけるタップと同じです。マウスで何かを「右クリック」する必要がある場合があります。これは、卓で Edit キーを押してから、目的のオブジェクトをタップするのと同じです。インターフェースはタッチ操作を前提に作られていますが、必要や好みに合わせて、卓で外部マウス/トラックボールを利用することもできます。
卓の画面には、以下のように番号が振られています。
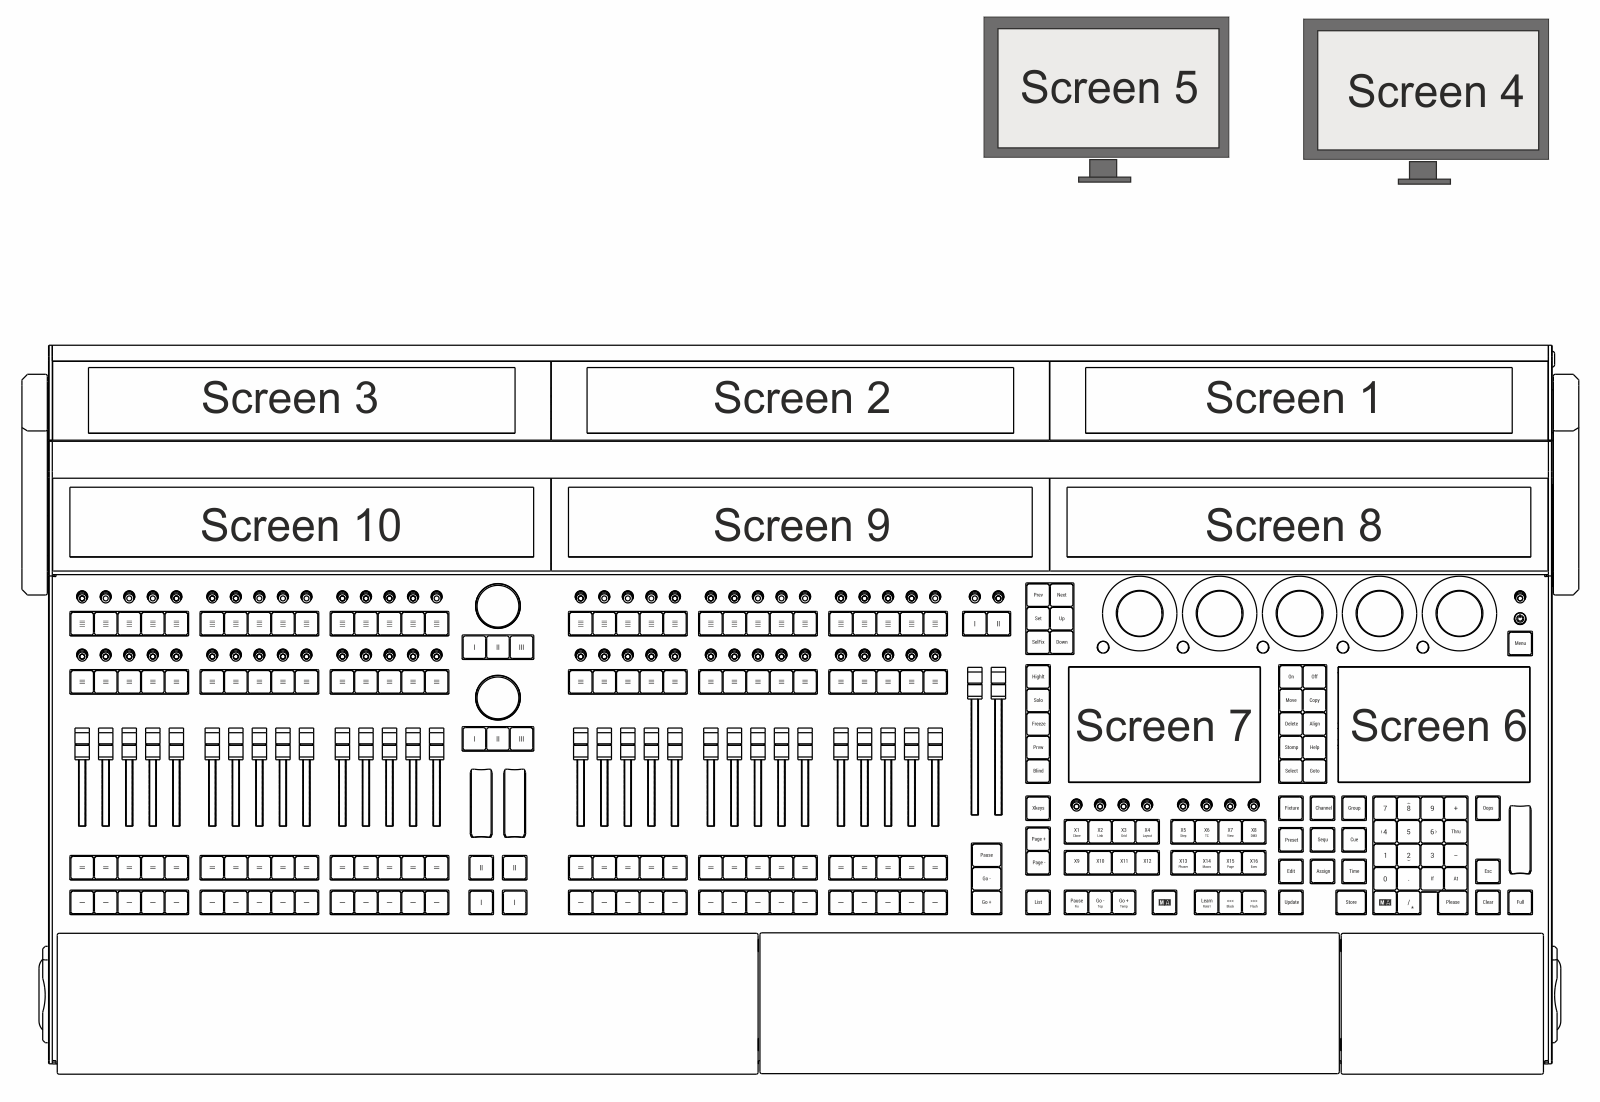
grandMA3 onPC では少し異なります。多くの作業を「仮想ディスプレイ」で行います。
- Display 1 は、卓の画面1と8を組み合わせたものに相当します。
- Display 2 は、卓の画面2と9を組み合わせたものです。
- Display 3 は、卓の画面3と10を組み合わせたものです。
- Display E4 は、外部画面4に相当します。
- Display E5 は、外部画面5です。
- Display S6 は、卓の画面6です。
- Display S7 は、卓の画面7です。
これらのディスプレイは、左側のコントロールバーにある ![]() アイコンで開く Display ポップアップによって切り替えられます。Display 1 は非表示にできません。
アイコンで開く Display ポップアップによって切り替えられます。Display 1 は非表示にできません。
コントロールバーからは、Command Section、Master Controls、Playback Controls、および Custom/Master Section という仮想コントロールにもアクセスできます。これらは、キーボードの F3、F4、F5、および F7 キーによっても切り替えられます。これらのコントロールについては、後の章で改めて説明します。
クイックスタートガイドでの表記
このガイドでは、状況に応じて異なる表記を用いています。
キーを押す必要がある場合は、Store Cue 1 Please などというように表しています。onPC では、卓のキーに対応する仮想ボタンのクリックに相当します。
単にキーについて述べる場合は、シングルクォーテーションで囲んで 'Store' キー というように表します。
画面上の領域をクリックまたはタップする必要がある場合、Internal というように表します。メニューにあるタブや画面上のボタンなどがこれに該当します。
用語として説明する場合などは、「Store は何かを保存するための機能です」というように太字で強調表示します。
キーボードによってコマンドラインに何かを入力する必要がある場合は、下のように表します(この内容については後で見ていきます)。
|
|
Admin[Fixture]>Store Cue 1 |
このような入力はすべて、キーボードの 'Enter' キーで実行しますが、Please キーは表示されません。これは、Please キーと同じです。'Please' や 'Enter' キーは表示されるコマンドではなく、入力されたコマンドを実行するキーです。上のコマンドライン入力には、デフォルト・キーワード(角括弧内の黄色い単語)が表示されています。これはすでに表示されているので、新たに入力する必要はありません。場合によっては、上の例とは異なるキーワードになるかもしれません。
システムからのフィードバックは、下のように表示されます。
| OK : | Store Cue 1 |
Please や Enter は表示されていないことに注目してください。フィードバックは、Command Line History ウィンドウで確認できます(詳細は後述)。
コマンドライン以外でキーボード入力が必用な場合、My Favorite Cue というように表します。例えばこれは、名前の入力かもしれません。
ガイドには、ヒント、重要な情報、制限事項などが示されている場合があります。これらは、情報の種類を示すアイコンと小さな見出しの付いたボックスに記載されています。
|
|
ヒント |
| ヒントはこのように書かれています。 |
要約
各章の最後では、行ったことを簡単に振り返ります。また、ユーザマニュアルにある関連トピックへのリンクが示されている場合があります。これによって、各章で触れた特定の内容に関するより詳細な情報を得られます。ガイドから一旦離れてユーザマニュアルのトピックを読んでもかまいませんが、次章に進むためにはその必用はありません。
この章については、以下のリンクをあげておきます。
onPC のインストール方法については、grandMA3 onPC - Windows でのインストール などを参照してください。
卓の設置や接続などについては、最初のステップ を参照してください。
コマンドラインの入力については、コマンドライン を参照してください。
要約の最後には、次の章 へのリンクがあります。準備ができたらクリックして先に進んでください。