| grandMA3 ユーザマニュアル » アピアランス » アピアランスの作成 | Version 2.2 |
アピアランスを新規作成するには、Appearance プールで空のプール・オブジェクトを編集します。
そのためには、以下のいずれかを行ってください。
- Edit を押してから、プール内のアピアランスをタップします。
- プール・オブジェクトで Swipey コマンド を開いて Edit を選択します。
- コマンドラインを利用: Edit Appearance ["アピアランス名" または アピアランス番号]
既存のプール・オブジェクトを編集すると、現在のアピアランスの状態で Appearance Editor が開きます。
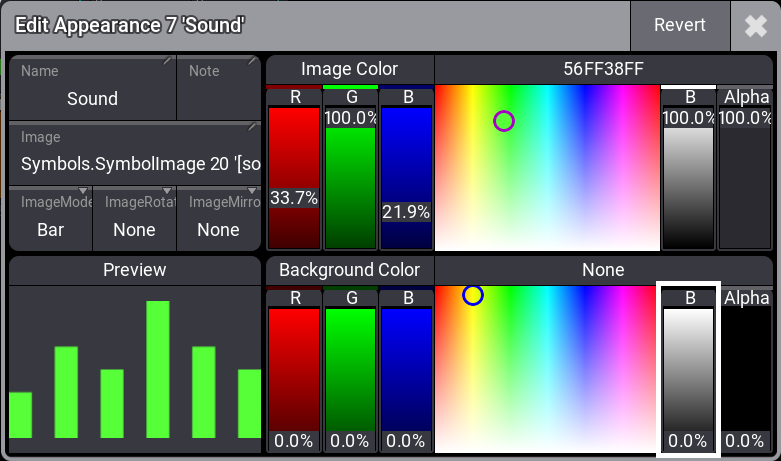
入力ボックスが6つ、カラーピッカーと色を調整するための16進カラーコードを備えたフェーダが2組、そしてアピアランスのプレビューを表示する領域があります。
背景色の設定
Background Color フェーダと Color Picker を用いて、アピアランスの背景を変更できます。デフォルトの背景は透明です(Alpha フェーダ 0%、B フェーダ 0%)。
Alpha 値を上げ、R (赤)、G (緑)、B (青)のフェーダでRGB範囲内の任意の色を混ぜ合わせます。Color Picker エリアをタップして色を選択したり、その上にある16進カラーコードを編集したりすることもできます。
アピアランスに名前を付ける
名前を編集するには、Label キーワード を用いるか、Appearance Editor で名前をタップします。
アピアランスは、他のプール・オブジェクトと同様に名前を付けられます(プール・ウィンドウ を参照)。
アピアランスに画像を追加
アピアランスには画像を使用できます。画像は、背景の前面、ラベルの背面に配置されます。
- Image 入力ボックスをタップして画像を追加します。Select Image dropdown ドロップダウンが開き、すべての画像の一覧表示されます。
- タイトルバーにある ImageSource をタップすると、Images、Videos、Gobos、および Symbols プールに保存されている種々のオブジェクトが表示されます。
- ポップアップで、使用したい画像をタップしてください。
| ヒント | |
| 画像を使用するアピアランスは、名前がデフォルトの場合、プール・ウィンドウのオブジェクトに名前が表示されません。 |
アピアランスには、メディア・オブジェクト(画像、動画、シンボル、ゴボ)を割り当てられます。空のアピアランスに画像を割り当てると、Appearances プールに新しいオブジェクトが作成されます。
|
|
ヒント |
| アピアランスを別のアピアランスに割り当てると、最初のアピアランスのコピーが作成されます。 |
画像には、以下のようにいろいろなモードがあります。これらは、アスペクト比に対して画像をどのように表示するかを指定します。
- Stretch
アピアランス領域に合わせて画像が伸縮されます。
Fixture Sheet - Stretch に設定されたアピアランス - Bar
画像のアスペクト比を変えずに、アピアランス領域に合わせて表示します。
Fixture Sheet - Bar に設定 - Crop
アピアランス領域全体を覆うように調整されます。画像のアスペクト比は維持され、領域に合うように切り抜かれます。

Fixture Sheet - Crop に設定 - Tile
画像はタイル状に並べられます。画像は元のサイズのまま、領域全体を埋め尽くすように繰り返し表示されます。画像のアスペクト比は維持されます。
Fixture Sheet - Tile に設定 - Center
画像は元のサイズで表示され、領域の中心に揃えられます。画像のアスペクト比は維持されます。
Fixture Sheet - Center に設定
モードを変更するには、以下のようにしてください。
- ImageMode ボタンをタップすると、さまざまなモードが切り替わります。ボタンをスワイプして Select ImageMode ドロップダウンを開くこともできます。
- ドロップダウンでモードを選択します。
画像の色と向きを変更
Appearance Editor の上部にあるフェーダとカラーピッカーを用いて画像の色を調整できます。16進カラーコードを直接編集することも可能です。これを編集するには、カラーピッカー上部の入力欄をタップし、Edit ImageRGBA ポップアップで調整します。
つまり、同じ画像を、異なる色相や透明度を持つさまざまなアピアランスで使用できるということです。
|
|
制限 |
| 画像に色を追加することはできますが、取り除くことはできません。つまり、画像内の黒い部分は変更できませんが、白い部分は変更できます。 |
画像を回転するには、Appearance Editor で ImageRotation をタップします。画像は、90°、180°、または270°回転できます。
画像を鏡像反転するには、Appearance Editor で ImageMirror をタップします。画像は、垂直方向、水平方向、またはその両方に反転できます。
例を見るには、以下の動画をタップしてください。
変更を元に戻す
直前の編集操作で行われた変更を元に戻すにには、以下のようにします。
- Revert をタップするとポップアップが開きます。
- OK をタップすると、変更が取り消されます。