14 フェイザー
| grandMA3 クイックスタートガイド » 14 フェイザー | Version 2.2 |
フィクスチャを動き回らせ、色を変え、あるいは値の組み合わせを動的に変化させたいと思うことがよくあります。これは、多くの場合、ある種のエフェクト・エンジンによって実現されます。
grandMA3 のエフェクト・エンジンは、フェイザーと呼ばれます。
フェイザーは複雑なため、詳細には触れません。ここでは基本的な事柄について見ていきましょう。
フェイザーは、ステップを使用します。これまでに保存してきたキューやプリセットには、1つのステップがあります。何も指定しない場合、値はステップ1に保存されます。ステップには、一連の値が含まれています。
通常、フェイザーには、一連の値を含むステップが2つ以上必要です。フェイザーを持つオブジェクトは、「マルチステップ」オブジェクトと呼ばれることがあります。フェイザーは、キューやプリセットと同じように保存できます。
フェイザーは、各ステップを1つずつ実行してループ再生します。
Speed 値は、このループの再生スピードを指定します。
すべてのフィクスチャが同時に同じステップを進んでいる場合、それらは同じ Phase 値を持っているといいます。しかし、フィクスチャを分散させ、異なるループ位置の動作をさせたい場合がしばしばあります。これは、フィクスチャに異なる Phase 値を指定することで実現できます。Phase 値を Phasers (フェイザー)の概念と混同しないでください。
ディマー・チェイサーの作成
これらの概念について試すため、Even Blinders を用いて2値間でフェードする単純なディマー・チェイサーを作成してみましょう。
プログラマをクリアしてください。
グループ4(Even Blinders)を選択します。
それらのアクティブなディマー値を0%にします。
エンコーダ・ツールバーにある以下の部分を見てください。

これは、ステップバーと呼ばれます。今は "1" と表示されています。これは、1ステップのうち、ステップ1の値を扱っていることを示しています。これまでの章の作業は、すべてステップ1で行っていました。
ここでは、新しい値を持つ別のステップを追加する必要があります。
ステップバーにある右矢印をクリックしてください。
表示が "2/1" に変わります。

フィクスチャには何も値を指定していないため、まだ1ステップしかありませんが、ステップ2を選択して値を追加する準備ができました。
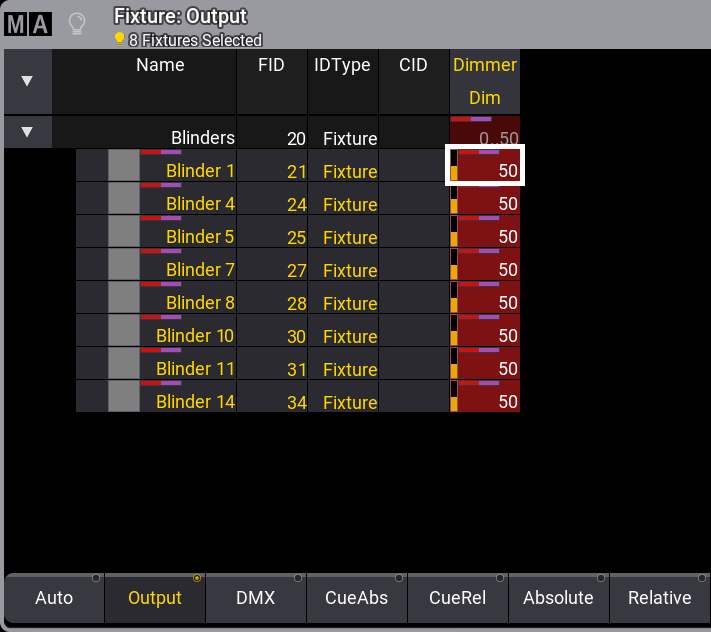
フィクスチャを100%にしてください。
これで、フィクスチャ出力は2ステップ間でループします。
Fixture Sheet を見てください。値の変化は分かりませんが、これは "Absolute" というレイヤを見ているためです。これは、プログラマに要求した値を表示しています。現在、ステップ2の値を見ています。
フェイザーなどのさまざまな要素が、出力に影響を与える可能性があります。Fixture Sheet を変更して、実際の出力を確認できます。
Fixture Sheet にレイヤ・ツールバーが表示されていない場合はオンにする必要があります。
Fixture Sheet ウィンドウの左上隅にある MA ロゴをクリックして、Settings を開きます。
"Layer Toolbar" という設定をオン(黄文字表示)に切り替えます。
そして、ポップアップの右上隅にある X をクリックして Settings を閉じてください。
Fixture Sheet の下部にレイヤ・ツールバーが表示されます。
レイヤ・ツールバーによって種々のレイヤを選択できます。詳細は省きますが、Output をクリックすると、フィクスチャの値が出力を動的に変更していることが分かります。
ここには、エンコーダ・ツールバーにあるレイヤ・ツールバー部分も表示されています。

レイヤは3つの異なるグループに編成されます。現在、最初のグループ(Values and Timings)が表示されています。他の2つのグループは、フェイザーに関連するレイヤです。
Phaser レイヤは、上部に紫色のバーで表示されます。Fixture Sheet 上のフェイザーが影響を与える値にも同じ色のインジケータが表示されます。
エンコーダバーのレイヤ・ツールバーは、エンコーダが制御する「レイヤ」を指定します。Fixture Sheet のレイヤ・ツールバーは、どのレイヤを見ているかを指定します。
エンコーダ・ツールバーのレイヤ・ツールバーで、Phaser Overall をクリックし、次に Speed をクリックします。
最初のエンコーダで Speed を制御します。デフォルトでは、値がBPM (ビート/分)で表示されます。各ビートが1ステップに相当しますので、60ステップのフェイザーを60BPMで動作させると、全ステップを実行するのに1分かかります。
Speed エンコーダは現在空です。これはスピードが指定されていないことを意味し、フェイザーは現在デフォルト値(60 BPM)を用いています。
Fixture Sheet を見ると、現在 Blinder が一緒に動いていることが分かります。Phase レイヤで異なる値を指定すると、この状態を変更できます。
エンコーダ・ツールバーで Phase をクリックしてください。エンコーダをクリックするか短く押すと、電卓が開きます。
"Specials" セクションで 0 thru 360 をクリックしてください。
これで、フィクスチャがループ全体に均等に分散されます。
これは、Fixture Sheet で "Phase" レイヤを選択すると確認できます。
'Phase' ボタンが見えない場合は、レイヤ・ツールバー上で左右のマウスボタンを押したままバーを横に動かすることによって、Fixture Sheet のレイヤ・ツールバーをスクロールできます。卓では、レイヤバーを2本指で横にスクロールしてください。
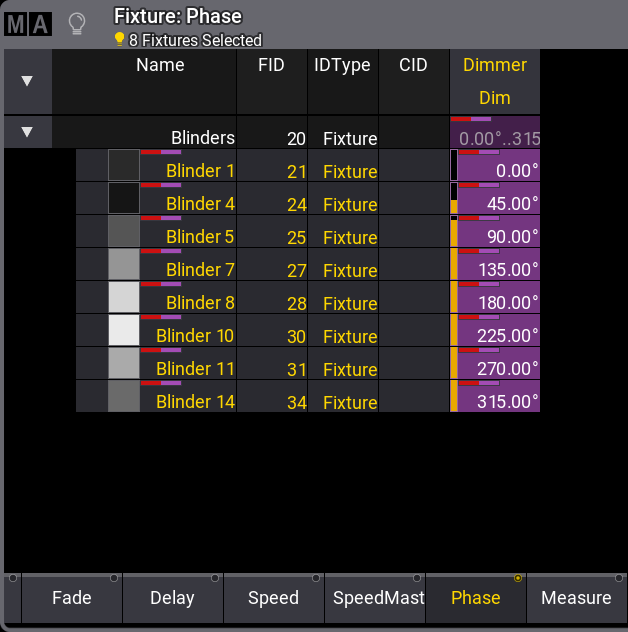
割り当てられた値は、実際には0〜360ではないことに注意してください。これは、Phase 値が円周上での角度として定義されているためです。
すべてのステップが輪になってループしていると想像してください。円周上で0°と360°は同位置になるため、実際に0から360まで動作させると、最初と最後のフィクスチャが同じ値になってしまいます。
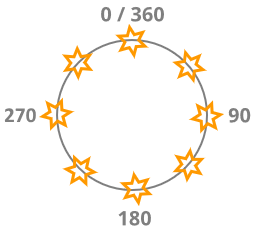
Phase 値は、円周上では以下のようになります。
フェイザーの保存と利用
これを、最初のプリセットのプリセットプール22の新しい All プリセットに保存します。

プリセットをクリックすると、そのプリセットへの参照がプログラマでアクティブになります。
Store を押すかクリックしてから、エクゼキュータ103をクリックしてください。
新しいポップアップが表示されます。
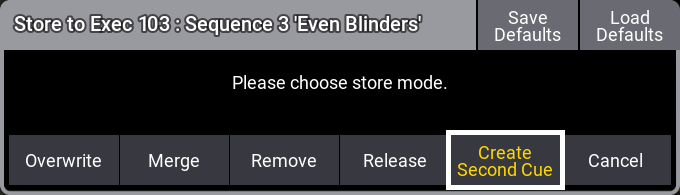
このフェイザーをキュー2として保存します。Store コマンドを正確に指定することもできましたが、その場合はこのポップアップは表示されません。
この確認は、既存キューに値を保存したり、2番目のキューを作成したりできる場合に表示されるものだからです。デフォルトの Store Settings には "If not empty" というオプションがあり、保存時のデフォルト動作は "Ask" に設定されています。
Create second cue をクリックしてください。
これで、エクゼキュータ203の "Go+" ボタンによって、2つのキューを切り替えられるようになります。
2番目のフェイザーの作成
ここで、あるステップから別のステップへ値が変化する際の制御について、もう少し詳しく説明します。
Accel (加速) と Decel (減速)という2つの Phaser (ステップ)レイヤがあります。これらは、ステップ間のフェード・カーブの有無を制御します。
Transition レイヤは、各ステップ間で利用可能なタイムのうち、どの程度を値の遷移に用いるかを指定します。
これら3つの値によって、ステップ間で値がどのように変化していくかが決まります。
Default 値では、利用可能なタイム全体で直線的にフェードします。
同様のフェイザーで3番目のキューを作成しますが、値の間でフェードするのではなく、ステップ間でスナップさせます。
エクゼキュータがアクティブな場合はオフにし(Off を押してから エクゼキュータ103)、プログラマをクリアしてください。
All プリセットに保存した多くの値は再利用できます。これを2回クリックすると、フェイザーがプログラマに呼び出されます。
Blinder をステップ間でフェードさせるためには何も行っていません。Default 値でこのようになっています。
Phase 値の場合と同様に Phaser レイヤを用いれば目的を達成できますが、ここでは Phaser Editor について見てみましょう。
エンコーダバーには一時的な Phaser Editor を表示するボタンがありますが、これをウィンドウとして作成することもできます。
エンコーダバーで Phaser をクリックしてください。

これは Phaser Editor です。このエディタのすべての要素やオプションを説明することは、クイックスタートガイドの範囲外です。詳細を知りたい場合は、ユーザマニュアルの フェイザー を参照してください。
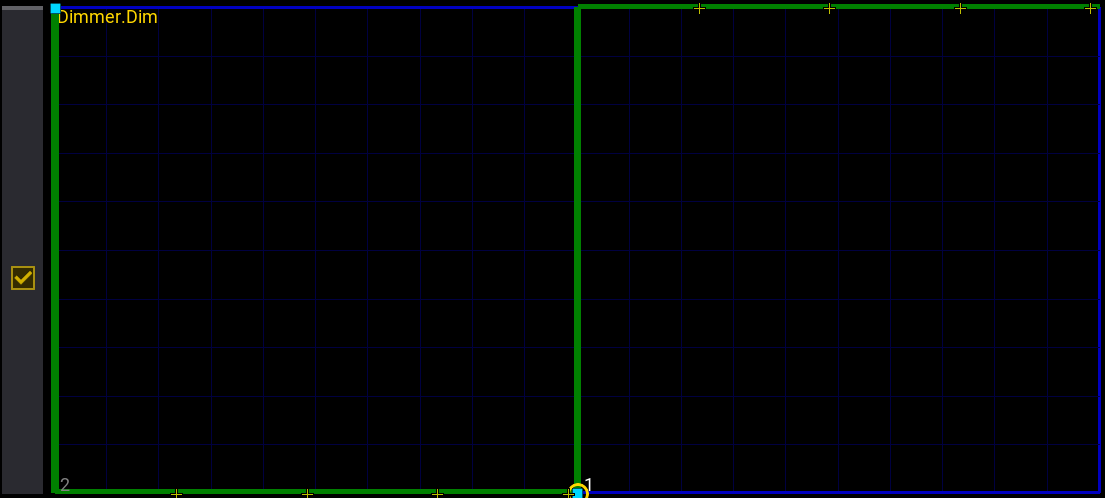
エディタに表示されている緑のV字状のラインは、2ステップ間の Dimmer 値のパスです。ステップ1はV字の下端(0%)に、ステップ2は左上端にあります。下部の青ライン上にステップ番号が表示されています。緑ラインに沿って移動する黄色のマーカは、フィクスチャのさまざまなディマー値です。
左側にある白枠の四角い領域は、ポジション・フェイザーを作成する際に用いられ、Pan/Tilt を表しています。しかしここでは、ディマーに専念しましょう。
緑ラインの形状を変更してみましょう。現在、値は2値間で直線的にフェードしています。
形状の変更には、左側にあるツールボタンが役立ちます。
Select Form ボタンをクリックしてください。

右側に新しいツールバーが表示されます。

一番上のボタンをクリックしてください。
フォームが以下のように変わります。
ここでは、緑ラインがまっすぐ垂直になっていることが分かります。これは、値が新しい値にジャンプ/スナップすることを意味します。実際には、両方のステップで Transition 値を0%に設定しています。
ステップごとに異なる Transition 値を設定すれば、独創的なフェイザーを作ることもできます。
右上隅の ![]() をクリックして Phaser Editor を閉じます。
をクリックして Phaser Editor を閉じます。
2番目のフェイザーの保存と利用
これを、新しい All プリセットとしてプリセットプール22に保存します。分かりやすいように、2つのプリセットに "Even Blind Soft" および "Even Blind Snap" という名前を付けておきましょう。

2番目のプリセットをクリックしてプログラマでアクティブにし、Store に続けてエクゼキュータ103を押してください。
今回は確認のポップアップが出ません。少なくとも2つのキューがあるシーケンスに保存する場合、次の整数をキュー番号として保存するものとみなされます。それ以外の場合は、キュー番号を指定する必要があります。
プログラマをクリアして、エクゼキュータで3種類のキューを試してみてください。動作の確認には、3D ウィンドウが最適です。
エクゼキュータの変更
これをより使いやすくするために、調整しておきたいことがいくつかあります。現在はマスターを下げきるとシーケンスがリセットされますが、選択した最後のキューにとどまるようにした方がよいかもしれません。また、Speed を動的に制御したい場合もあるでしょう。この2点について変更してみましょう。
これには、Assign メニュー が必要です。Assign をクリックしてから、Even Blinder シーケンスのエクゼキュータ・ボタンの1つを押してください。
メニューは Handle ページにしてください。まだアクティブになっていなかったら、左側の Handle をクリックします。
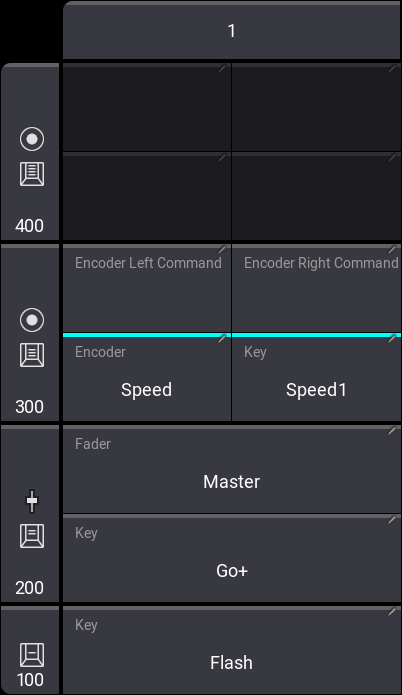
エクゼキュータをさらに上に拡張するために、300 というボタンをクリックしてください。
サイズ変化によって Key の割り当てが変わります。ここでも、下部のエクゼキュータ・ボタンは "Flash" にします。そして、300 ノブの Encoder を "Speed" に、300 ボタンの Key を "Speed1" にしてください。Handle の割り当ては以下のようになります。
次に、エクゼキュータの設定を調整します。左側の Edit Setting をクリックすると、シーケンスに対する設定が開きます。
多くの設定がありますが、変更したいのはメニューの中程にある "Restart Mode" です。
この設定には3つの選択肢がありますが、表示が "Current Cue" になるまでボタンをクリックしてください。
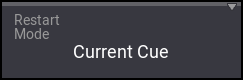
これによって、シーケンスは前回終了したキューで再開されます。
設定が終わったら、Assign メニューを閉じてください。
3つのキューとともに、新しい Speed ノブやフェーダをいろいろと試してみてください。ノブの下にあるボタンを押すと、Speed が 60 BPM にリセットされます。onPC のノブは、エンコーダと同じように回すことができます。これはシーケンス全体の Speed であり、フェイザーのものではないことに注意してください。ただし、フェイザーはシーケンスに含まれているため、シーケンス・スピードの影響を受けます。
Odd Blinders に対するフェイザーの作成
先ほどと同様に、今度は Odd Blinders に対しても同じ方法でエクゼキュータを設定します。
フェイザーは、新しい All プリセットに保存してください。それが終わったら、次の章に進みましょう。
要約
この章では、単純なディマー・フェイザーについて見てきました。ユーザマニュアルには フェイザー というセクションがあり、フェイザーの作成に関する詳細や、より高度なフェイザーの例があります。このショーを用いて、それらの例を試すことができます。
また、Fixture Sheet のレイヤ・ツールバーも見てみました。これについては、エンコーダ・ツールバー を参照してください。何か特定のものを見たい場合を除き、Fixture Sheet で Auto レイヤを選択したままにしておくことがよくあります。この場合、エンコーダ・ツールバーで選択されたレイヤにしたがいます。
Store Settings についても簡単に触れました。このクイックスタートガイドでは、これ以上説明しません。詳しくは Store Settings とプリファレンスの保存 を参照してください。
次の章 では、新しいシーケンスを作成します。