17 レシピ
| grandMA3 クイックスタートガイド » 17 レシピ | Version 2.2 |
15章では、種々のプリセットを用いて複数キューを持つシーケンスを作成しました。
レシピでも同様の結果が得られますが、非常に柔軟な設定になります。これは、フィクスチャの数や種類が将来変更される可能性があること想定し、それに備えてショーをプログラムできることを意味します。
レシピの仕組みについて見ていきましょう。
レシピ行には一連の情報を含めることができます。これには、多くの場合、フィクスチャ・セレクション(おそらくグループから)、値のセット(多くの場合プリセットから)、および値をフィクスチャに適用する方法についての情報が含まれています。この情報が、キューや新しいプリセットに「クック(cook)」されます。
要素が変更された場合、レシピを再クックすることで、更新された情報をキューやプリセットに反映されることができます。セレクションに値を適用する方法に関する情報を含む要素は、(第13章で行ったように)すべてのプリセットを埋め込み(Embedded)プリセットで用いる場合に比べて、レシピをユニークなものにしています。また、いくつかのグループを更新してからシーケンス全体を再度クックできる柔軟性により、例えばツアーなどでショーのセットアップを頻繁に調整しなければならない場合に、レシピは非常に柔軟で優れたツールとなります。
レシピには複数のレシピ行を含めることができます。各行は1セットの情報を持てるため、レシピ全体では複数の情報セット持つことができます。
この図は、「レシピ」トピックからのものです。


これは、レシピをキューパートやプリセットに保存し、それをキューパートで利用できることを示しています。"MAtricks" という要素もありますが、これについてはクイックスタートガイドの範囲を超えるため説明しません。
キューパートがそれ自身のレシピを含んでいて、レシピ付きのプリセットを使っている場合、ソフトウェアがフィクスチャの出力を決定するのに複雑な計算が必要になることがあります。最終的に各フィクスチャは、一度に1つのソースからの出力しか行えません。
したがって、できるだけシンプルにすることをお勧めします。どんなに複雑なプログラムを作成してもソフトウェアはそれを理解してくれますが、自分自身や同僚を混乱させるリスクが大きくなります。
では、実際にレシピを作成して、その機能を見てみましょう。
ビューの設定
まず、使用する要素を含むビューを設定しましょう。
シーケンスを確認するには Sequence Sheet が必要です。空のユーザ定義エリアに Sequence Sheet を作成するか、Sequence Sheet を含むビューを呼び出してください。
空のプール・オブジェクトを持つ Group プール、そして All 1 プリセットプールも必要です。3D Viewer を表示しておくと役立つ場合もあります。
Sequence Sheet にレシピ行が表示されていることを確認してください。デフォルトでは表示されているかもしれませんが、確実に表示するには、シートの左上隅にあるMAロゴをクリックし、Mask タブをクリックします。このタブには、Sequence Sheet の表示方法を調整するための設定があります。Show Recipes をクリックすると、オンに切り替わります。この設定には、タイトルバーに 'Show Recipe' というボタンもあるかもしれません。これは 'Mask' にある設定と同じものを切り替えます。

設定を閉じてください。
これで、Sequence Sheet の下部に、レシピを作成・編集できる領域が表示されます。

レシピ付きキュー
レシピを用いたキューを作成しましょう。
まず、プログラマをクリアし、アクティブなシーケンスをすべてオフにします。
次に、新しいシーケンスを保存し、それを選択します。ここではシーケンス6になります。
新しいシーケンスには、空のキュー1があるはずです。必要に応じて、シーケンスを制御するエクゼキュータを割り当てることができます。
グループを用いたレシピを作成していきます。フィクスチャ201と202を選択し、これを新しいグループとして保存します。これがグループ17になります。
これでキュー・レシピに必要な構成要素がすべて揃いました。
Sequence Sheet の下部にはレシピ領域があります。キュー1をクリックして選択します。キューのパート番号をクリックする必要があるかもしれません。
通常の Sequence Sheet とレシピ領域との境界線を上下にドラッグすると高さを調整できます。
レシピ領域で New Recipe を右クリックし、レシピ行を作成します。
この行には、レシピ行で設定できる多くの列項目があります。それぞれの機能については、このクイックスタートガイドの範囲外です。
"Selection" 列のセルを右クリック(または編集)します。これによって、すべてのグループを含む選択ポップアップが開きますので、2台の Mega Pointe を含む新しいグループを選択します。そして、"Values" 例のセルを右クリックし、Color プリセットを選択してください。
キュー名が変わり、小さなポット・アイコン(![]() )が追加されています。
)が追加されています。

シーケンスの最初のキューを実行します。何も見えないので、グループを選択しフィクスチャにディマー値を与えてください。これを "Merge" でキュー1に保存し、プログラマをクリアします。
フィクスチャは、キューにクックされたプリセットから色を取得し、ディマー値はプリセットやレシピを参照せずにキューに直接保存されていることが分かります。Track Sheet をオンにして、キューに何が保存されているかを確認しましょう。手動でキューに保存した場合と同様に、色はプリセットから取得されているように見えます。値の右上隅にある小さな緑のドットと、名前のポット・アイコンだけが、一部のアトリビュートがレシピの影響を受けていることを表しています。
低いレベルや100%など、いくつかの Dimmer プリセットが必要です。ない場合は、これらを(Universal プリセットとして)作成してください。
キュー1用に新しいレシピ行を作って2行にします。この行のセレクションもグループにしましょう。グループの Swipey メニューで Assign を選んで新しいレシピ行をクリックすると、そのグループがセレクションとして割り当てられます。
2つの方法のいずれかで、「値」としてより低いディマー値を持つ Dimmer プリセットを選択してください。

これによって出力が変化しないことに注意してください。これは、手動で保存されたキューの「ハード」値がレシピデータよりも優先されるためです。
2行目のキューの名前が赤く、キュー名のポット・アイコンも赤くなっています。これは、一部のレシピ値がクックされていないことを示しています。
グループ内のフィクスチャ・セレクションを変更してみましょう。グループ7を選択し、新しいセレクションをレシピで使用しているグループ(この例ではグループ17)に保存します。グループをマージするか上書きするかを選択できます。
その結果、他のスポットは選択した色と低いディマー値で点灯しました。それらは、Dimmer と Color プリセットの両方を参照しています。ポット・アイコンは再び緑に変わりました。
ここで、キューから保存された「ハード」ディマー値を削除します。
グループのセレクションによって、フィクスチャにディマー値を与えます。実際の値は重要ではありません。必要なのはアクティブなプログラマ値だけです。
以下のコマンドを実行します。
|
|
User name[Fixture]>Store Cue 1 /Remove |
プログラマをクリアしてください。すべてのディマー値がキューから削除され、フィクスチャがオフになります。レシピにディマー値が残っていても、クックされたデータをキューから削除できます。レシピのディマー値をキューに戻したい場合は、レシピを編集して自動クックをトリガーするか、キューやシーケンスを手動で再度クックします。
手動でやってみましょう。以下のコマンドを実行してください。
|
|
User name[Fixture]>Cook Sequence 6 |
シーケンス6ではない場合は、番号を合わせてください。
これによって、以下のようなポップアップが表示されます。
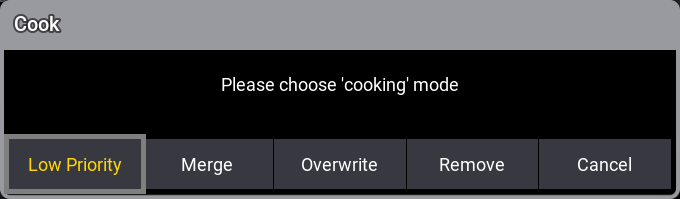
値をキューにどのようにクックするかをコマンドで指定しなかったため、どうするかを尋ねられます。Cook コマンドによってもレシピデータを削除できることに注意してください。
レシピデータをマージしたいので、Merge をクリックします。
これで、フィクスチャは Dimmer プリセットを用いるようになります。
2番目のレシピ行で Dimer プリセットを変更してみましょう。高い出力の別の Dimer プリセットを選択してください。Assign を用いるか、レシピ行の Values セルを右クリックして、目的のプリセットを選択します。参照されたプリセットを表すように、キュー名が調整されることに注目してください。
3番目のレシピ行を追加し、同じグループをセレクションとして、また Position プリセットを値として使用します。
値とセレクションが追加されると、自動的にキューにクックされ、フィクスチャに出力が反映されます。
最後の変更は、Dimmer レシピ行のフェード/ディレイタイムを調整することです。
レシピを右にスクロールして、"Fade" と "Delay" の4列を表示します。
フェード/ディレイの両方に、"From X" と "To X" という項目があります。X についての説明は省きますが、From と To によって、セレクションに値範囲を追加できます。"Fade From X" 欄の値を 3、"Fade To X" を 10、そして "Delay From X" を 1 に設定してください。
プリセットは異なるかもしれませんが、結果は以下のようになるはずです。

シーケンスをオフにし、キューを実行してみてください。個々のフィクスチャが、レシピの範囲に一致する個別フェードタイムを用いていることが分かります。Fixture Sheet で見ると分かりやすいかもしれません。
最後に、グループ17を編集してフィクスチャ201と202だけを含め、これら2つのフィクスチャだけを "Overwrite" を用いてグループに保存します。
これで、出力が更新されました。更新されていない場合は、シーケンスをオフにしてキューを再度実行し、新しいセレクションに合わせて出力がどのように調整されるかを確認してください。
プリセット・レシピ
レシピを含むプリセットを作成しましょう。
プログラマをクリアし、シーケンスをオフにしてください。
"Recipe Editor" ウィンドウ、Color プリセットプール、Dimmer プリセットプールを含むようにビューを調整します。ここでは、以下のようにします。

Recipe Editor は、プログラマ内でレシピを作成・編集するためのウィンドウです。これを用いて新しいレシピを作成し、それを新しいプリセットに保存します。
編集モードをオンにするには、ウィンドウのタイトルバーにある Edit Recipe ボタンをクリックします。
プリセットと Groups プールのタイトル・フィールドに緑のレシピポット・アイコンが追加されます。 また、'Edit' とsc' キーが点滅し、編集モードであることを示しています。
これで、関連するプール・オブジェクトをクリックしてレシピを作成できます。
2台のフィクスチャ(グループ17)を含むグループをクリックし、75%の Dimmer プリセットをクリックします。両方のフィクスチャに緑枠が表示され、レシピ行がエディタに追加されます。
Color プリセットの Dimmer プリセットの1つをクリックします。
これで、レシピ行が3つと、緑枠のプール・オブジェクトが4つできました。
これらのうち2つは Dimmer プリセットです。どちらも同じグループに Dimmer 値を送信しようとしますが、レシピ行のうち使用できるのは1行だけです。最後にクリックした行が使用されます。
保存はできましたが、少しだけクリーンアップすることしかできませんでした。タイトルバーの CleanUp をクリックすると、不要なレシピ行が削除されます。
結果は以下のようになります。

これらはプログラマ値で、キューまたはプリセットに保存できます。これを新しい "All 1" プリセットとして保存します。使用可能な最初のプリセットは3番です。
プリセットが作成され、アクティブなプログラマ値が削除されます。グループは選択されたままで、編集モードも有効なため、グループには緑枠が表示されます。
プログラマをクリアし、Edit Recipe をクリックしてオフにします。
プリセットを2回クリックして試してみましょう。フィクスチャは選択した色で点灯するはずです。プリセットを調整してみましょう。
プリセットを右クリックします。レシピ行が Recipe Editor に呼び出され、"Edit Recipe" モードではなく、通常の編集モードであることを示す緑枠が表示されます。
"Fade From X" の値として2を追加します。正しい列を見つけて、値を2に編集してください。

Update をクリックして、プリセットを更新します。プログラマをクリアし、プリセットを2回クリックして変更をテストします。色がフェードインするはずです。
すべての Mega Pointe を含むグループ7をクリックし、セレクションをレシピで使用したグループ (グループ 17) に保存(マージ)します。
出力は更新されません。プログラマには2つのフィクスチャのレシピ情報しか残っていません。追加されたフィクスチャは、プログラマに自動的にはクックされまれません。プリセットをクリックすると、グループ全体のレシピ値が呼び出されます。
セレクションなしのレシピ・プリセット
セレクションを含まないレシピ・プリセットを作成します。セレクションのないプリセットは、現在のセレクションに適用できます。有効な値はプログラマにクックされます。
All 1 プリセットプールの空のプリセットで、Swipey メニューを用います。ここでは、最初の空のプール・オブジェクトが4番です。Swipey メニューで Edit Settings を選ぶと、プール・オブジェクトのエディタが開きます。
これはかなり大きなエディタで、かなりのスペースを使います。タイトルバーの 'Settings' をオフにすれば、もう少しスペースを確保できます。
![]()
この大きなエディタには、Recipe Editor と同じレシピ・セクションに加え、下部に大きな MAtricks セクションがあります。レシピ行を追加する前に、エディタ下部の Turn into Recipe をクリックする必要があります。
これで、"Value" を割り当てることができる最初のレシピ行が表示されます。値として Color プリセットを選択してください。
レシピ行の下の MAtrick セクションで、"XWings" の値を 2 に、"Fade From X" 列を 3 に、"Delay From X"を 0 に、そして "Delay To X" を 5 に設定します。
追加のレシピ行と、そのレシピ行に高い値を設定した Dimmer プリセットを追加します。
結果は以下のようになります。

MAtricks 部分が変更され、選択した行の設定が表示されることに注意してください。
エディタをとじます。
プログラマが空であることを確認してください。すべての Aura を含むグループを選択し、新しいプリセットをクリックします。
フェード/ディレイタイムとレシピの値を用いて、プリセットをプログラマに呼び出します。プログラマの内容はレシピ・プリセットではなく、その内容を参照します。これは Fixture Sheet で確認できます。
このようなプリセットは、ライブなどにおいてその場で値を再生したり、他のプリセットを構築したりするために使用できます。
プログラマをクリアします。
レシピ・プリセットをシーケンスに追加する
最初に作成したプリセットを2回クリックします。
これをレシピ・シーケンスのキュー2として保存します。
プログラマをクリアし、2つのキューを実行しください。フィクスチャは、期待通り動作しているようです。
シーケンスを再びオフにします。
フィクスチャ201と202を選択し、セレクションをレシピ・グループ(グループ17)に保存(上書き)します。
2つのキューを再度実行してください。
キュー1は期待通りの見えますが、キュー2はまだすべてのフィクスチャに影響を与えています。 プリセットを2回クリックすると、新しいグループを使用するようにプリセットが実際に更新されたことが確認できます。
キュー2の問題は、プリセットへのリンクが新しいグループ内容に更新されなかったことです。キューは、レシピ・プリセットがより大きなセレクションに拡張されたことを認識していません。
2番目のキューにレシピを追加して、この問題を解決しましょう。
2番目のキュー・レシピ行では、レシピ・グループ(グループ17)をセレクションとし、All プリセットを「値」として設定されます。
ここで、以下のコマンドを用いてシーケンスをクックする必要があります。
|
|
User name[Fixture]>Cook Sequence 6 /Overwrite |
シーケンスが6ではない場合は、一致するように番号を調整してください。
Overwrite は非常に危険な機能ですが、この場合はレシピの内容だけをキューに含ませたいので、これを使用することは理にかなっています。
シーケンスをオフにし、プログラマをクリアして、2つのキューをもう一度実行してみてください。
これで、期待通りのキューになります。
さらに調べたい場合は、引き続きレシピをいろいろと試してみてください。
終わったら、ショーを保存するのを忘れないでください。
要約
この最終章は長くなりましたが、レシピは話題は広範囲にわたり、ここでは表面をなぞっただけに過ぎません。
レシピにはさらに多くの詳細がありますが、柔軟性が必要とされるショーでレシピを用いる利点の一端を知っていただければと思います。
レシピについては、レシピ で詳しく説明されています。キューにおけるレシピの使用については、キュー・レシピ で述べられています。また、プリセットでの使用については、レシピ・プリセット を参照してください。
最後に
これでクイックスタートガイドは終了です。お読みいただきありがとうございます。楽しく学んでいただけたでしょうか。
このガイドでは、最高度のショーを作成したわけではありません。目標は、ソフトウェアが持つ多く機能のいくつかを紹介することでした。
ユーザマニュアルは、grandMA3 に関する詳細情報を得るための優れたリソースです。また、リリースノートで最新の変更点を把握できます。
さらに学びたい場合は、オンライン学習も用意されていますので、MA Lightings Webサイト をご覧ください。
他のユーザや専門家から助けを得られる Official Forum もあります。
またオンライン上には、grandMA3 に関する優れた洞察や情報を提供する、公式・非公式のさまざまな動画があります。
Happy Programming