レシピ
| grandMA3 ユーザマニュアル » レシピ | Version 2.2 |
レシピ(Recipe)は、ツアーでのショーや、内容変更が予想される場合に、非常に便利なツールとなります。
レシピは、キューパートやプリセットに保存できます。
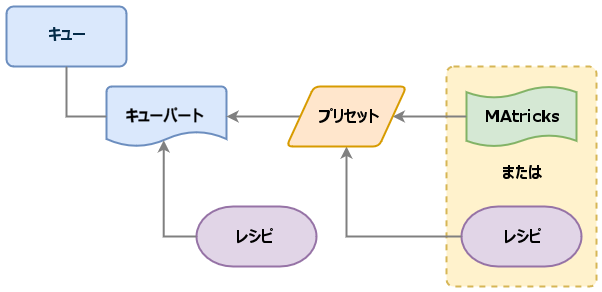

キューパートとプリセットの両方にレシピや保存値があると、データに競合が発生する可能性があります。
キューパートには値を保存できますが、レシピ・データを含めることも可能です。
キューパートのレシピは、キューパートにクックする必要があります。これを "Merge" オプションでクックすると、キューパートの既存値はレシピによって上書きされません。"Overwrite" オプションでは、すべての既存値がレシピによって上書きされます。レシピの影響を受けない値は、上書きされたキューから削除されます。
プリセット・レシピは自動的にプリセットにクックされ、キューパートでプリセットを使用できます。
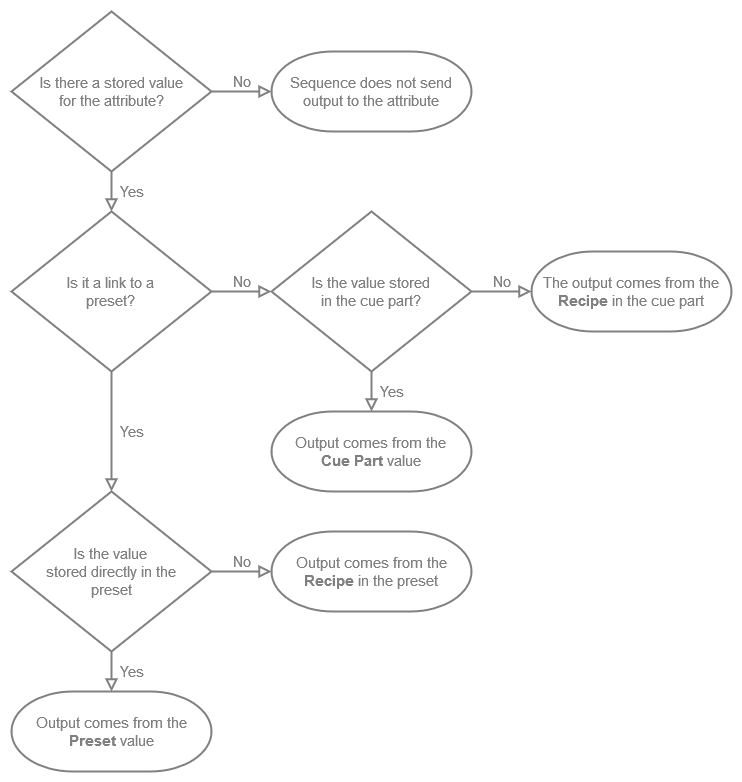
つまり、アトリビュートは4つの異なる場所から値を取得できる可能性があるわけですが、出力できる値はこれらのうちの1つだけです。
- キューパート
- キューパート・レシピ
- プリセット
- プリセット・レシピ
キューパートに保存されている値は、キューパートのレシピ値よりも優先されます。プリセットに保存されている値は、プリセット・レシピ値よりも優先されます。プリセットをキューパートに保存すると、プリセットへのプリセット参照が作成されます。その場合、出力はプリセットの優先度によって決まります。
以下のフローチャートによって、出力がシーケンスのどこから来ているかを判定できます。

レシピには、一連の情報に基づいて何をするのかを記述した1つまたは複数のレシピ行が含まれています。レシピは、キューパート、プリセット、またはプログラマに値を「クック(cook)」するために用いられます。クックされたデータには、小さなポット・アイコン ![]() が表示されます。またクックされたデータは、必要に応じてを簡単に削除できます。
が表示されます。またクックされたデータは、必要に応じてを簡単に削除できます。
レシピ行には、フィクスチャ・セレクション、グループ、プリセット、MAtricks、個別フェード、ディレイ、スピード、および位相値に関する情報を含めることができます。
レシピからの値は、保存されている通常の値と組み合わせることができます。
レシピ・システムの柔軟性によって、以下のように多様な用途に利用できます。
- 柔軟なフィクスチャ設定のために、他のプリセットを参照するグループのレシピ・プリセットを作成します。
- 柔軟なフィクスチャ・セレクションに適用可能な値範囲を持つテンプレート・プリセットを作成します。
- さまざまな要素が目的の外観をどのようにもたらすかをレシピでキューに含めます。
キューやプリセットにレシピがある場合、小さなポット・アイコンが表示されます。レシピの状態によって見た目が異なります。
 緑のポット: すべてのレシピ行が有効です。
 赤のポット: 1つ以上のレシピ行をクックできません。
 開いたポット: これはレシピ・テンプレートです。
grandMA3 ソフトウェアは、レシピを作成・編集するための複数のツールと方法を提供しています。キューとプリセットで直接レシピを作成および編集する方法については、キュー・レシピ および レシピ・プリセット を参照してください。またレシピは、プログラマと Edit Recipe モードの Recipe Editor ウィンドウを用いて作成することもできます。
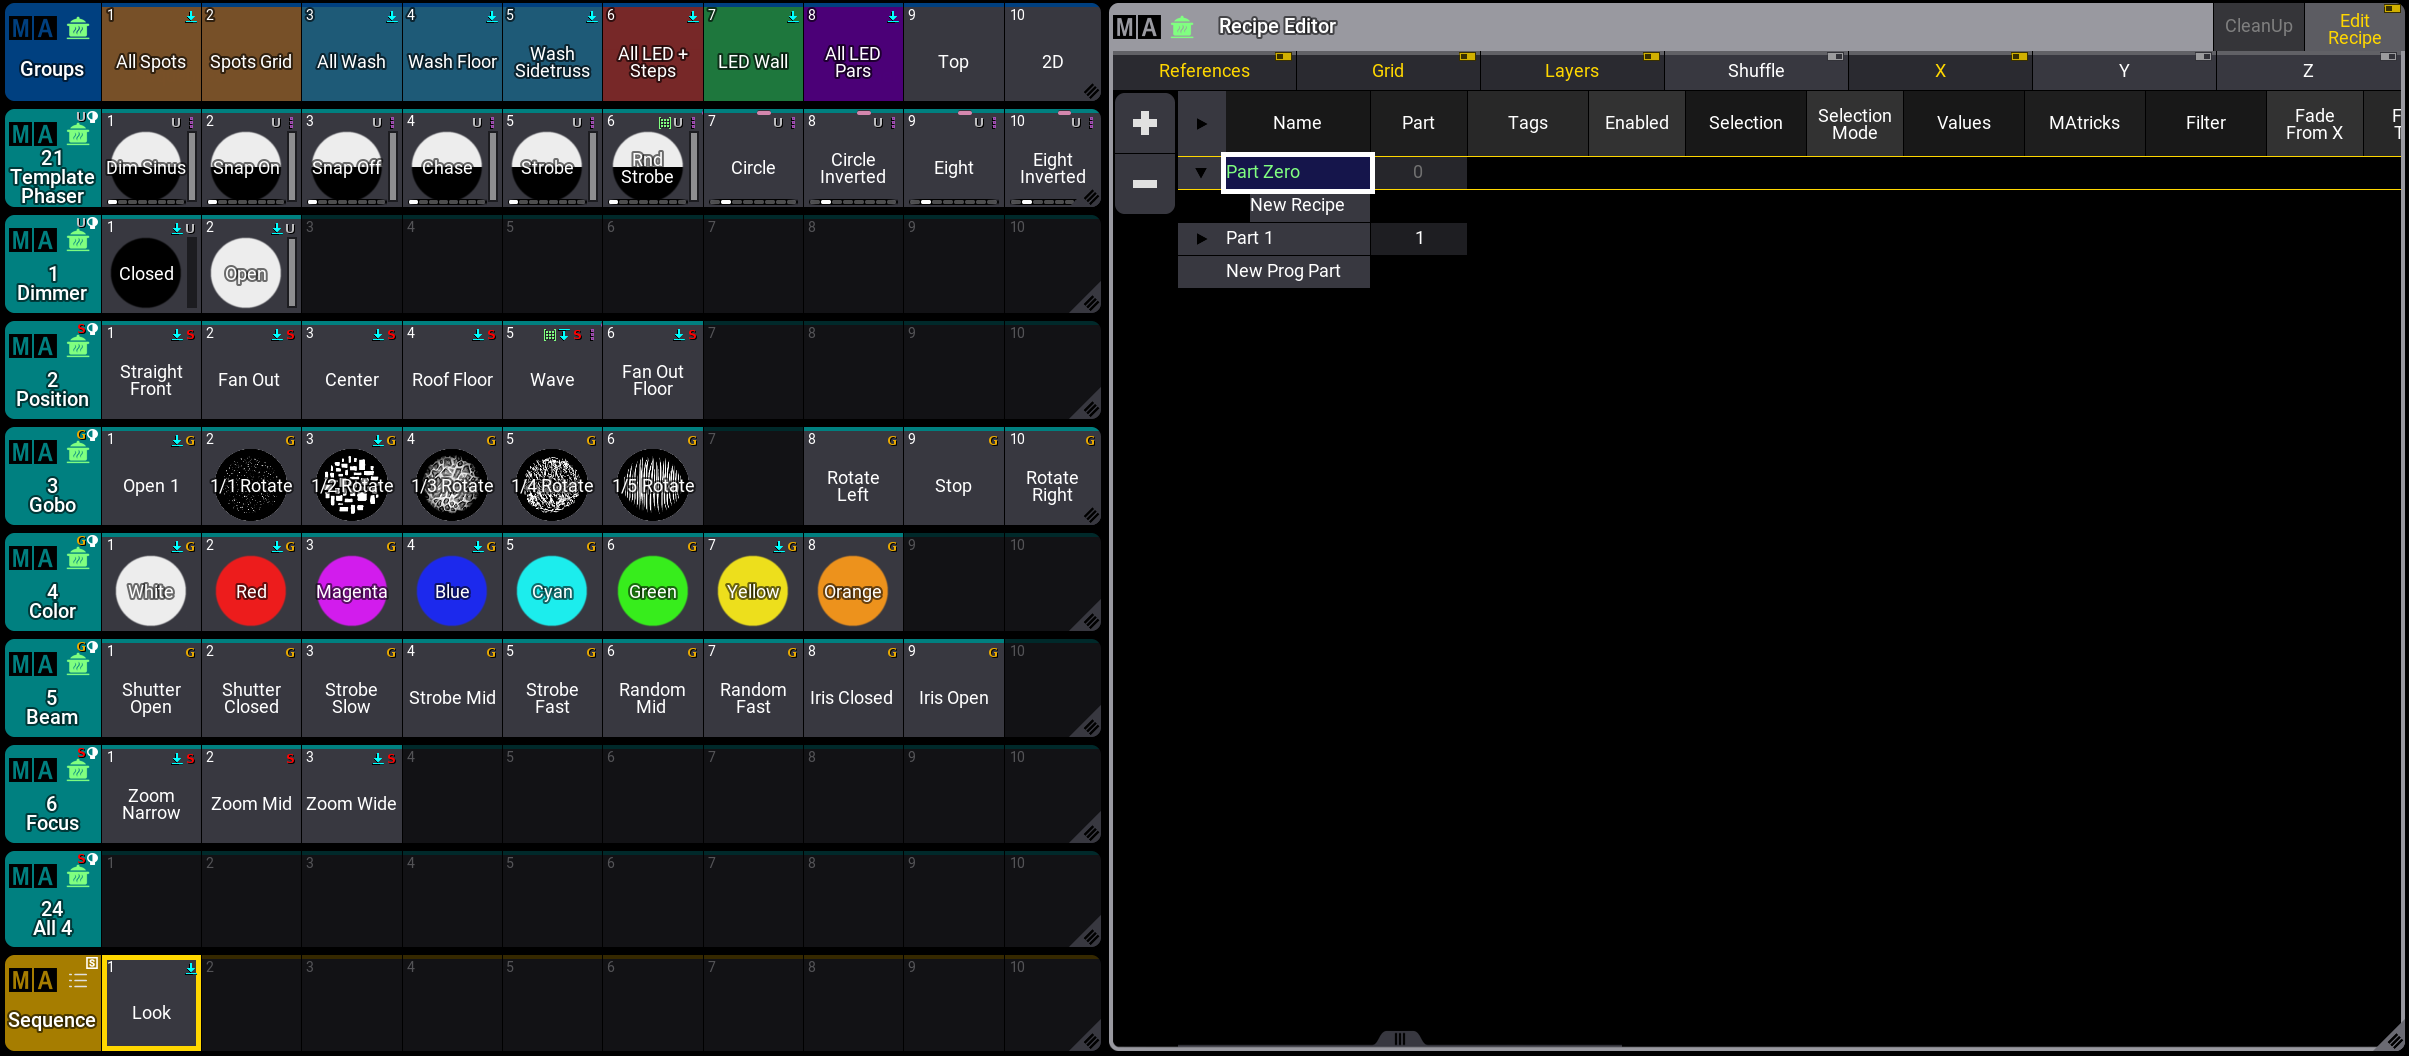
Recipe Editor ウィンドウ
Recipe Editor ウィンドウは、レシピ行を視覚的に表示し、プログラマ・パート の操作に役立ちます。すべてのレシピ行を編集できます。
Recipe Editor ウィンドウは、Add Window ポップアップの Tools タブにあります。

Edit Recipe モードを有効にするには、タイトルバーの Edit Recipe をタップします(後述 を参照)。レシピを作成する Part をタップして選択します。
グループ内に、同じアトリビュートに対して異なるプリセットを持つ複数のレシピ行がある場合、最後のエントリーのみが出力を生成します。同じフィーチャグループの複数プリセットで同じセレクションを用いるレシピをすべて削除するには、タイトルバーの CleanUp をタップします。出力を生成する最後のオブジェクトだけが保持されます。
例えば、Group 1 + Red + Yellow + Blue を選択し、CleanUp をタップすると、Group 1 + Red + Yellow のレシピ行が削除されます。すでに選択されているプリセットをもう一度タップして選択を解除すると、対応するレシピ行も削除されます。CleanUp は、同じフィクスチャを同じフィーチャグループの複数項目で使用している場合にのみ有効です。それ以外の場合、ボタンはグレーアウトされます。Edit Recipe が無効になっている場合、このボタンは表示されません。
左側の + と - を用いると、プログラマ・パートとレシピを追加・削除できます。
各パートのレシピが保存されるかどうかは、保存先によって異なります。
- キューパートがレシピの保存先である場合、選択されたプログラマ・パートのレシピ行(緑で表示)が保存先のキューパートに保存されます(例: Store Cue Part 1。
- キューを保存先とした場合、すべてのパートはそれぞれのキューパートとして保存されます(例: Store Cue 1)。
- 保存先がプリセットの場合、緑で表示されている選択パートがプリセットに保存されます(例: Store Preset 1.3)。
レシピは、保存されるとすぐに Recipe Editor から削除されます。
Recipe Sheet
複数の列を持つ Recipe Sheet は、キューパート、プリセット、および Recipe Editor ウィンドウ(プログラマ)のレシピの一部です。細かい違いはありますが、Recipe Sheet には3つの場所すべてで同じ情報が網羅されています。
以下は Recipe Sheet の例です。

上部バーにあるトグルボタンで、以下のようなレシピ要素の表示/非表示を切り替えられます。
- Lock:
この列が UL (UserLock)に設定されている場合、CleanUp をタップしてもロックされたレシピ行はクリーンアップされません。また、対応するレシピ行のオブジェクトを選択解除することもできません。 - Name:
Name 列は、レシピ行に名前を付けるのにも使用できます。名前の文字色が赤の場合、その行はクックできないことを示しています。例えば、値がセレクションに対して有効でない場合や、重要な要素が不足している場合などです。プール・オブジェクト、ワールド、またはフィルタから取得されない MAtricks 値は、Name セルの右側に小さな緑のアイコン( 、
、 、または
、または  )で示されます。
- Tags:
割り当てられたタグを表示します。セルを長押しして編集し、タグの割り当てや解除を行います。 - Enabled:
Yes に設定すると、レシピ行がクックされます。No に設定すると、レシピ行は赤くマークされ、クックされません。 - Selection Mode:
メインフィクスチャだけがレシピ・セレクションに含まれている場合、サブフィクスチャがどのように扱われるを指定します。- Normal:
値はサブフィクスチャに渡されます。 - Strict:
値は、セレクションに含まれるフィクスチャだけに厳密に適用されます。

ヒント v1.9.7.0 以前のショーファイルを移行する場合、既存のレシピでは Selection Mode 設定が Strict に設定されます。 - Normal:
- References:
以下は参照データの列です。- Selection:
このレシピ行を用いているフィクスチャ・セレクションを示します。セレクションがグループの場合、グループの番号と名前が表示されます。グループが空の場合、赤文字で表示されます。セレクションがプログラマからのものである場合、<Recipe> と表示されます。 - Values:
これはレシピ行で使用される値の参照です。値がプリセットの場合、プリセットの番号や名前、および Preset Mode、MAtricks、MultiStep、Layer 情報などを示すさまざまなプリセット・アイコンが表示されます。値がプログラマ値からのものである場合、<Recipe> と表示されます。選択したグループのフィクスチャの一部だけが使用されている場合、Values 列のテキストはオレンジ色で表示されます。これは、使用中の選択範囲のすべてのフィクスチャが選択したプリセットを使用できない場合や、レシピ行にワールドが追加された場合などに発生します。赤の場合、Selection 列のフィクスチャと互換性がありません。 - MAtricks:
既存の MAtricks プール・オブジェクトへの参照です。既存の MAtricks への参照があると、Grid 列に参照値が追加されます。 - Filter:
レシピ行にフィルタやワールドを割り当てることができます。
- Selection:
- Grid:
以下の列は MAtricks のものと同じです。グリッドにはX、Y、Z軸に対する列項目があります。上部のバーにある X、Y、および Z のいずれか、または複数を選択することにより、列を絞り込めます。このセクションには反転に関する列項目もあります。これらの列の一部は X 、Y、Z にリンクされていますが、一部は軸にリンクされておらず、共通の設定になっています。- X:
MAtricks Editor の X 値を編集します。 - Y:
MAtricks Editor の Y 値を編集します。 - Z:
MAtricks Editor の Z 値を編集します。 - Group:
セレクションを分割するグループ数です。 - Block:
ブロック化されるフィクスチャの数です。 - Wings:
セレクションが分割されるウィング数です。 - Width:
Selection Grid におけるセレクションの幅を変更します。 - InvertStyle:
反転が、Pan、Tilt、Pan と Tilt、あるいはすべてのアトリビュートに適用されるかどうかを指定します。 - PhaserTransform:
Transform を Mirror に設定できます。これによって、他のグリッド設定(Blocks、Groups、Wings など)に応じて値が鏡像反転されます。詳しくは MAtricks Transform を参照してください。 - Invert, Inv, InvB, InvG, InvW:
各グリッド軸に対するする反転の Yes/No 設定です。
- X:
- Layers:
Timing レイヤです。表示したいレイヤ列に対する X、Y、Z も有効にする必要があります。- Fade From / Fade To:
2つの Fade 値によって、フェードタイムの範囲を広げられます。 - Delay From / Delay To:
2つの Delay 値によって、ディレイタイムの範囲を広げられます。 - Speed From / Speed To:
2つの Speed 値によって、スピード値の範囲を広げられます。 - Phase From / Phase To:
2つの Phase 値によって、位相値の範囲を広げられます。
- Fade From / Fade To:
- Shuffle:
シャッフルに関する列項目です。表示したいレイヤ列に対する X、Y、Z も有効にする必要があります。- Shuffle:
この値によって、セレクションの選択順をシャッフルできます。 - Shift:
この値によって、Selection Grid でセレクションをシフトできます。
- Shuffle:
- X, Y, and Z:
各グリッド軸に対して列項目があります。レシピで1軸または2軸だけを用いる場合、関連する列だけを表示するように制限できます。
|
|
ヒント |
| MAtricks と Shuffle の設定については、MAtricks と Shuffle で詳しく述べられています。 |
レシピはすべての列に情報を記載する必要はありませんが、すべての列に情報を記載することは可能です。多くの場合、一部の列にだけ情報が記載されています。
Edit Recipe モードでのレシピ作成
キューパートやプリセットでレシピを扱うだけでなく、プログラマ内でもレシピを作成・編集できます。 このモードは、レシピを素早く効率的に作成するための プログラマ・ワークフロー に基づいています。すべてのプール項目のセレクションは記録され、レシピに保存されます。そして、プリセットやキューに簡単に保存できます。
Recipe Editor ウィンドウは、Edit Recipe モードでレシピを視覚的に確認し、編集できる便利なツールです。Recipe Editor ウィンドウについては、上述 を参照してください。

Edit Recipe モードを有効にするには、以下の複数の方法があります。
- Recipe Editor ウィンドウのタイトルバーにある Edit Recipe をタップします。
- At Overlay で Edit Recipes を有効にします。
- EditRecipe キーワードを用います。
Edit Recipe モードが有効になっている間、Edit キーと Esc キーが交互に点滅します。Edit Recipe モードを無効にするには、Esc キーを押すか、上述いずれかの方法でモードを切り替えます。Edit Recipe モードが無効になると、すべてのプールは通常通り動作します。
Edit Recipe モードが有効になっている場合、レシピに使用できる各オブジェクト・タイプのプール・ウィンドウには緑の ![]() が表示されます。
が表示されます。

以下のウィンドウでは、レシピ・インジケータが使用されています。
- Groups
- Preset Pools
- MAtricks
- Worlds
- Filters
- Layout Viewer
- Fixture Sheet
| ヒント | |
| レシピに使用できるように、対応するプールの Pool Action 設定を必ず SelFix/At または At に設定してください。 |
Edit Recipe モードでレシピを作成するには、Groups プール、複数のプリセットプール、Sequence プール、および Recipe Editor ウィンドウが表示されていると便利です。
以下に、レシピ作成の一般的なワークフローの概要を示します。具体的な例については、後述 を参照してください。
- Edit Recipe モードを有効にします。
- グループを選択します。選択されたグループは、プール・オブジェクトの周囲に緑枠で表示されます。複数のグループを同時に選択できます。
- プリセットを選択します。選択したグループのフィクスチャと互換性のないプリセットはグレーアウトされます。現在選択されているグループのレシピに選択されているすべてのオブジェクトは、プールウィンドウ内で緑枠で示されます。選択されているオブジェクトをもう一度タップすると、その選択が解除されます。選択には複数の値を追加できます。Recipe Editor ウィンドウでは、選択された値ごとに1つのレシピ行が作成されます。また、例えば Group 2 をタップして、異なるセレクションを定義することもできます。プール・オブジェクトの周りの茶色枠は、Group 1 など、以前のセレクションに対する値を示します。もう一度 Group 1 をタップすると、このセレクションに対して以前に定義された値が再び緑色で強調表示されます。Group オブジェクトの下部にあるフィーチャグループ・インジケータバーには、このグループのレシピでアクティブなフィーチャグループが表示されます
- 新しいレシピを、キュー、キューパート、またはプリセットに保存します。レシピを保存すると、Recipe Editor がクリアされ、選択されたオブジェクトとしてグループだけが残ります。
セレクションと値の記録順序は、レシピの処理方法に影響を与えます。同じセレクションを持つ複数のレシピ行が同じアトリビュートを参照している場合、最後のレシピ行が出力を決定します。特定のフィーチャグループ(例: Color プリセットプール)の プリセットプール にレシピを保存すると、Color の値だけでなく、選択したプログラマ・パートのすべてのレシピ行が保存されます。
対応するキュー、キューパート、またはプリセットを指定して EditRecipe キーワード を実行すると、Recipe Editor モードで特定のオブジェクトの編集モードが有効になります。Off を押してグループまたはプリセットをタップすると、対応するレシピ行が削除されます。グループやプリセットに複数の行がリンクされている場合、対応するすべての行が削除されます。
レシピに値を直接入力することはできません。事前にプリセットに保存する必要があります。プリセットが選択されていない場合、値は直接プログラマに入力されます。
|
|
重要 |
| レシピ作成時に入力された値は、プログラマに直接入力された値を上書きしたり置換したりしません。自動的にクックされたレシピは、低優先度で処理されます。プログラマ値を積極的に上書きまたはマージするには、Cook キーワード を用いてプログラマをクックしてください。 |
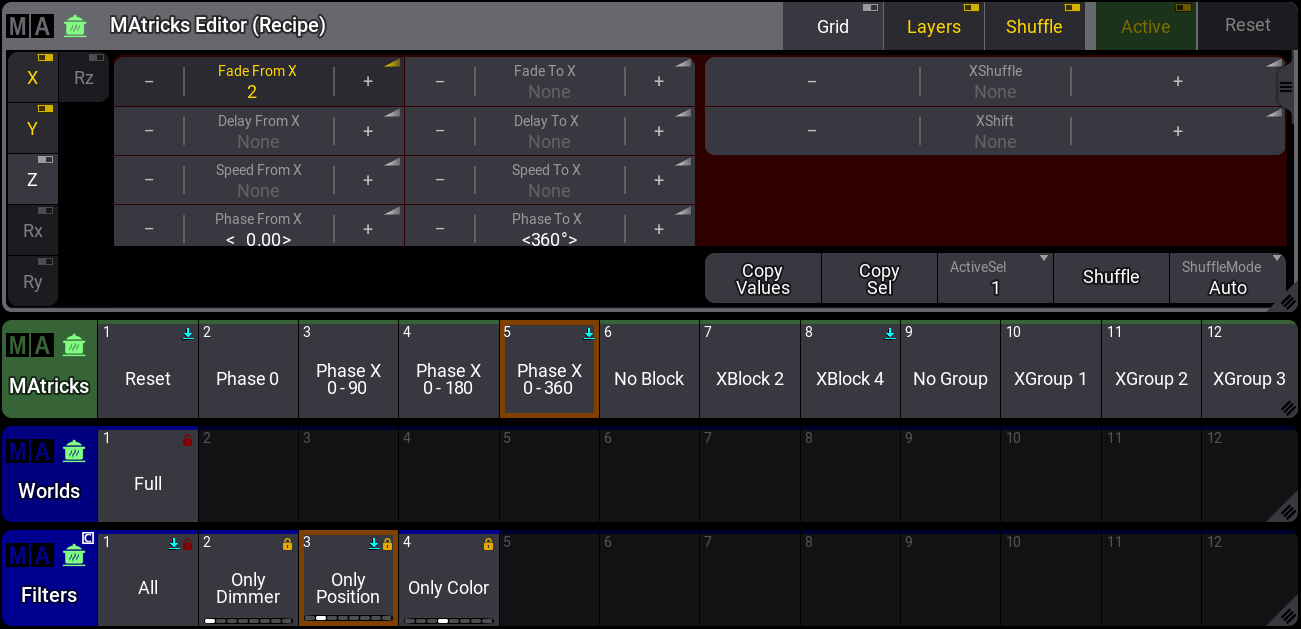
MAtricks Editor を開いて、レシピの各行に特定の MAtricks 値を定義します。MAtricks Editor でレシピを編集している間、タイトルバーには "(Recipe)" と緑のポット・アイコンが表示されます。
最後に作成したレシピに MAtricks、ワールド、フィルタを追加するには、プール内のオブジェクトをタップてください。MAtricks、ワールド、フィルタのプール・オブジェクトは、レシピで使用されている場合、茶色枠で囲まれます。
例
以下は、Recipe Editor ウィンドウを用いてキューのレシピ行を作成する方法の簡単な例です。
必要条件:
- デモショー・ファイルを読み込む。
- プリセットプール、Groups プール、Recipe Editor ウィンドウ、MAtricks Editor を表示。Sequence プールも便利ですが、必須ではありません。
2つのレシピ行を作成してキューに保存するには、以下の手順に従ってください。
- Recipe Editor ウィンドウで Edit Recipe を有効にします。
- グループ1をタップして選択します。その周囲に緑枠が表示されます。
- Dimmer プリセット2をタップします。
- Color プリセット2をタップしてください。
これでレシピ行が2行作成されます。グループ1は両方の行の選択範囲です。Values については、1行目にプリセット1.2が、2行目にプリセット4.2が設定されています。 - 別のグループ(Group 3)をタップして選択します。
すべてのプール・オブジェクトの以前のセレクションが解除され、茶色の枠で表示されます。 - Dimmer と Color プリセットを再度選択します。プリセット1.2とプリセット4.4をタップしてください。
選択したプリセットがグループ3に接続されます。 - Position プリセット3をタップします。
- テンプレート・フェイザー・プリセット1をタップします。
- MAtricks Editor に値を追加します。Phase From X を 0、Phase To X を 360°に設定してください。MAtricks Editor の値は、最後に作成したフェイザー・プリセット・レシピ行に追加されます。これは、Recipe Editor ウィンドウの Recipe 6 の Name 欄にある小さな MAtricks アイコンで示されます。
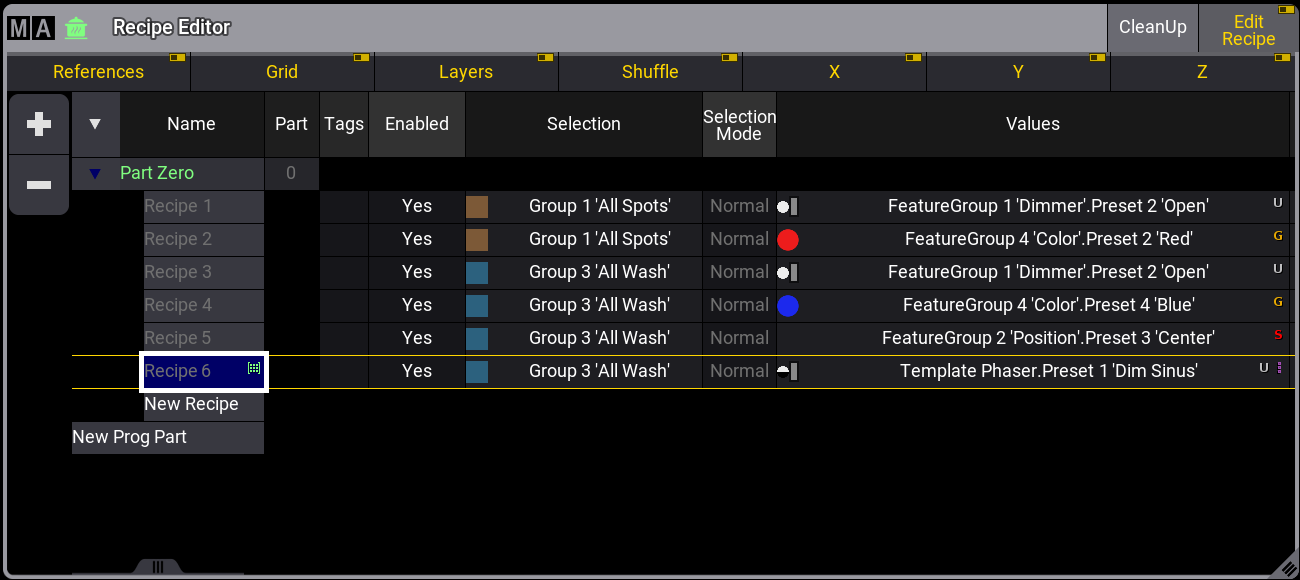
Recipe Editor ウィンドウ - 6つのレシピ行 - 最後のステップは、すべてのレシピ行をキューに保存することです(Store Sequence 2 Cue 1)。
6つのレシピ行すべてを含むキュー1が作成され、Recipe Editor ウィンドウからすべての行が削除されます。
例を見るには、以下の動画をタップしてください。