マーカ
|
grandMA3 ユーザマニュアル » タイムコード・ショー » マーカ
|
Version 2.2 |
マーカは、トラックグループ内の特定の場所をマークするために使用できます。これによって、曲やイベントの特定部分で起こっていることをマークができます。
縦方向のラインは、トラックグループ内のすべてのトラックに渡る基本マーカの位置を示しています。
マーカには、ラベルを付けることができます。名前はトラックグループに表示されます。アピアランスは、すべてのトラックに対して縦方向に表示されます。マーカの表示には、その長さが必要な場合があります。
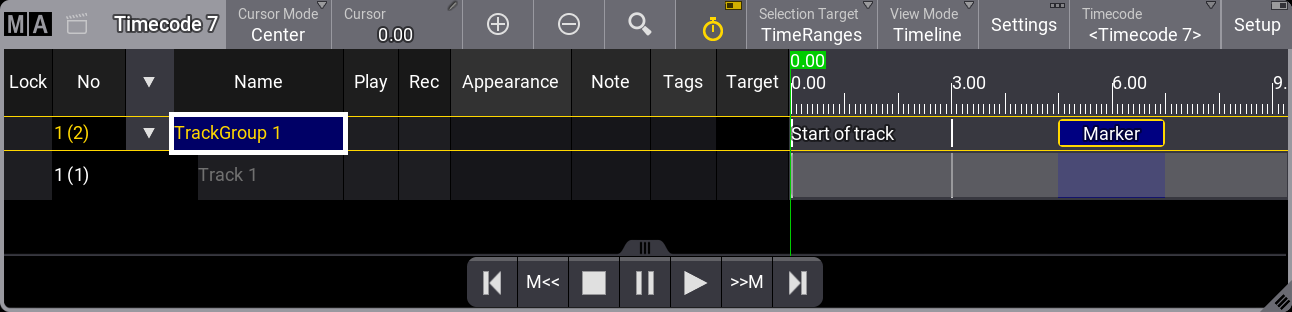
上の例は、3つの異なるマーカを示しています。最初のもの(タイム0)には名前がある。2つ目はラベルを持つ単純なマーカです。3つ目のマーカには範囲、名前、アピアランスがあります。
再生ツールバーの M<< / >>M ボタンは、タイムライン内の前/次マーカにジャンプします。
マーカ上のノートとタグは、Timeline ビューには表示されません。Text モードで確認してください。さまざまなモードについては、Timecode Viewer を参照してください。
トラックグループにマーカを追加
マーカを追加するには、Setup モードを有効にする必要があります。その後、以下の手順に従ってください。
- Selection Target が TimeRanges に設定されていることを確認します。これは、左側のツールバーにある
 をタップすることで変更できます。タイトルバーに Selection Target が表示されている場合は、タップして対象を変更できます。
 - マーカを追加するトラックグループを選択します。
- タイムライン内の正しい位置にカーソルを配置します。
- ツールバーの
 をタップすると、Edit Name ポップアップが開きます。
 - 新しいマーカ名を入力して、Please を押すか Enter をタップします。
- 新しいマーカが追加されます。
もう1つは、Quickly add marker ツールによる方法です。
- Selection Target が TimeRanges に設定されていることを確認します。これは、左側のツールバーにある をタップすることで変更できます。タイトルバーに Selection Target が表示されている場合は、タップして対象を変更できます。
- マーカを追加するトラックグループを選択します
- +M をタップするたびにマーカが追加されます。
作成時に名前の入力を求められないので、記録時に便利です。