Timecode Viewer
|
grandMA3 ユーザマニュアル » タイムコード・ショー » Timecode Viewer |
Version 2.2 |
Timecode Viewer はウィンドウとして作成できます。これは、タイムコード・ショーを制御したり、それを編集できる Setup モードにすることができます。
通常モードでは、タイムコード要素を確認するために使用できます。タイトルバーからいくつかの設定にアクセスできます(設定は調整可能)。下部には再生ツールバーが表示され、再生機能に素早くアクセスできます。
Setup モードでは、ビューアに要素が追加され、エディタになります。
Timecode プール・オブジェクトを編集すると、Timecode Viewer をポップアップ・エディタとして開くこともできます。
ポップアップ・エディタは、Setup が有効な Timecode Viewer と同様に機能します。若干の違いがあり、左側のツールバーにいくつかのツールが欠けていますが、基本的な機能は同じです。
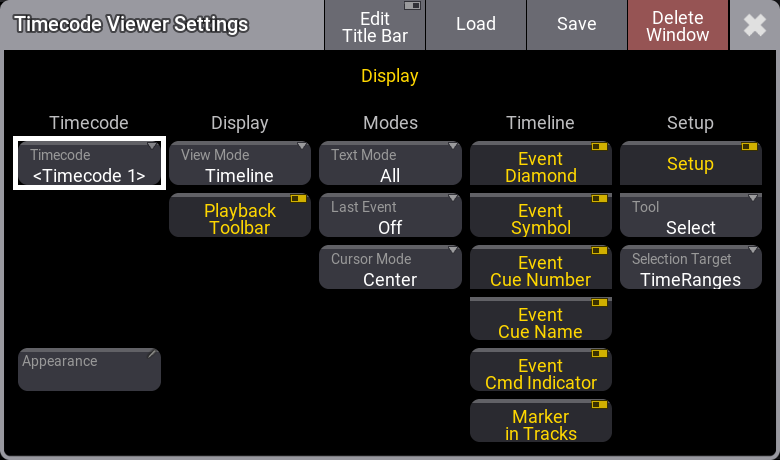
タイトルバー
デフォルトのタイトルバーでは、左側のMAロゴやポップアップ・エディタの歯車アイコン(![]() )をタップすることで、ウィンドウ設定にアクセスできます。ロゴとタイムコード・アイコンに続いて、タイトルバーにはタイムコード番号と名前(デフォルトの "Timecode" と異なる名前の場合)が表示されます。Setup モードでは、選択されているツールも表示されます。右側のボタンは編集可能で、後述 のウィンドウ設定で説明されています。
)をタップすることで、ウィンドウ設定にアクセスできます。ロゴとタイムコード・アイコンに続いて、タイトルバーにはタイムコード番号と名前(デフォルトの "Timecode" と異なる名前の場合)が表示されます。Setup モードでは、選択されているツールも表示されます。右側のボタンは編集可能で、後述 のウィンドウ設定で説明されています。
左側ツールバー
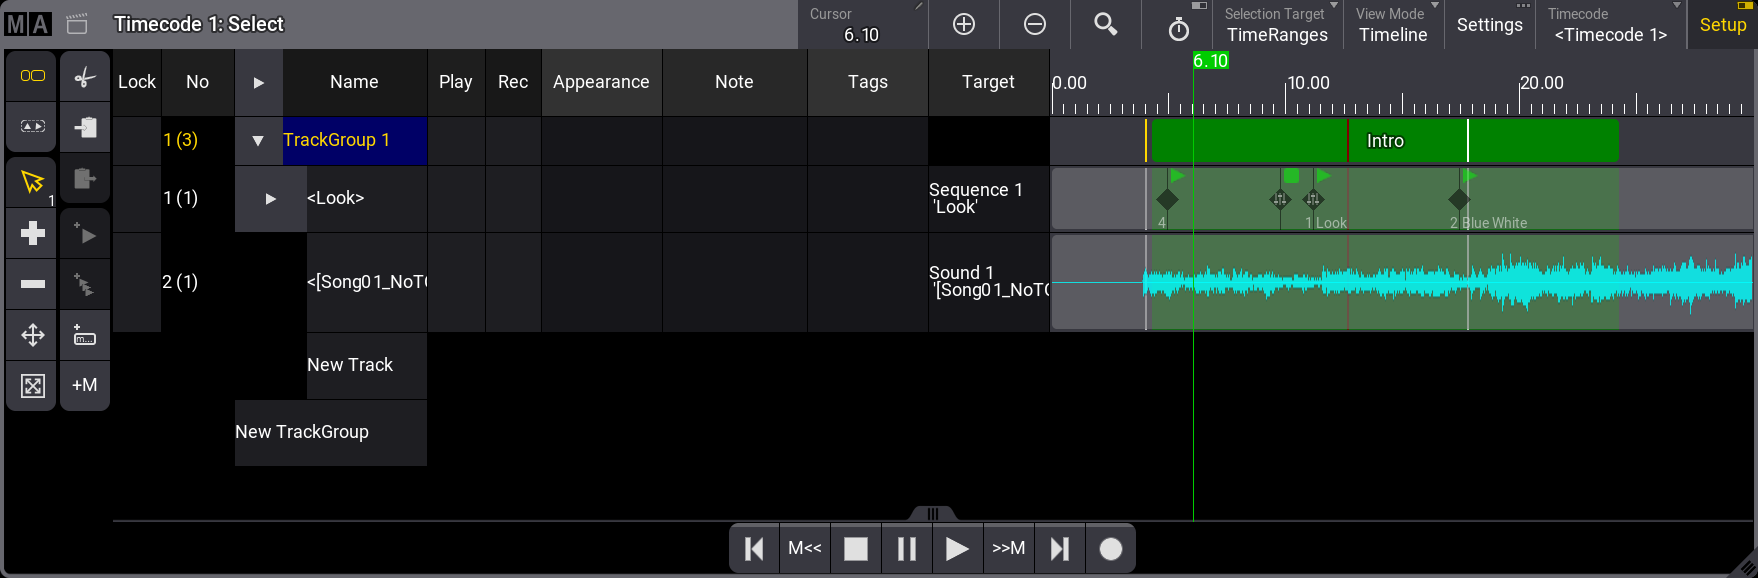
ビューアが Setup モードの場合、左側のツールバーが表示されます。ツールバーは、4つのグループに分かれています。
Select Target:
このグループは、選択する要素を指定します。これらのツールは、Timecode Viewer で Setup が有効な場合にのみ使用できます。
- Select Time Range (
 ):
):
これを選択すると、トラックグループ内のタイム範囲を選択できるようになります。 - Select Events (
 ):
):
これを選択すると、トラック内のタイムコード・イベントを選択できるようになります。
Tools:
以下は、トラックやトラックグループと相互作用するツール・グループです。
- Select Tool (
 ):
):
トラックやトラックグループ内の要素を選択するために使用します。選択されている場合、このボタンの右下隅に、その要素数を示す小さな数字が表示されます。 - Add Tool (
 ):
):
選択したターゲットとタップした要素に基づいて、関連する要素を手動で追加します。 - Minus Tool (
 ):
):
タップした要素と選択したターゲットに基づいて、タップされた要素を手動で削除します。 - Move Tool (
 ):
):
選択した要素を移動できます。 - Resize Tool (
 ):
):
タイム範囲の長さを変更します。開始位置はそのままで、終了位置を移動できます。
Selection:
このグループには、選択した要素を切り取り、コピー、貼り付けるためのツールが含まれています。これは、Select Tool が有効な場合にのみ表示されます(前述を参照)。
- Cut Selection (
 ):
):
選択した要素を切り取ることができます。 - Copy Selection (
 ):
):
選択した要素をコピーできます。 - Paste Selection (
 ):
):
切り取った要素やコピーした要素を貼り付けられます。
Add Menu:
このメニューは、トラックにイベントとマーカを追加するために用いられます。
- Add Event At Time Cursor (
 ):
):
これをタップすると、選択したトラックの現在のタイム・カーソル位置にイベントが追加されます。 - Add Multiple Events At Time Cursor (
 ):
):
これをタップすると小さなポップアップが開き、タイム・カーソル位置から、選択したトラックに指定したタイム間隔で複数のイベントを追加できます。 - Add Marker At Time Cursor (
 ):
):
これをタップするとマーカが追加され、マーカ名やテキストを入力できるポップアップが開きます。マーカは、現在選択されているトラックグループに追加されます。 - Quickly Add Marker At Time Cursor (+M) :
これをタップすると、Name ポップアップを開かずに、現在選択されているトラックグループにマーカが追加されます。
再生ツールバー(Playback Toolbar)
再生ツールバー(Playback Toolbar)は、ビューアの下部に表示できます。ウィンドウ設定の Playback Toolbar 設定で、ツールバーの表示/非表示を切り替えられます。設定方法については 後述 を参照してください。
Setup モードが有効な場合、ツールバーは以下のようになります。

以下は(最大)8つのボタンの簡単な説明です。
- Jump to start of timeline(
 ):
):
タイムラインの先頭にジャンプします。 - Jump to previous marker(M<<):
現在のカーソル位置に基づいて前のマーカにジャンプします。 - Stop(
 ):
):
タイムコード・ショーを停止します。 - Pause (
 ):
):
タイムコード・ショーの再生を休止します。 - Play(
 ):
):
タイムコード・ショーの再生モードを有効にします。タイム信号をリッスンし、記録されたイベントを再生できるようになります。 - Jump to next marker(>>M):
これをタップすると、現在のカーソルの位置に基づいて次のマーカにジャンプします。 - Jump to end of timeline(
 ):
):
これをタップすると、タイムラインの最後にジャンプします。 - Record(
 ):
):
記録モードを有効にします。タイムコード・ショーへのエクゼキュータ・イベントの自動記録が可能になります。
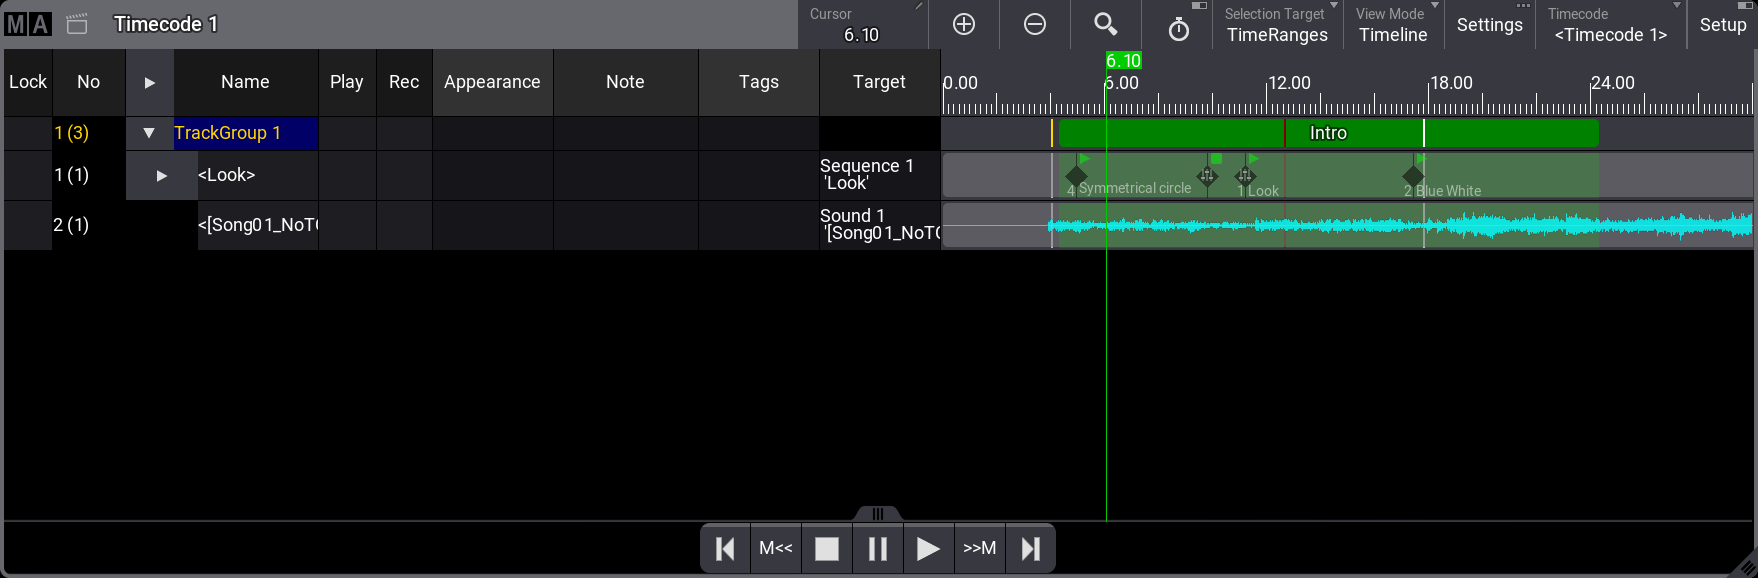
View Mode
Timecode Viewer は、2つの主な表示モード(Text と Timeline)と、これら2つの組み合わせである3番目の表示モード(Both)があります。
モードが変わってもウィンドウの左側は変わりません。常にトラックグループとトラックが表示されています。
左側には以下のがあります。
- Lock:
トラックやトラックグループをロックできます。 - No:
トラックグループまたはトラックの番号です。 - Name:
トラックグループ、トラック、およびサブトラックの名前です。 - Play:
トラックやトラックグループの再生を無効にできます。セルが空の場合、トラックは再生されます。セルを編集すると、トラックが再生されていないことを示す色付きのアイコンが追加されます。

- Rec:
トラックやトラックグループへの新しいイベントの記録を禁止できます。セルが空の場合、新しいイベントの記録や上書きが可能です。セルを編集すると、記録モードが有効なときにトラックが変更から保護されていることを示す色付きアイコンが表示されます。

- Appearance:
トラックやトラックグループのアピアランスを設定できます。詳しくは the アピアランス を参照してください。 - Note:
トラックやトラックグループに注記を追加できます。詳しくは ノート を参照してください。 - Tags:
トラックやトラックグループにタグを追加できます。このセルを編集すると、Edit Tags ポップアップが開きます。詳しくは タグ を参照してください。 - Target:
トラックにはターゲット・オブジェクト(通常はシーケンス、サウンド、プリセット、グループ、マスター)へのリンクが必要です。このセルを編集すると、Assignment Editor ポップアップが開きます。
View Mode - Text
Text モードでは、イベント、トラック、および マーカがウィンドウの右側にスプレッドシート形式で表示されます。
Text Mode 設定では、表示される情報を指定します。詳しくは 後述 を参照してください。
4つの異なるモードがあり、マーカ、イベント、および タイム範囲を表示できます。
Selection Target という設定は、Text モードのビューアでの表示内容に大きく影響しますので注意してください。Selection Target は Events または TimeRanges を選択できます。詳しくは 後述 を参照してください。
- All:
Selection Target が Events の場合、すべてのトラックにあるすべてのイベントがビューアに表示されます。
Selection Target が TimeRanges の場合、すべてのトラックにあるすべてのマーカとタイム範囲がビューアに表示されます。 - Tracks:
Selection Target が Events の場合、選択されているトラック内のすべてのイベントがビューアには表示されます。
Selection Target が TimeRanges の場合、選択されているトラックのマーカとタイム範囲がビューアに表示されます。 - Selected:
Selection Target が Events の場合、選択されているイベントがビューアに表示されます。
Selection Target が TimeRanges の場合、選択されているマーカとタイム範囲がビューアに表示されます。 - Markers:
選択されているトラックグループに対するすべてのマーカが表示されます。
デフォルトでは、View Mode、Text Mode、および Selection Target はタイトルバーのボタンになります。
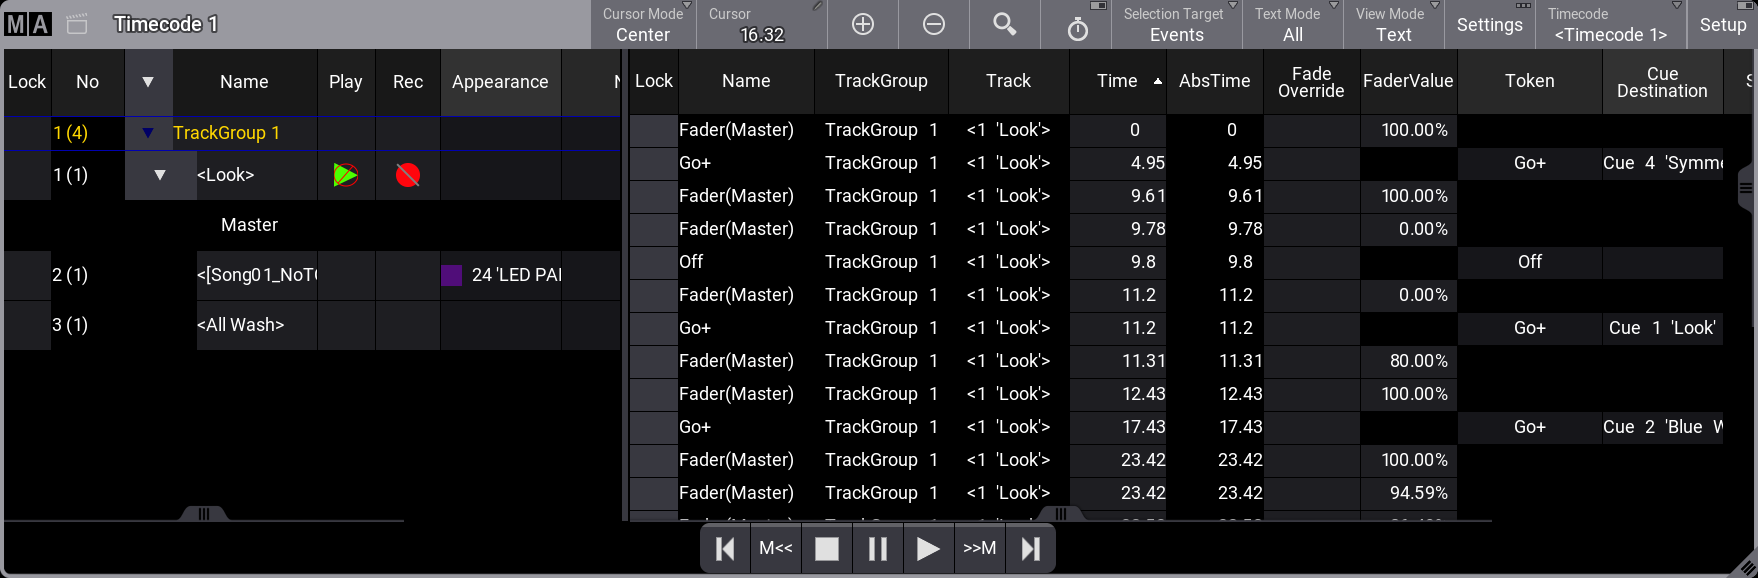
Text モードで可能な列は以下の通りです。
- Lock:
行をロックできます。 - Name:
要素の名前です。Event 要素の名前は編集できません。 - TrackGroup:
要素のトラックグループを表示します。 - Track:
トラックを表示します。 - Appearance (タイム範囲):
タイム範囲とマーカのアピアランスです。 - Note (タイム範囲):
タイム範囲とマーカに注記を追加できます。 - Tags (タイム範囲):
タイム範囲とマーカのタグを追加・編集できます。 - Start (タイム範囲):
タイム範囲の開始タイムを編集できます。 - Duration (タイム範囲):
タイム範囲の長さを編集できます。 - Speed Factor (タイム範囲):
タイム範囲のスピード係数を変更できます。この値によって、タイム範囲のスケールが変わります。デフォルト値は1です。 - Time (イベント):
タイム範囲内のイベントの時間を報告します。これは編集可能です。 - AbsTime (イベント):
タイムコード・ショー内のイベントの絶対タイムを報告します。絶対タイムは、イベントがトリガーされる時間を示します。絶対タイムは、上述の Time とタイム範囲の開始時間を組み合わせたものです。タイム範囲の開始時間は、オフセットとして機能します。 - Fade Override (イベント):
これを用いて、タイムコード・ショーの再生時に、キュー・フェードタイムをオーバーライドするイベントのフェードタイムを指定できます。 - FaderValue (イベント):
フェーダを用いてトラックを記録する場合、その動きは0%〜100%のステップで記録されます。この列には、各ステップにおけるフェーダ値が表示されます。これを長押しすると電卓が開き、新しい値を設定できます。 - Token (イベント):
この列には、イベント再生時に実行されるアクションが表示されます。セルを長押しして Select Token アップを開くと、トークンを選択できます。 - Cue Destination (イベント):
上述の Token に関連するキューを指定できます。例えば、トークンが Go+ で、キューのデスティネーションが指定されていない場合、次に実行可能なキューがトリガーされます。キューのデスティネーションが指定されている場合、Go+ は指定されたキューをトリガーします。 - Status (イベント):
ステータスを持つトークンの状態を確認・編集できます。例えば、トークンが Flash の場合、オン/オフのステータスを用いて、Flash の動作を指定できます。 - Execute Command (イベント):
イベントの再生時にキュー・コマンドを実行するかどうかを指定します。この列のセルを長押しし、Yes または No に設定します。デフォルトは Yes です。
セルに "- - -" と表示されている場合、タイムコード・ショー内でキュー・コマンドの実行をユーザがオーバーライドできないことを示しています。キュー・コマンドは記録され、キュー内のコマンドを後で変更してもタイムコード・ショーには反映されません。これは、Playback and Record 設定が All Events に設定されている場合にのみ有効です。
View Mode - Timeline
タイムコード・ショーがタイムラインとして表示され、トラックが行になり、イベント、マーカ、およびタイム範囲をタイムラインに表示できます。
View Mode - Both
タイムラインとテキストの両方が隣り合って表示されます。
ウィンドウ設定
ウィンドウ設定には、ビューアの右上隅にあるMAロゴやポップアップ・エディタの歯車アイコン(![]() )をタップしてアクセスできます。
)をタップしてアクセスできます。
一部の設定は非表示になっており、Edit Title Bar モードがオンになっていると表示されます。非表示の設定のほとんどは、タイトルバー用のボタン機能です。
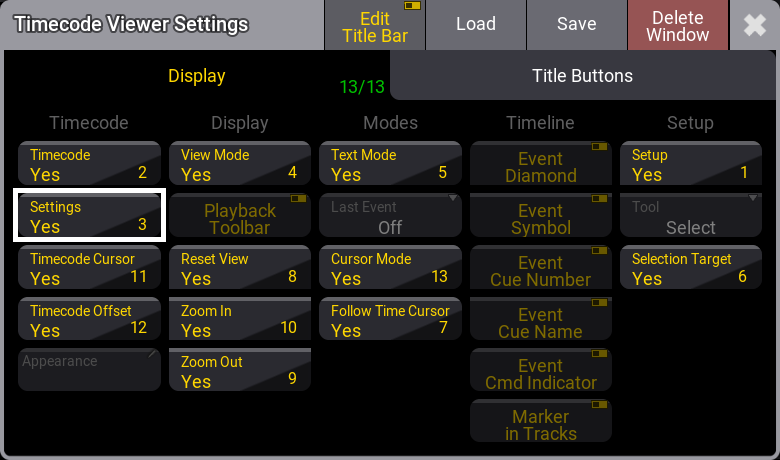
設定は、さまざまなセクションに分かれています。
Timecode
- Timecode:
ビューアに表示されるタイムコード・ショーを選択します。特定のタイムコード・ショーを選択することもできますが、"<Link Selected>" を用いると、選択したタイムコード・ショーを常にビューアに表示することもできます。ビューアは複数の View Modes を持つことができるため(前述を参照)、選択したタイムコード・ショーにリンクされた複数のビューアを表示し、それぞれ異なるモードでタイムコード・ショーを表示するという使い方も可能です。 - Settings:
タイトルバーにタイムコード・ショー設定を開くボタンがあるかどうかを切り替えます。 - Timecode Cursor:
The title bar can have a Cursor input field. タイトルバーにカーソル入力欄を追加できます。ここには現在のカーソル位置が表示されます。タップすると電卓が開き、新しいカーソル位置を入力できます。タイムコード・ソースがタイムコード・スロットの場合、そのfps(フレーム/秒)が小さな四角形内に表示されます。例えば、タイムコード・スロットが30fpsに設定されている場合、 アイコンが表示されます。
 - Timecode Offset:
タイムコード・ショーは、受信したタイムコード・ソースからのオフセットを設定できます。このオフセットは、タイトルバーの Offset TC Slot 入力欄に表示されます。これをタップすると、オフセットを設定できる電卓が開きます。オフセットは、タイムコード・ショー設定の一部です。 - Appearance:
これをタップすると Select Appearance ポップアップが開き、定義されているすべてのアピアランスと、新しいアピアランスを作成するオプションが表示されます。アピアランスを選択すると、それがウィンドウに適用されます。
Display
- View Mode:
これをタップすると、3種類の表示モードが切り替わります。長押しすると、小さな Select View Mode ポップアップが開きます。これで、ビューアの右側の表示が変わります。各表示モードについては、前述 を参照してください。- Text:
ビューの右側には、イベント、マーカ、タイム範囲が行列形式のテキスト・グリッドで表示されます。 - Timeline:
ビューの右側には、タイムコード・ショーのタイムラインが表示されます。トラックは行として表示され、イベント、マーカ、タイム範囲が時間に基づいてトラック上に表示されます。 - Both:
Text と Timeline の両方が右側に表示されます。
- Text:
- Playback Toolbar:
再生ツールバーはビューアの下部に表示されます。再生ツールバーについては 前述 を参照してください。 - Reset View(
 ):
):
タイトルバーに Reset View アイコンを表示するかどうかを切り替えます。このボタンをタップすると、Timeline 表示モードのズームレベルがリセットされます。 - Zoom In(
 ):
):
タイトルバーに Zoom In アイコンを表示するかどうかを切り替えます。このボタンをタップすると、タイムラインが拡大表示されます。 - Zoom Out(
 ):
):
タイトルバーに Zoom Out アイコンを表示するかどうかを切り替えます。このボタンをタップすると、タイムラインがズームアウトします。
Modes
- Text Mode:
View Mode が Text または Both の場合にビューアに表示される情報を指定します(前述 を参照)。 - Last Event:
タイムコード・ショーで最後に再生されたイベントを選択するかどうかを指定します。以下の選択肢があります。- Off:
最後に再生されたイベントは選択されません。 - Track:
選択したトラックで最後に再生されたイベントが選択されます。 - All:
どのトラックであっても、最後に再生されたイベントを選択します。
- Off:
- Cursor Mode:
タイトルバーの Follow Time Curcor ( )を有効にすると、タイムコードの実行中もカーソルが表示されます。以下の選択肢があります。
- Page:
外部タイム信号が入力されるか、卓によって生成されると、カーソル(緑のタイムライン)はタイムラインの表示領域の終わりまで移動します。その後、タイムラインの新しいセクションが表示されます。カーソルは新しいセクションの先頭から末尾まで移動し、タイムコードが停止するまでこれを繰り返します。 - Center:
外部タイム信号が入力されるか、卓によって生成されると、カーソル(緑のタイムライン)はタイムラインの表示領域の中央まで移動します。タイムラインはカーソルを画面の中央に保つように移動を開始します。これがデフォルトの設定です。
- Page:
- Follow Time Cursor():
タイトルバーのアイコンの表示/非表示を切り替えます。
Timeline
タイムコード・タイムラインのさまざまな要素の表示・非表示を切り替えます。詳しくは、イベント および マーカ を参照してください。
- Event Diamond:
オンに切り替えると、タイムラインにイベント・ダイヤマークが表示されます。 - Event Symbol:
オンに切り替えると、タイムライン上のイベントの横に緑のイベント・アイコンが表示されます。 - Event Cue Number:
オンに切り替えると、タイムライン上のイベントの横にキュー番号が表示されます。 - Event Cue Name:
オンに切り替えると、タイムライン上のイベントの横にキュー名が表示されます。 - Event Cmd Indicator:
オンに切り替えると、タイムライン上のイベントの上や横にコマンド・インジケータが表示されます。 - Marker in Tracks:
オンにすると、トラックグループ内のすべてのトラックにマーカが表示されます。オフにすると、マーカはトラックグループ・セクションにのみ表示されます。
Setup
- Setup:
ビューアの Setup モードを切り替えます。Setup モードでは、タイムコード・ショーを編集できます。 - Tool:
このスワイプボタンをクリックすると、左側のツールバーにあるものと同じツールのリストが開きます(前述 を参照)。このボタンで必要なツールを選択できます。前述のツールに加えて、Operate という追加オプションがあります。これはツール機能ではありませんが、他のツールが選択されないようにするために使用できます。 - Selection Target:
Events または Time Ranges にフォーカスを移動します。詳しくは 前述 を参照してください。
タイムコード・エンコーダバー
Timecode Viewer で Setup が有効になってフォーカスされている場合、またはタイムコード・ポップアップ・エディタが開いている場合、エンコーダバーはタイムコード・エンコーダバーに変わります。

一番上の行には、再生ツールバー と同じボタンがあります。詳しくは 前述 を参照してください。
エンコーダには以下の機能があります。
- Cursor:
エンコーダを回すとカーソル位置を変更できます。回しながら押すとカーソルが速く移動します。エンコーダを短く押すと電卓が開き、特定のカーソル位置を入力できます。 - Marker:
エンコーダを回すと、選択したトラックグループ内のマーカ間を移動できます。エンコーダボタン(エンコーダの横)を押すと、小さな Select Marker ポップアップが開きます。 - Track:
エンコーダを回してトラックやトラックグループを選択します。エンコーダを短く押すと、小さな Select Track ポップアップが開きます。 - TimeRange:
回転して、選択したトラックやトラックグループ上の異なるタイム範囲を選択します。 - Event:
2つのエンコーダのいずれかを回して、選択したトラックやトラックグループ上の異なるイベントを選択します。内側のエンコーダを短く押すと、小さな Select Token ポップアップが開きます。 ここでトークンを変更したり、フェーダ位置を指定する電卓(選択したオブジェクトがフェーダ・イベントの場合)を使用したりできます。エンコーダの横にあるエンコーダボタンを押すと、小さな「Select Event(イベント選択)」ポップアップが開きます。 - Start:
イベントが選択されている場合、エンコーダを回すとタイムライン上のイベントが移動します。
タイム範囲やマーカが選択されている場合、エンコーダを回すと要素の開始点が移動します。 - Duration:
エンコーダを回してマーカやタイム範囲の長さを調整します。