エクゼキュータへのオブジェクト割り当て
| grandMA3 ユーザマニュアル » エクゼキュータとは » エクゼキュータへのオブジェクト割り当て | Version 2.2 |
多くのオブジェクトをエクゼキュータに割り当てられます。エクゼキュータは、割り当てられたオブジェクトを制御する物理的なキー、フェーダ、またはノブです。物理デバイスは、画面上のコントローラとして表すこともできます。
| クイックステップ | |
|
キーとプールによるオブジェクト割り当て
エクゼキュータに何かを割り当てるのは簡単です。
Assign を押してから目的のオブジェクトを押し、そして割り当てたいエクゼキュータを押してください。
以下のように、3通りの方法があります。例ではシーケンスを用いていますが、許可されているタイプならどれでも可能です。
例1
キー操作だけで、現在のページのエクゼキュータ105にシーケンス3を割り当てます。
Assign Sequ 3 At MA + X16 | Exec 1 0 5 Please
例2
画面にプールが表示されている場合、プールの選択にキー操作を組み合わせることによっても、割り当てることできます。
- 割り当てたい Sequence プール・オブジェクトをタップしてスワイプアウトします。
- Swipey コマンドの Assign に指を移動して離します。
- 目的のエクゼキュータに関連付けられているキーの1つを押してください。
例3
キーを押すとコマンドラインにキーワードが入力されますので、コマンドラインからも行えます。
| User name[Fixture]>Assign Sequence 4 At Page 2.301 |
このコマンド例では、シーケンス4をページ2のエクゼキュータ301に割り当てています。特定ページのエクゼキュータをアドレス指定する場合は、Page キーワードが必要です。また、そのページが存在していなければなりません。
Assign メニューによるオブジェクト割り当て
Assign メニューは、エクゼキュータに何かを割り当てるための視覚的なアプローチを提供します。最初にエクゼキュータを選択してから、オブジェクトを選択してください。
Assign メニューを開くには、主に二通りの方法があります。
- Assign を押してから、目的のエクゼキュータに関連付けられているキーの1つを押します。
― または ―
- ミニエクゼキュータバー でエクゼキュータ・ラベルをタップします(長押ししないでください - 代わりにエディタが開いてしまいます)。
タイトルバーには、Lock Exec という切り替えボタンがあります。これによって、エクゼキュータを変更からロックできます。これはエクゼキュータへの変更を防ぐだけで、再生や他の機能の実行は通常通り可能です。
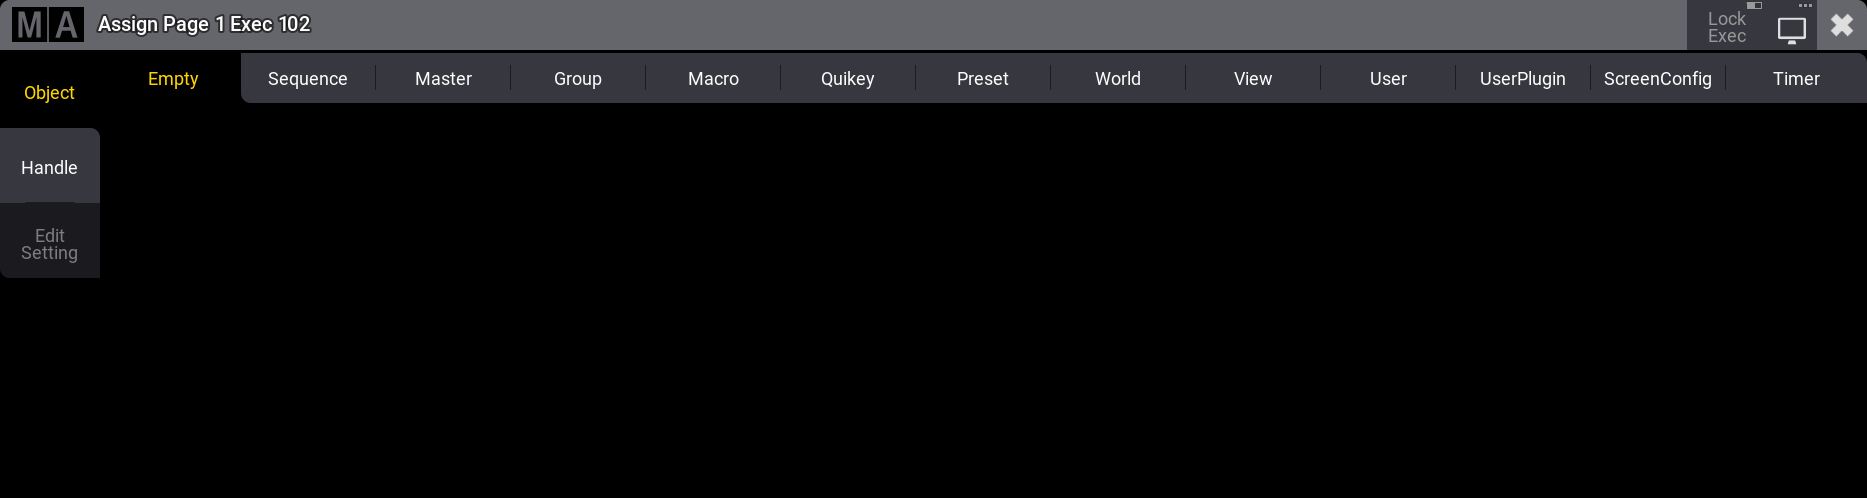
これは、Assign メニューの Object ページです。左側で Object をタップすると、このページが選択されます。
上部には、エクゼキュータに割り当て可能なオブジェクト・タイプごとのタブと、空のオブジェクトを選択するための特別な Empty タブがあります。Empty 以外のタブでは、そのタイプの選択可能なオブジェクト一覧が開きます。
オブジェクト・タイプには以下のものがあります。
可能なシーケンスの一覧を開くには、Sequence をタップしてください。
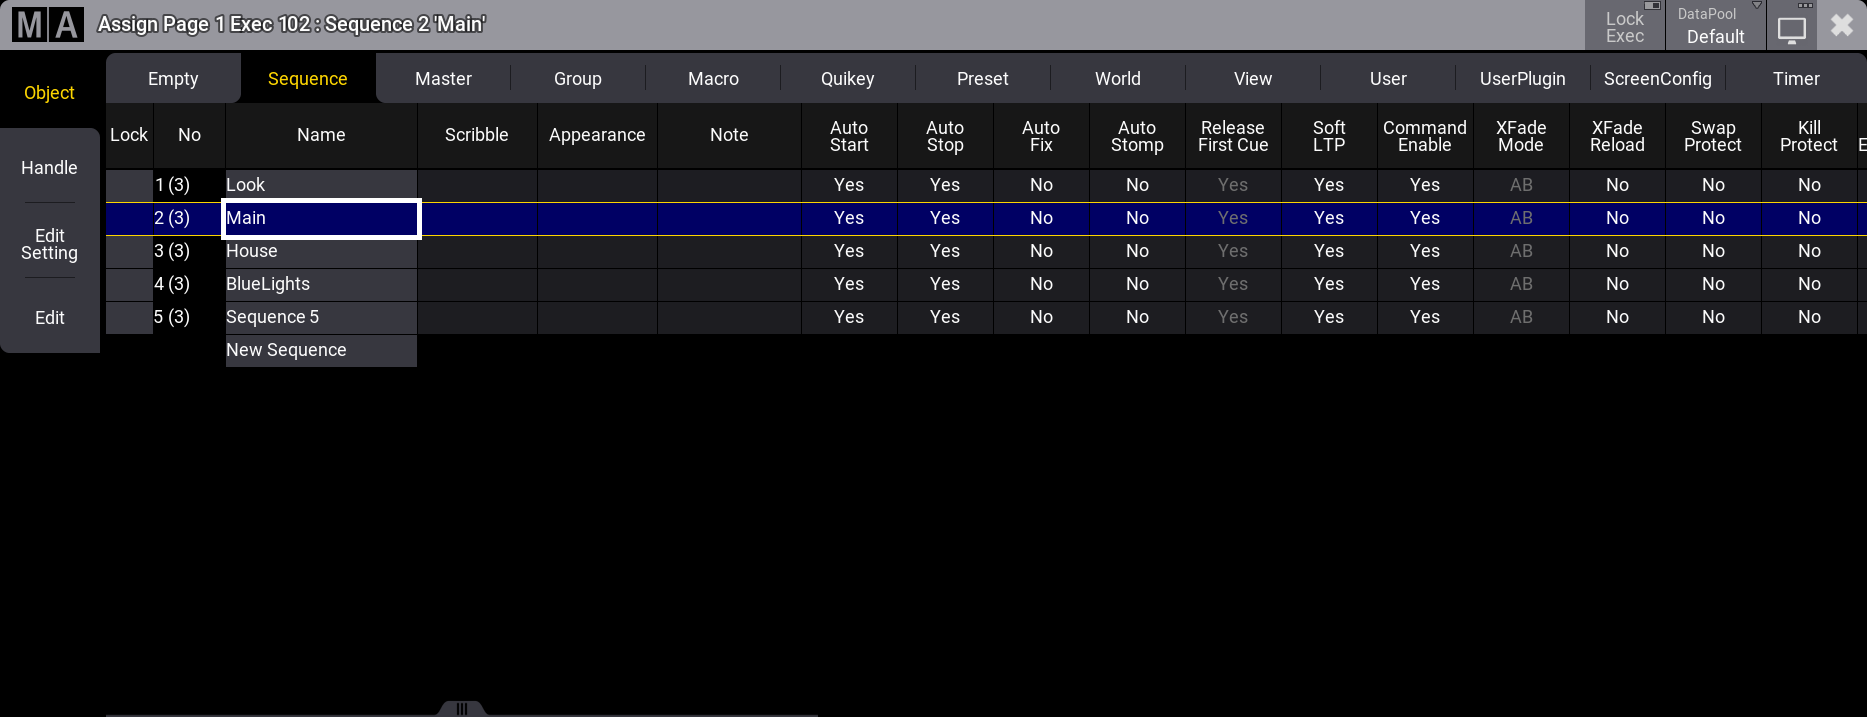
エクゼキュータに割り当て可能なタイプでは、それぞれで利用可能なオブジェクトの一覧が表示されます。タイトルバーの DataPool ボタンを用いると、別のデータプールからオブジェクトを簡単に選択できます。
目的のオブジェクトをタップして選択してください。
デフォルトのハンドル構成が、エクゼキュータに適用されます。これにはエクゼキュータの拡張も含まれ、Handle ページで定義できます。
キー機能とエクゼキュータ・サイズの変更
エクゼキュータに何かが割り当てられている場合、エクゼキュータ・キー、フェーダ、およびノブに割り当てられている機能を変更できます。
Assign メニューで引き続き作業する場合は、左側の Handle をタップしてください。
以下のような画面になります。
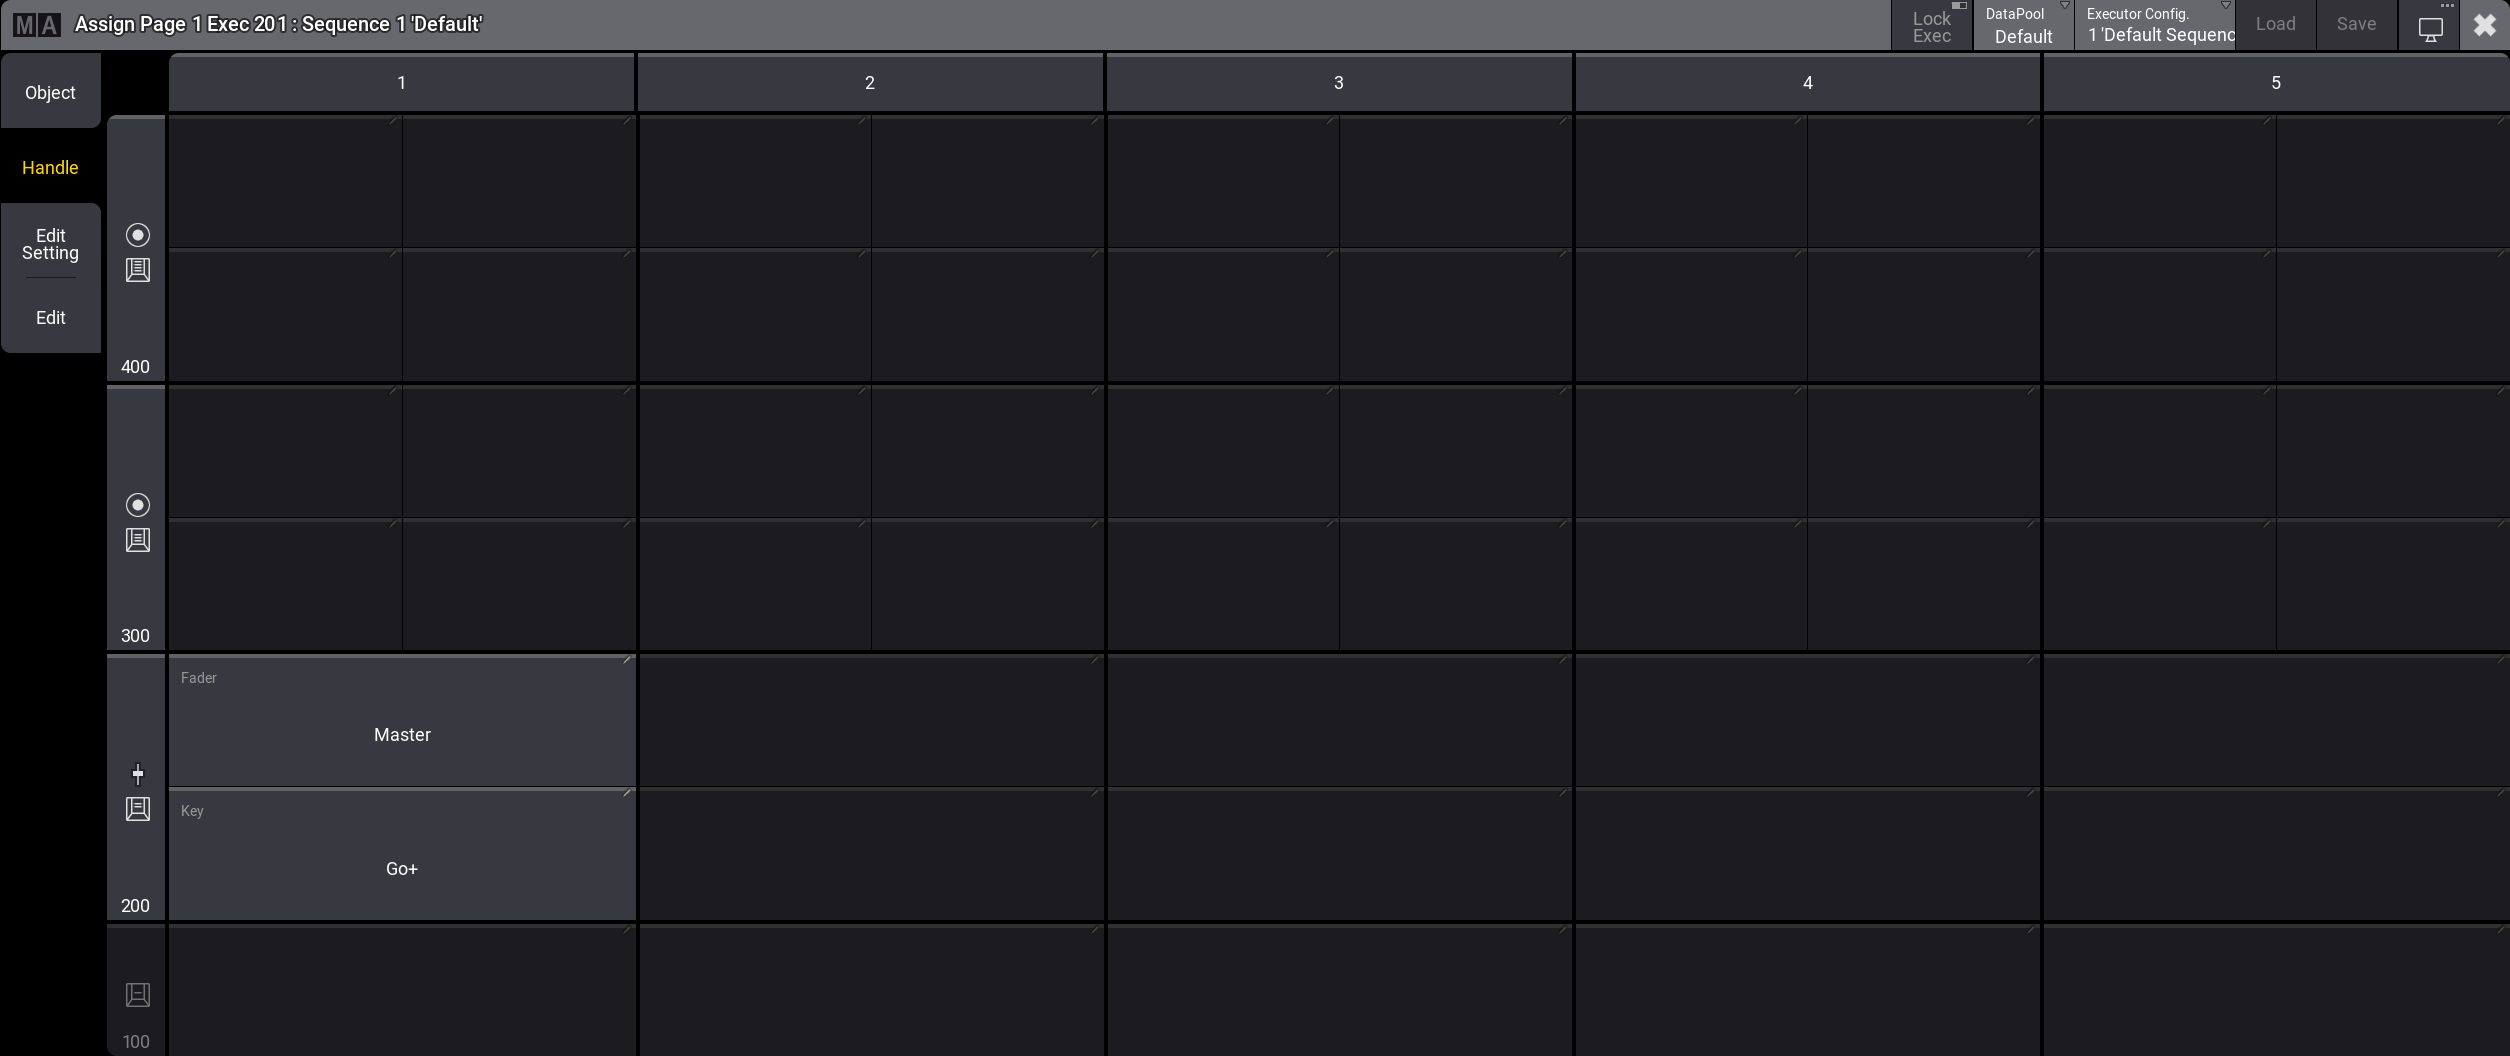
エクゼキュータの上側や右側が空いている場合、そのエクゼキュータを拡張できます。エクゼキュータは5列幅のセクションにグループ化されています。これらのグループは互いに交差できません。例えばエクゼキュータ104や105は、106に拡張できません。
余裕があれば、上側にも拡張できます。上の画面例では、エクゼキュータ102の上側および右側に余裕があります。このエクゼキュータは、4列すべてを覆う幅と、4行すべてを覆う高さにまで拡張できます。
エクゼキュータは、上部の列番号や左側の行番号をタップすることで拡張できます。拡張されると、エクゼキュータで利用できるボタンが増えます。
100 の行には、単独のエクゼキュータ・ボタンしかありません。200 の行には、ボタンとフェーダがあります。300 と 400 の両方の行には、ボタンとエンコーダ・ノブがあります。エクゼキュータが4行すべてに拡張されていると、以下のようになります。
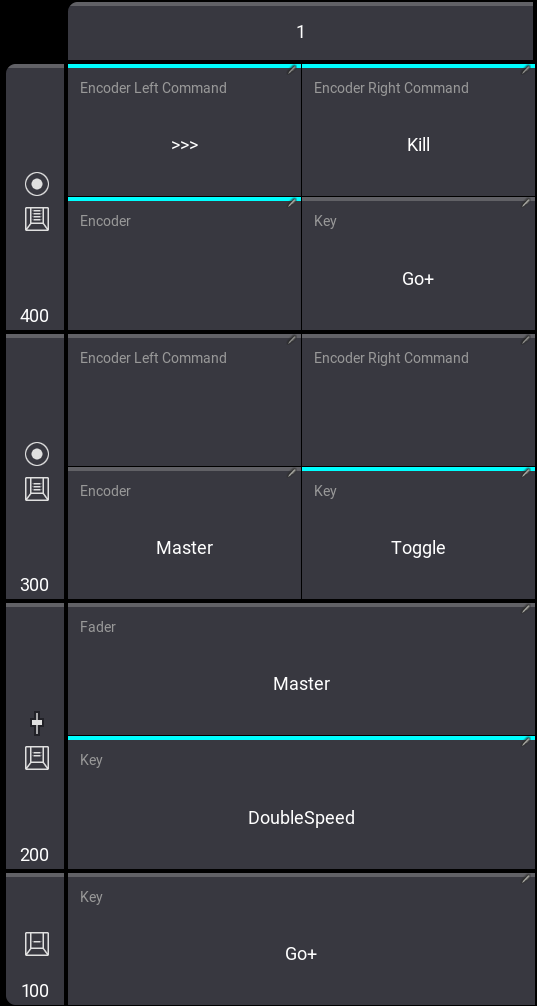
キー、フェーダ、およびエンコーダには、種々の機能を割り当てられています。オプションは、エクゼキュータに割り当てられたオブジェクトによって異なる場合があります。
有効なボタンをタップすると、利用可能なオプションを備えた小さな選択ポップアップが出ます。
Encoder Left Cmd と Encoder Right Cmd で開くポップアップでは、任意のコマンドを入力できます。MA キーを押しながらエンコーダ・ノブを回すと、別コマンドを指定することもできます。
| ヒント | |
| エンコーダ・コマンドは、通常のエンコーダ機能と互いに排他的です。上の画面例では、300 の行にはエンコーダ機能のみがあり、400 の行には Encoder Left Command と Encoder Right Command のみがあります。いずれかのコマンドを編集すると、エンコーダがクリアされます。エンコーダ機能を編集すると、両方のコマンドがクリアされます。 |
通常のキーには以下の選択肢があり、Playback ウィンドウ にアイコンが表示されます。
- Empty:
キーは機能しません。 - At:
プリセットとともに用います。割り当てられているプリセットで At コマンド を実行します。エクゼキュータ上のプリセットについては、プリセットの利用 を参照してください。 - <<< (GoFastBackward):

キュー・タイミングなしで、1つ前のキューに移ります。 - >>> (GoFastForward):

キュー・タイミングなしで、1つ後のキューに移ります。他のキューはトリガーしません。 - Black:
ボタンを押している間、エクゼキュータのインテンシティがオフになります。 - DoubleSpeed:

Speed マスターの結果スピードが2倍になります。 - Call:
画面構成とともに用います。割り当てられている画面構成で Call コマンド を実行します。 - Flash:

ボタンを押している間、エクゼキュータがオンになり、仮想インテンシティ・マスターが100に設定されます。ボタンを離すと、押す前の状態に戻ります。 - Go+:

フェード/ディレイタイムを用いて "Go" を実行します。 - Go-:

フェード/ディレイタイムを用いて、逆にフェードします。 - Goto:

キューを選択できるポップアップが開きます。キューをタップすると Goto コマンド が実行され、そのキューがアクティブになります。 - HalfSpeed:

Speed マスターの結果スピードが半分になります。 - Kill:

このシーケンスをオンにし、他のすべてのシーケンスをオフにします。Sequence Settings で、シーケンスを Kill から保護できます。 - LearnSpeed:

Speed を設定します。少なくとも2回押すことで、Speed が自動的に調整されます。 - Load:

シーケンス内のキューを一覧表示するポップアップが開きます。キューをタップすると Load コマンド が実行され、次の Go コマンドで、選択したキューに移動します。 - LogIn:
ユーザが割り当てられている場合に用いられます。割り当てられているユーザで LogIn コマンド を実行します。 - Off:

エクゼキュータをオフにします。 - On:

エクゼキュータをオンにします。 - Pause:

アクティブなフェードやディレイを休止します。 - Rate1:

Rate フェーダをリセットします。 - Select:

エクゼキュータを選択します。 - SelectFixtures:
エクゼキュータに割り当てられたオブジェクトで使用されているフィクスチャを選択します。 - Speed1:

Speed フェーダをデフォルトにリセットします。 - Swap:

Swap は、エクゼキュータのマスターレベルを一時的にフルにオーバーライドし、他のすべてのマスターレベルをゼロにします。Sequence Settings で、エクゼキュータを Swap から保護できます。 - Time:
エクゼキュータの Time 機能が切り替わります。オンの場合、保存されているキューパートのタイムを上書きします。 - Temp:

押している間、エクゼキュータがオンになります。Temp 機能は、キューからのフェードタイムと、インテンシティ・マスターで設定されたレベルを用います。 - Toggle:

アクティブなエクゼキュータはオフに、非アクティブなエクゼキュータはオンになります。 - Top:

割り当てられているシーケンスの最初のキューにフェードします。
これらの主な機能はキーワードです。詳しくは 一般キーワード を参照してください。
機能は、キーやコマンドを用いて割り当てることもできます。その機能に対応する物理キーが無い場合は、キーボードでコマンドを記述することで割り当てられます。
キーの例
目的の機能に対応する物理キーがある場合、それをエクゼキュータ・キーに割り当てるのは簡単です。Assign を押してから、その機能キーを押し、そして割り当てたいエクゼキュータ・キーを押してください。
例1
例えば、Off 機能を、エクゼキュータ101に関連付けられたキーに割り当てるには、以下のようにキーを押します。
Assign Off - (卓の左下隅にあるエクゼキュータ・キー)
例2
Fix 機能をエクゼキュータ・キーに割り当てます。
Assign MA + Pause [目的のエクゼキュータ・キー]
コマンドの例
機能は、コマンドラインからも割り当てられます。
一般的な構文は以下の通りです。
Assign [機能] at [場所]
場所は、エクゼキュータ・ページに関連付けられている特定の物理キーでなければなりません。
例えば、Pause 機能を、エクゼキュータ・ページ8のエクゼキュータ5に関連付けられた上部キーに割り当てるには、以下のコマンドを入力します。
| User name[Fixture]>Assign Pause At Page 8.405 |
フェーダ機能の変更
エクゼキュータに割り当てられているオブジェクト・タイプによっては、フェーダの機能を変更できる場合があります。変更は、Assign メニューの画面上で対応するボタンをタップすることで、エクゼキュータ・キーと同じように行えます(上述を参照)。
Select Fader ポップアップには以下の選択肢があります。
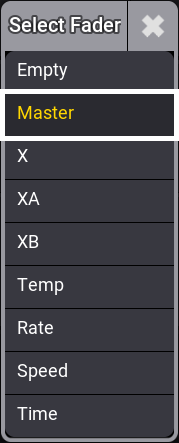
- Master:
インテンシティを制御します。詳しくは FaderMaster キーワード を参照してください。 - X (CrossFade):
現在キューと次キューとの間でクロスフェードします。フェーダが、開始位置から他方の終端位置に達すると、現在のキューが変わります。詳しくは FaderCrossFade キーワード を参照してください。 - XA (CrossFadeA)
2つのキュー間を手動クロスフェードさせる2本のフェーダのうち最初のものです。XFadeB とともに動作します。クロスフェード機能は、Sequence Settings で変更できます。詳しくは FaderCrossFadeA キーワード を参照してください。 - XB (CrossFadeB)
2つのキュー間を手動クロスフェードさせる2本のフェーダのうち2番目のものです。XFadeA とともに機能します。クロスフェード機能は、Sequence Settings で変更できます。詳しくは FaderCrossFadeB キーワード を参照してください。 - Temp:
上げたときにキューをオン、下げたときにキューをオフへとクロスフェードします。詳しくは FaderTemp キーワード を参照してください。 - Rate:
シーケンスのフェード/ディレイタイムをフェーダ値で変更します。Speed from Rate がオンの場合、キューに保存されているフェイザー・スピードに対しても有効になります(Sequence Settings を参照)。詳しくは FaderRate キーワード を参照してください。 - Speed:
キューのフェイザー・スピードを制御します。詳しくは FaderSpeed キーワード を参照してください。 - Time:
Executor Time の上書きタイムを設定します。詳しくは FaderTime キーワード を参照してください。
機能は、コマンドラインからも割り当てられます。
構文はキー機能の場合と同様です(Empty を除く)。以下の例を参考にしてください。
例
例1
Rate 機能を、現在のページの得た209に割り当てます。
| User name[Fixture]>Assign FaderRate At Executor 209 |
例2
Empty 機能をエクゼキュータ・フェーダに割り当てる場合は構文が異なります。この例では、ページ1の左端のフェーダに Empty を割り当てています。
| User name[Fixture]>Set Page 1.201 Property "Fader" "Empty" |
キーおよびフェーダ割り当ての保存
キーやフェーダ機能の現在の割り当ては、Executor Configuration プールに保存できます。詳しくは Executor Configurations を参照してください。