クローンによる値の転送
| grandMA3 ユーザマニュアル » フィクスチャの操作 » クローン » クローンによる値の転送 | Version 2.2 |
クローンに関する一般的な事柄については、まず クローン を参照してください。
Clone ウィンドウ
Clone ウィンドウを開くには、以下のいずれかを行ってください。
- MA + X1 を押してから Please を押します。
- コマンドラインに clone と入力して Please を押します。
- コマンドラインにショートカットの clo を入力して Please を押します。
Clone ウィンドウが開きます。
Clone ウィンドウは、以下の領域に分かれています。
- 左側: クローン・ソース。
- 右側: クローン・デスティネーション。
- 中央: オブジェクト・ボタンバー。詳しくは ショーデータのクローン化 を参照してください。
|
|
重要 |
| 各領域は、画面をタップすることで個別にフォーカスできます。白い枠は、現在フォーカスされている領域を示します。 |
フィクスチャの追加
フィクスチャを Clone Source に設定するには、以下のようにします。
- プログラマでフィクスチャを選択します。詳しくは フィクスチャの選択 を参照してください。
- 左側の Clone Source にある Add Selection をタップします。フィクスチャが設定されます。各側のフィクスチャ総数は、括弧内の数字で示されます。
― または ―
- Clone Source にフォーカスします。
- 左端のツール領域にある
 をタップします。ポップアップが開きます。
 - ポップアップでフィクスチャまたはグループを選択します。
- Add をタップすると、フィクスチャが設定されます。
|
|
ヒント |
| 卓の場合、2本指編集操作でフィクスチャを追加します。 |
クローン・リスト全体をクリアするには、以下のようにします。
- Clear List をタップします。
Clone Source でフィクスチャを置き換えるには、以下のようにします。
- 置き換えたいフィクスチャをタップしたままドラッグして選択します。選択されたフィクスチャは、青で強調表示されます。
- 強調表示されている領域を2本指編集します。ポップアップが開きます。
- 置き換えるフィクスチャをポップアップで選択します。選択されたフィクスチャは、青で強調表示されます。
- Replace をタップすると、選択したフィクスチャが置き換えられます。
|
|
ヒント |
| Clone Destination にフィクスチャを設定する場合も、上で述べた手順で行えます。 |
セレクションのフィクスチャを整理するには、Clone ウィンドウの左側にある以下のツールを使用します。
 : フォーカス側から選択したフィクスチャをコピーします。
 : 選択したフィクスチャをフォーカス側に貼り付けます。
 : フォーカス側から選択したフィクスチャを切り取ります。
- : Add Fixtures ポップアップを開きます。
 : フォーカス側から選択したフィクスチャを削除します。
 : フォーカス側から選択したフィクスチャを上に移動します。
 : フォーカス側から選択したフィクスチャを下に移動します。
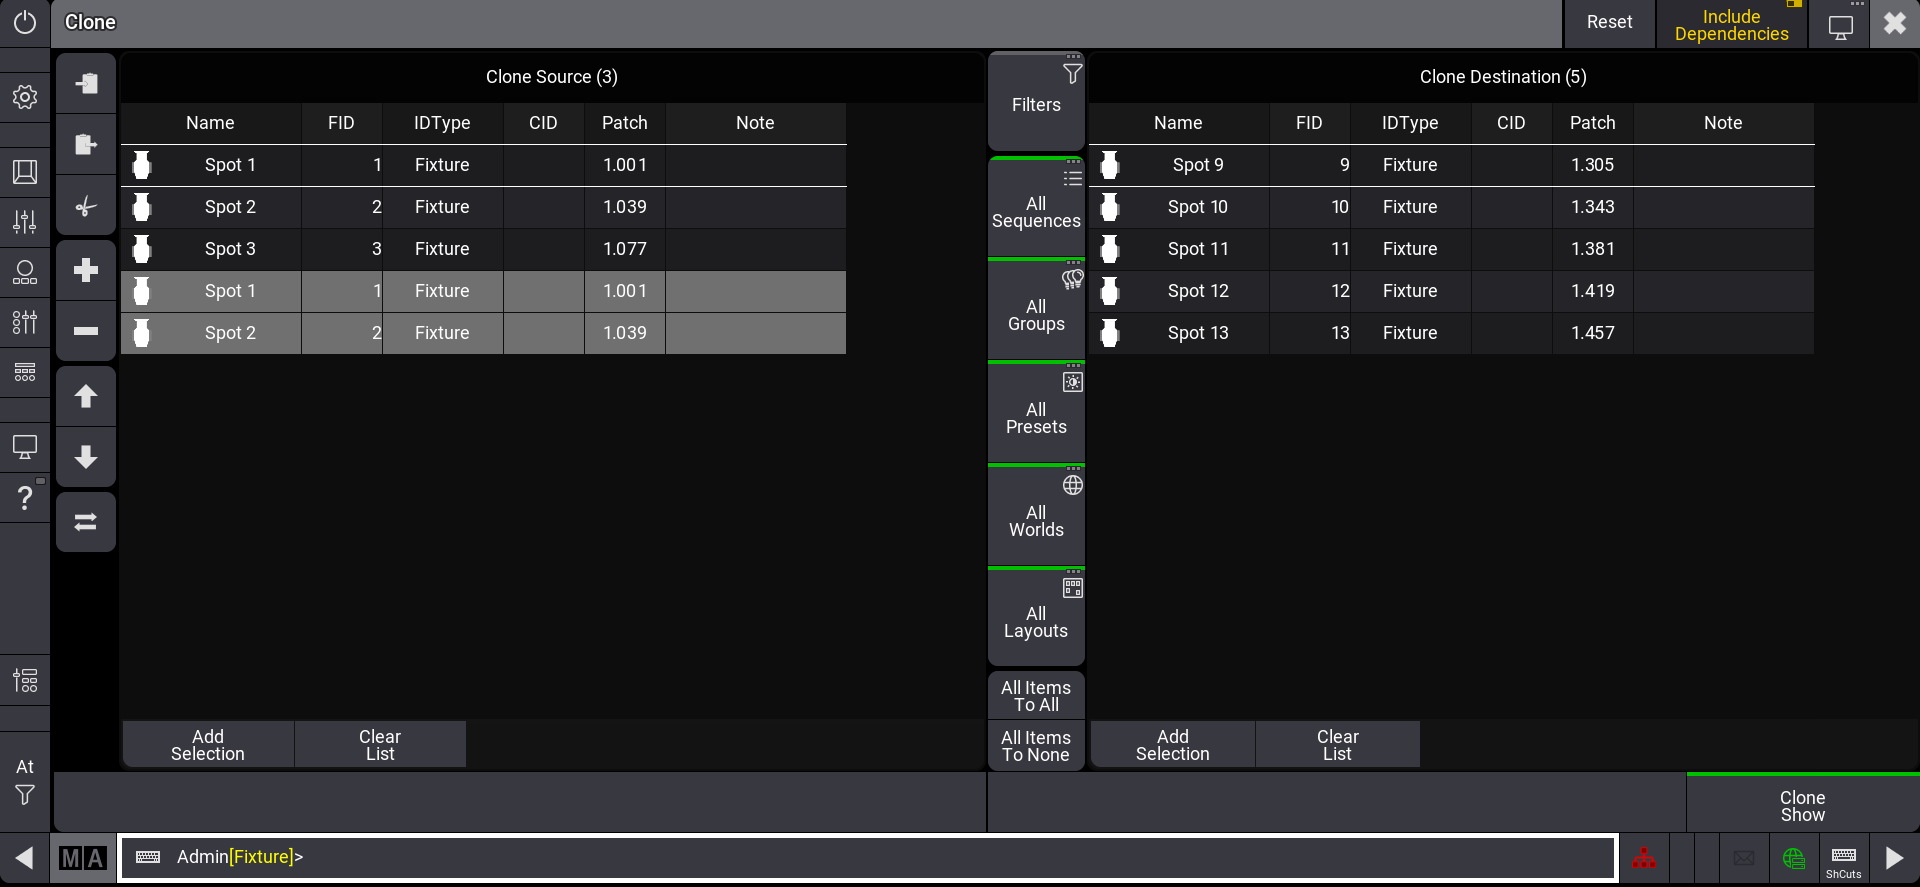
フィクスチャ・セレクションは、Clone ウィンドウの両側で同期されます。Clone Source の最初の行は、Clone Destination の最初の行を対象として使用します。
例
下の画面例では、フィクスチャ1がフィクスチャ9の、フィクスチャ2がフィクスチャ10のクローン・ソースとして設定されています。
一方の側のフィクスチャがもう一方より少ない場合、フィクスチャ数が少ない側が自動的に調整されます。調整されたフィクスチャは灰色背景になります。
Clone ウィンドウでプログラマ値をクローン化
プログラマ値についてのみフィクスチャ間で値をコピーするには、以下の2つの方法があります。
- コマンドライン入力で At キーワードを利用できます。詳しくは At キーワード を参照してください。
- または、コマンドライン入力で Clone キーワードを用います。詳しくは Clone キーワード を参照してください。
Clone キーワードを実行した場合、Clone ウィンドウが開きます(例: Clone Fixture 1 At Fixture 2)。
- Clone コマンドを直接実行するには、If キーワードを用います。例えば、コマンドライン入力に Clone Fixture 1 At Fixture 2 If Programmer と入力すると、Clone ウィンドウは開かずに、Priority ポップアップが開きます。詳しくは If キーワード を参照してください。
- Clone ウィンドウや Priority ポップアップを開かずに Clone コマンドを実行するには、/NoDependencies オプション・キーワードを用います。コマンドは低優先度で実行されます。詳しくは /NoDependencies を参照してください。
例
必要条件:
- grandMA3 デモショー・ファイルを読み込んで、Clone ウィンドウを開く。
Clone ウィンドウを用いて、プログラマでフィクスチャをクローン化するには、以下のようにします。
- 上で述べた手順で、Clone Source と Clone Destination 領域にフィクスチャを追加します。
- 中央のオブジェクト・ボタンバーにある All Items To None をタップします。右下隅のボタンが Clone Programmer に切り替わり、オブジェクト・ボタンのインジケータバーが灰色になります。
- Clone Programmer をタップすると、フィクスチャ値がクローン化されます。
|
|
ヒント |
| プログラマ値のみのクローン化の場合、オブジェクト・ボタンと Clone ボタン上部のインジケータバーが灰色になります。詳しくは ショーデータのクローン化 を参照してください。 |
|
|
ヒント |
| プログラマ値のみをクローン化する場合、Include Dependencies は効果がなく、ボタンはグレー表示になりiます。詳しくは Import / Export の Include Dependencies を参照してください。 |
ショーデータのクローン化
以下の動画は、ユーザインターフェースを用いたショーデータのクローン化について示しています。
オブジェクト・ボタンは、ウィンドウの中央にバーの形で表示されます。オブジェクト・ボタンは、以下のオブジェクトに対し、フィルタによって現在のクローン化処理を制限します。
- Sequences
- Groups
- Presets
- Worlds
- Layouts
- At Filter や Filter プールも利用できます。詳しくは At Filter または Filters を参照してください。
オブジェクトの選択項目に応じて、オブジェクト・ボタン上部のインジケータバーの色が変わります。
- 緑: すべてのオブジェクト項目がクローン化されます。
- 黄色: 選択したオブジェクト項目のみがクローン化されます。Clone Show ボタンが Clone Selected Objects に変わります。
- 灰色: オブジェクト項目はクローン化されません。
|
|
ヒント |
| オブジェクトに項目が含まれていない場合、オブジェクトのインジケータバーは灰色になります。 |
クローン化処理を制限するには、以下のようにします。
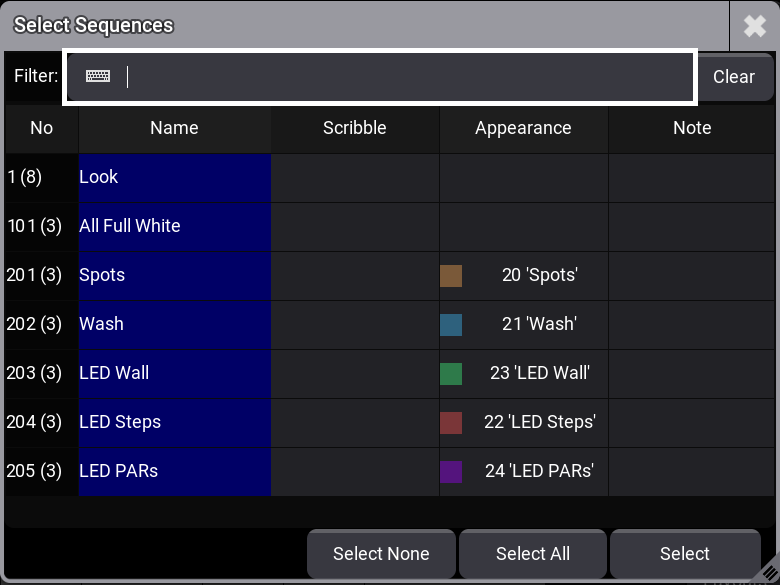
- オブジェクト・ボタン(例: All Sequences)をタップします。ポップアップが開きます。
- シーケンスを選択して Select をタップします。ポップアップが閉じます。
クローン化処理が、選択したオブジェクトに制限されています。
- 特定のオブジェクトの全項目を無効にするには、ポップアップで Select None をタップします。
- 特定のオブジェクトの全項目を有効にするには、All Items To All をタップします。
- すべてのオブジェクトの全項目を選択するには、オブジェクト・バーの All Items To All をタップします。Clone コマンドを実行するには、Clone Show をタップしてください。