OSC (Open Sound Control)
| grandMA3 ユーザマニュアル » リモート入出力 » OSC (Open Sound Control) | Version 2.2 |
OSC (Open Sound Control)は、受信側サーバ内の要素のアドレス指定に使用されるメッセージ・アドレスパターンを指定するクライアント/サーバ・システムです。OSCを使用すると、異なる種類のデバイスがピアツーピア・メッセージング・プロトコルを介して他のデバイスを制御できます。OSCメッセージは、人が読める形式であり、単なる数字や文字列ではありません。MSC (MIDI Show Control) などとは異なります。
grandMA3 ソフトウェアは、 OSC 1.1 をサポートしています。OSCパケットなど、OSCに関する一般的な情報については、https://ccrma.stanford.edu/groups/osc/spec-1_0.html. を参照してください。
OSCの構造
OSCメッセージは、特定のパターンに従います。
"(/プレフィックス)/[OSCアドレス],[OSCタイプ],[値]"
Prefix: これは、システム構成に依存するオプションです。より複雑なOSCネットワークにおいて、特定のデバイス(例: 照明卓)に向けたメッセージを、他のデバイス(例: 音響卓)に向けたメッセージと区別するために使用できます。プレフィックスが指定された場合、それで始まるOSCメッセージだけが処理され、その先頭にプレフィックスが付加されます。
| ヒント | |
| プレフィックスには、スラッシュ("/")を含めることはできません。 |
OSCアドレス: 受信デバイス上の制御対象です。例えば /Fader201 は、grandMA3 でエクゼキュータ201のフェーダを動かすためのアドレスになります。アドレスがより複雑になる場合もあります。例えば /Page1/Fader201 は、grandMA3 のページ1にあるエクゼキュータ201のフェーダを動かすためのアドレスになります。
| 制限 | |
| OSCパケットの送受信時には、OSCメッセージだけがサポートされます。OSCバンドル・メッセージは現在サポートされていません。 |
OSCタイプ - 送信する値の型です。例えば以下のようなものがあります。
i = integer
f = float
s = string
T = true
F = false
値: ターゲットに送信する値です。
以下は、エクゼキュータ201のフェーダを100に設定するOSCコマンドの例です。
- "/Page1/Fader201,i,100"
- "/gma3/Page1/Fader201,i,100" (プレフィックスで grandMA3 デバイスだけを指定)
OSC メニュー
OSC メニューを開くには、以下のようにします。
- Menu - In & Out - OSC を選ぶと、OSC メニューが開きます。
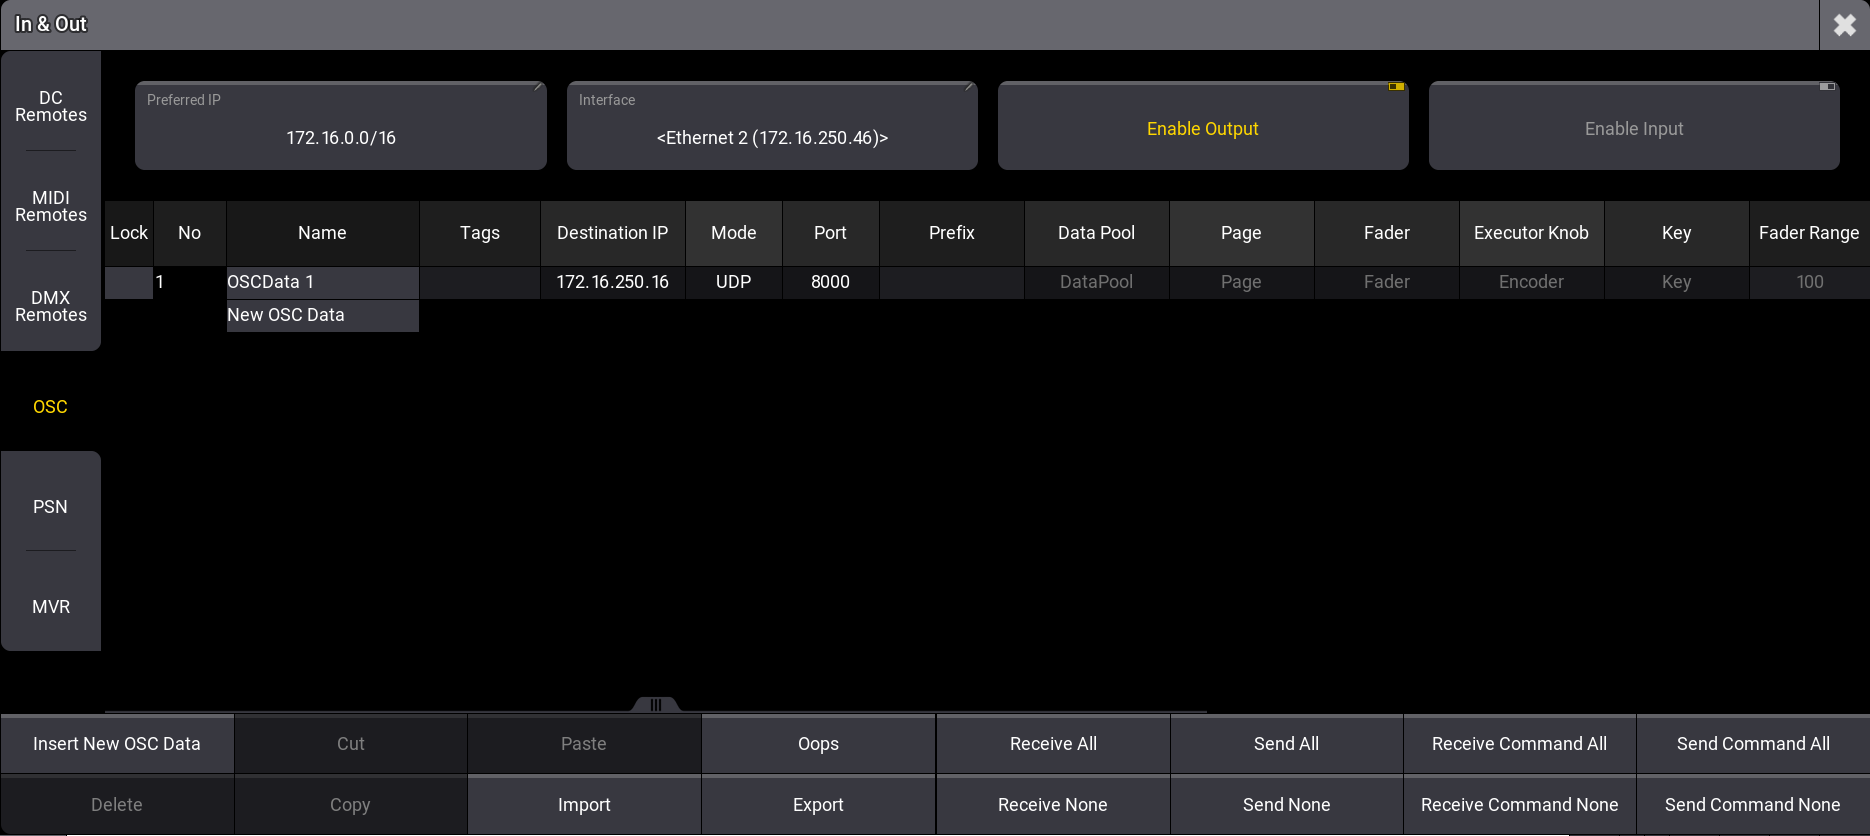
メニューの上部では、以下の4つのオプションを設定できます。
- Preferred IP: OSCプロトコルで優先して用いられるIPアドレスまたはアドレス範囲です。
- Interface: このボタンをタップすると Select Interface ポップアップが開き、目的のネットワーク・インターフェースを選択できます。詳しくは インターフェースとIP を参照してください。
- Enable Output: OSCを送信するには、このトグルボタンを有効にする必要があります。詳しくは Station Control を参照してください。
- Enable Input: OSCを受信するには、このトグルボタンを有効にする必要があります。詳しくは Station Control を参照してください。
| ヒント | |
| OSCメッセージを受信すると、Enable Input のタイトルバーが黄色に強調表示されます。OSCメッセージを送信すると、Enable Output のタイトルバーが強調表示されます。 |
OSC メニューで設定できる具体的なパラメータは以下の通りです。
- Name: この設定に対する名前を設定します。
- Destination IP: OSCデータを送信するためのIPアドレスを設定します。特定のIPアドレスまたはブロードキャストIPを設定できます。
- Tags: Tags Editor を開きます。
- Mode: OSCパケットは、UDPまたはTCPで送信できます。
- Port: OSCパケットの送受信に用いるネットワーク・ポートを指定します。
- Prefix: 必要に応じてプレフィックスを設定できます。プレフィックスは、受信可能な範囲を制限するための基準として利用できます。例えば、/lighting は、これを持つパケットだけを受け入れ、/sound というプレフィックスを持つOSCパケットは破棄します。
- Page: 受信OSCメッセージのどのOSCアドレスをページに送るかを指定します。
- Fader: 受信OSCメッセージのどのOSCアドレスをフェーダに送るかを指定します。
- ExecutorKnob: 受信OSCメッセージのどのOSCアドレスをミニエンコーダに送るかを指定します。
- Key: 受信OSCメッセージのどのOSCアドレスをキーに送るかを指定します。
- FaderRange: フェーダに対して用いられるOSC値の範囲を指定します。例えば、FaderRange 255 は、OSC 0〜255 を 100%に設定します。
- Receive: OSCデータ(コマンドは除く)を受信するかどうかを指定します。
- Send: このOSC設定が、OSCデータ(コマンドは除く)を送信するかどうかを指定します。
- Receive Command: コマンドラインのコマンドをOSCで受信するかどうかを指定します。この設定は、一般的な受信設定から独立しています。
- Send Command: コマンドラインのコマンドをOSCで送信するかどうかを指定します。この設定は、一般的な Send 設定から独立しています。
- EchoInput: 入力データを System Monitor に表示するかどうかを指定します。
- EchoOutput: 出力データを System Monitor に表示するかどうかを指定します。
- Note: この設定に対する注記を設定します。
Receive All、Receive None、Send All、Send None、Receive Command All、Receive Command None、Send Command All、Send Command None ボタンを用いると、すべてのOSC設定行に対して Receive、Send、Receive Command、および Send Command の各プロパティを一括変更できます。
OSCの受信
必要条件:
- ネットワーク接続が確立され、インターフェースが両方のデバイスにあること。詳しくは ネットワーク接続の有効/無効化 を参照してください。
- ネットワーク・プロトコル(UDP、TCP)とポートが正しく設定されていることを確認。ポート設定は、OSCデータの送受信に使用されることに注意ください。
| ヒント | |
| 送信と受信に異なるポートを使用する場合は、複数の設定行を作成できます。 |
例
以下は、grandMA3 light 卓でOSCパケットを受信する例です。
- In & Out メニュー / OSC を開きます。
- Enable Input をタップすると、入力が有効になります。
- グリッド内の Receive 下で最初の行を2本指でタップします。パラメータは Yes に設定されています。
| ヒント | |
| OSCメッセージを受信すると、Enable Input のタイトルバーが黄色で強調表示されます。 |
| ヒント | |
| 上の例では、プレフィックスが指定されていないことに注意してください。 |
その他の例については、高度な例 を参照してください。
コマンドラインの制御
grandMA3 のコマンドライン全体には、OSCアドレスに "/cmd" を指定し、OSCタイプに 's' (string) を用いてOSC経由でアクセスできます。
| ヒント | |
|
コマンドラインのOSCメッセージを受信するには、対応するOSC構成行で Receive Command を Yes に設定します。 |
以下は、他の卓から受信卓に送信できる例です。
- SendOSC 1 "/cmd,s,FaderMaster Page 1.201 At 50": ページ1のフェーダ201を50%にします。上述の例と同じですが、代わりに grandMA3 のコマンドライン構文を用います。
- SendOSC 1 "/cmd,s,FaderMaster Page 1.201 At 50 Fade 5": ページ1のフェーダ201を50%にし、さらに5秒のフェードタイムを追加します。
- SendOSC 1 "/cmd,s,Fixture 1 At 75": grandMA3 のコマンドライン構文を用いて、"Fixture 1 At 75" というコマンドをコマンドラインで実行します。
- SendOSC 1 "/cmd,s,Go+ Exec 402": エクゼキュータ402をトリガーします。
- SendOSC 1 "/cmd,s,Patch Fixture 1 3.42": フィクスチャ1を、ユニバース3のアドレス42にパッチします。
Object Playback Control
以下のプール・オブジェクトの再生は、OSCを介して制御されます。
- Sequences
- Masters
- Groups
- Presets
- Sounds
- Worlds
- Plugins
- Screen Configuration
- Timers
プール・オブジェクトは、grandMA3 ディレクトリ構造内の列挙アドレスによって指定されます。詳しくは List キーワード を参照してください。
| ターゲット | アドレス | タイプ・タグ | 引数 | 結果 | 例 |
|---|---|---|---|---|---|
| Sequence X | /13.13.1.6.X | si | <Key 機能>,1 |
指定された Key 機能のキーを押します。 | /13.13.1.6.1,si,Flash,1 |
| - |
- |
si |
<Key 機能>,0 |
指定された Key 機能のキーを離します。 | |
| - |
- |
sif |
<Fader 機能>,3,0 … 100 |
指定された Fader 機能のフェーダを指定されたパーセント値に設定します。 | |
| - |
- |
sii |
<Fader 機能>,0 … 3, -100 … 100 |
Fader 機能のフェーダを指定されたパーセント値だけ段階的に移動します。 |
| 重要 | |
| grandMA3 のディレクトリ構造内のアドレスは、ソフトウェアのバージョンによって変更される場合があります。ソフトウェアのアップデートを行う際は、必ずアドレスを確認してください。 |
オブジェクト・タイプをエクゼキュータに割り当てる際に使用できるすべての再生機能は、OSCからも制御できます。詳しくは エクゼキュータへのオブジェクト割り当て を参照してください。
例
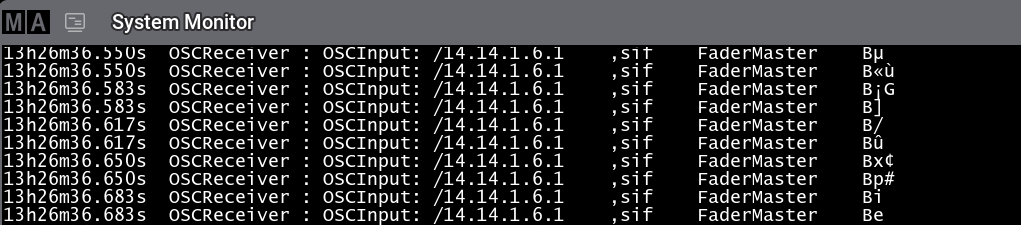
System Monitor で再生制御機能の引数を表示するには、以下のようにします。
- 受信側デバイスで、Menu を押し、In & Out をタップして OSC メニューを選びます。
- Enable Input をタップします。
- 対応するOSC構成行で Receive を Yes に設定します。
- Echo Input を Yes に設定します。
- タップして In & Out メニューを閉じます。
- Add Window - More - System Monitor を開きます。
- 再生コマンドを実行します(例: 送信側デバイスの Fader201 を動かす)。再生コマンドの引数は、受信側の System Monitor に表示されます。
オブジェクトの列挙アドレスを取得して Command Line History に表示するには、以下のようにします。
- コマンドラインをタップします。
- Lua "Printf( ObjectList( 'Master 1' )[ 1 ]:Addr() )" と入力し、Please を押します(例の Master 1 を別のオブジェクトに置換)。
列挙されたアドレスは、Command Line History に表示されます。

Command Line History
詳しくは、Lua 関数の Printf(string) を参照してください。
OSCの送信
|
|
ヒント |
| OSCの送信については、SendOSC キーワード を参照してください。 |
例1
grandMA3 onPC ステーションからOSCパケットを送るには、以下のようにします。
- In & Out メニュー / OSC を開きます。
- Enable Output をタップすると、出力が有効になります。
- グリッドの最初の行にある Destination IP を2本指でタップすると、エディタが開きます。
- 受信デバイスの Destination IP を設定し、Please を押します。
- 2本指で Send Command 下の最初の行をタップします。パラメータは Yes に設定されています。
- 受信デバイスにデータを送信します(例: SendOSC 1 "/Page1/Fader201,i,50")。
- Enable Output のタイトルバーが黄色に変わり、OSCパケットが grandMA3 onPC から grandMA3 light 卓に送信されます。

データ送信時に Enable Output ボタンのタイトルバーが黄色に変化
| ヒント | |
| OSCメッセージを送信すると、Enable Output のタイトルバーが強調表示されます。 |
オブジェクト再生フィードバック
| ヒント | |
| 再生アクションのOSCメッセージを送信するには、対応するOSC構成行で Send を Yes に設定します。 |
再生アクションは、以下のオブジェクトにOSC出力を生成し、Echo Output が有効な場合に System Monitor で使用できます。
- Sequences
- Masters
- Groups
- Presets
- Sounds
- Worlds
- Plugin Components
- Screen Configuration
- Timers
詳しくは プラグイン を参照してください。
例2
再生制御機能などのコマンドを grandMA3 卓に送信するには、以下のようにします。
- 送信側デバイスで、Menu を押し、In & Out をタップして OSC メニューを選びます。
- Enable Output をタップします。
- 対応するOSC構成行で Send を Yes に設定します。
- Echo Output を Yes に設定します。
- X をタップして、In & Out メニューを閉じます。
- Add Window - More - System Monitor.を開きます。
- 再生コマンドを実行します(例: Fader201 を動かす)。コマンドは受信側に送信されます。
例3
grandMA3 onPC ステーションからOSCデータを送信し、それを卓で受信するには、以下のようにします。
必要条件:
- IPアドレスが正しく設定されており、両方のデバイスでネットワークが有効になっている。
- いくつかのフィクスチャが受信卓にパッチされている。
送信側:
- In & Out メニュー / OSC を開きます。
- Enable Output をタップすると、出力が有効になります。
- Send Command を Yes に設定します。
- grandMA3 onPC でコマンドラインをタップします。
- SendOSC 1 "/cmd,s,Fixture 1 At 75" と入力して、Please を押してください。
受信側:
- In & Out メニュー / OSC を開きます。
- Enable Input をタップすると、入力が有効になります。
- Receive Command を Yes に設定します。
- コマンドが受信されると、卓でフィクスチャ1が75%になります。
例4
grandMA3 onPC ステーションからビデオサーバなどのサードパーティ・デバイスにOSCデータを送信するには、以下のようにします。
必要条件:
- 両方のデバイスでIPアドレスが正しく設定されている。
送信側:
- In & Out Menu / OSC を開きます。
- Enable Output をタップすると、出力が有効になります。
- Send Command を Yes に設定します。
- grandMA3 onPC でコマンドラインをタップします。
- SendOSC 1 "/Videoserver/Master,i,100" と入力して、Please を押してください。
その他の例については、高度な例 を参照してください。