キュー・タイミング
| grandMA3 ユーザマニュアル » キューとシーケンス » キュー・タイミング | Version 2.2 |
各キューパートは、多くのタイミング情報を持ちます。
キュー作成時に何も指定されていない場合は、デフォルトのタイムが用いられます。デフォルトは変更できます(後述 を参照)。
キュー・タイミングは、コマンドラインやGUI(Sequence Sheet)によって、いつでも変更できます。
フィクスチャの値がどのように変化するかに影響する多くの要素があり、以下のようなグループに分類できます。
- 一般的なキュータイム
- フィーチャタイプ・タイミング
- 個別アトリビュート・タイム
- キュー実行時の Executor Time
- 動的に変更される Rate タイム
このリストでは、下にあるのものほど優先度が高くなっています。
また、値がどのように変化するかを指定する Cue Transition もあります。
一般的なキュータイム
以下の6種類の一般的なキュー・タイミングがあります。設定で表示が省略されていなければ、それらに対応する列項目が Sequence Sheet に表示されます。詳しくは Sequence Sheet を参照してください。
- Cue In Fade
より高い値へと変化するすべてのインテンシティ値やアトリビュート値に対して適用されるフェードタイムです。キューがトリガーされ、Cue In Delay のカウントダウン後に開始されます。 - Cue In Delay
フェード前のディレイです。キューがトリガーされてからフェードが開始されるまでのカウントダウン・タイムを指定します。In Delay は In Fade に影響します。デフォルト値は 0 (ディレイなし)です。 - Cue Out Fade
より低い値へとフェードするインテンシティ値に対して適用されます。これは、Cue Out Delay の後に実行されます。デフォルト値は In Fade で Cue In Fade と同じです。 - Cue Out Delay
Out Fade に対するディレイです。インテンシティ値がフェードアウトし始めるタイミングを遅らせたい場合に用います。デフォルト値は In Delay で Cue In Delay の値と同じになります。 - Snap Delay
いくつかのアトリビュートは Snap として定義されていて、フェードせずに可能な限り速く値が変化します。このディレイは、このようなアトリビュートで Snap が行われるのを遅らせるために用いられます。これによって、例えば新しいゴボに移る前に、フィクスチャをフェードアウトしたりできます。これは、キューに保存されているすべての Snap アトリビュートに影響します。個別のタイミングで上書きすることも可能です。 - Cmd Delay
コマンドの実行を遅らせます。このディレイを指定できるのはここだけです。これに対する個別のタイミングはありません。
これらの値は、以下の構文で変更できます。
Cue ["キュー名" または キュー番号] CueInFade [新しいキュータイム]
対応キーワードの CueInFade、CueOutFade、CueInDelay、CueOutDelay、SnapDelay、または CommandDelay を使用してください。
キューのフェード/ディレイは、CueFade と CueDelay でも設定できます。これらによって、キューの4つのフェード/ディレイタイムを設定できます。これらは、1つのキーワードだけで In/Out タイムを設定するのに用いられます。
In と Out タイムはスラッシュで区切ります。スラッシュの前が In タイム、スラッシュの後が Out タイムです。In と Out の両方を指定しなくてもかまいません。スラッシュを用いて一方だけを設定できます。設定したいタイムは、スラッシュの正しい側に記述してください。
スラッシュなしでタイムを1つだけ設定した場合、In タイムにはその値が用いられ、Out タイムは In タイムにリンクされます(厳密には "None" に設定)。そのため、例えば、フェードインとフェードアウトは同じになります。
例えば、キュー3のインフェードを5秒に、アウトフェードを8秒に設定するには、以下のようにキーを押します。
Cue 3 Time 5 / 8 Please
コマンドラインでは以下のようになります。
|
|
User name[Fixture]>Cue 3 CueFade 5/8 |
タイムを1つだけ指定すると、In と Out の両方がそのタイムになります。例えば以下のようにすると、キュー4のフェードインとフェードアウトが両方とも7秒になります。
|
|
User name[Fixture]>Cue 4 CueFade 7 |
これにより、キュー4はフェードインとフェードアウトの両方に7秒を使用するようになります。
また、スラッシュの片側だけに数値を記述することで、In または Out タイムだけを指定できます。 例えば以下のようにすると、アクティブなキューに対して、CueOutFade が3に、CueInDelay が1に設定されます。
|
|
User name[Fixture]>CueFade /3 CueDelay 1/ |
Time キー によって、CueFade と CueDelay の両方にアクセスできます。詳しくは CueFade および CueDelay を参照してください。
フィーチャグループ・タイミング
各フィーチャグループには独自のフェードタイムとディレイタイムがあり、Sequence Sheet にはそれぞれに列があります。
これらのタイムは、そのフィーチャグループの値を変更するすべてのフィクスチャで用いられます。これにより、そのフィーチャグループの一般的なキュー・タイミングが上書きされます。
|
|
重要 |
| インテンシティ値が下降する場合は、"Dimmer Fade" タイムの影響を受けません。これらは "Cue Out Fade" によって制御されます。 |
フィーチャグループのフェードとディレイのデフォルトは、一般的なキュー・タイミングです。つまり、Cue In Fade と Cue In Delay と同じタイムになります。
個別アトリビュート・タイミング
個々のアトリビュートには、個別にフェード/ディレイタイムを設定できます。これは個別(Individual)タイムと呼ばれます。これらの個別タイムは、プログラマ を用いて選択され、保存 の際にキューに追加されます。Track Sheet モードの Sequence Sheet で、これらを編集することもできます(トラッキングとは を参照)。
Sequence Sheet には Indiv Fade と Indiv Delay という2つの列項目があり、個別タイムの最大値が表示されます。また Indiv Duration という列には、全体としての個別タイム(ディレイ + フェード)が表示されます。
Executor Time
Executor Time というマスター・フェーダがあります。これは Master Controls ポップアップで確認・変更できます。また、物理的なコントロールやエクゼキュータに割り当てることも可能です(エクゼキュータへのオブジェクト割り当て を参照)。
この機能がオンになっていると、保存されているフェード/ディレイ・タイミングの代わりに、このフェーダで設定したタイムが用いられます。キューがトリガーされると Executor Time フェーダ位置が登録され、動作中のキューフェードに影響を与えることなく、後からフェーダを動かせます。詳しくは タイム・コントロール を参照してください。
Sequecne Settings で Use Executor Time の設定をオフにすると、この機能からシーケンスを保護できます。
Rate タイム
Rate によって、キューフェード動作中にタイミングを動的に変更できます。保存されているタイムは変えずに、それがより速く/遅くなるように簡単に調整できます。
フェーダを上げると、保存されているタイムより短くなって、フェードが速くなります。フェーダを下げると、保存されているタイムより長くなって、フェードが遅くなります。
Rate の影響を受けるタイムには、その前にアスタリスク(*)が表示されます。Rate が下がりきっている場合、タイムは *Stopped と表示されます。Rate が上がりきっている場合、タイムは *0 と表示されます。
Rate 機能を持つエクゼキュータでは、エクゼキュータ・ラベルに Rate がパーセント表示されます。Rate がちょうど100%の場合、ラベルには 1:1 と表示されます。Rate が最大の場合には 1:∞、最小の場合には Stopped と表示されます。
Rate は、Rate1 キーワード でリセットできます。
Timing マスター
Timing マスターは50個あります。これらは、0秒〜10秒の値に設定できます。Timing マスターは、キューフェード、キューディレイ、フィーチャグループ・フェード、フィーチャグループ・ディレイの値として参照できます。キューは、特定のフェード値やディレイ値ではなく、Timing マスターで設定された値を使用します。
Timing マスターは、以下のタイミングに追加できます。
- CueIn Fade
- CueOut Fade
- CueIn Delay
- CueOut Delay
- Feature Group Fade
- Feature Group Delay
これらは、コマンドラインを用いたり、Sequecne Sheet のセルを編集したりして割り当てることができます。
iming マスターの名前は、Menu → Preference and Timings → Masters で変更できます。ここでは、Label コマンドで名前を変更したり、アピアランス、タグ、またスクリブルを追加したりすることもできます。
例
以下では、シーケンス内のキュー3のキューフェードとディレイを動的に調整できるようにします。
この例では、シーケンスが存在し、Timing マスターの名前は変更されていません。
- キュー3の Cue Fade セルを編集します。電卓ポップアップが開きます。
- ポップアップで Masters を選択します。
- Timing1 を選択します。
- コマンドラインで Cue 3 CueDelay "Timing2" と入力します。
- Timing マスターをページ1のエクゼキュータ216に割り当てるには、Assign Master "Timing"."Timing1" At Page 1.216 と入力します。
- そして、Timing2 を Assign Master"Timing"."Timing2" At Page 1.217 で割り当てます。
結果は以下のようになります。
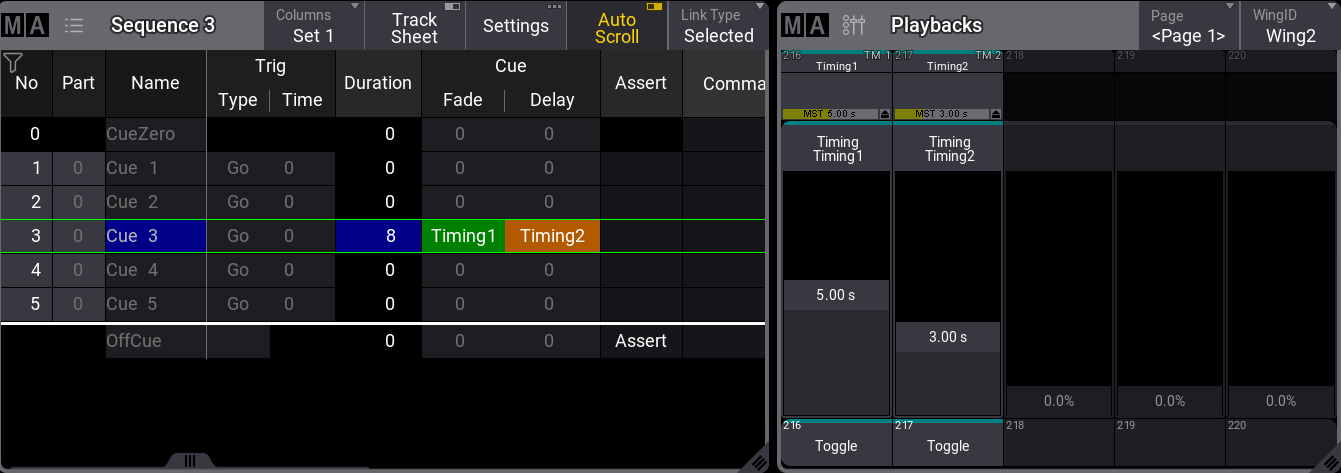
これで、2つのフェーダを用いてキューフェードとディレイタイムを調整できるようになります。
Timing マスターの位置は、キューがトリガーされる際に使用されます。そのため、フェードやディレイの実行中にフェーダを動かしてもタイミングには影響しません。
Timing マスターは、コマンドラインでキューを呼び出すときにも使用できます。例えば、キュー2を現在の Timing3 の値で呼び出すには、Goto Cue 3 Fade "Timing3" と入力します。
デフォルトのキュー・タイミング
Preference and Timings 設定には、Cue Timings のいくつかの設定が含まれています。
これらのタイミングは、キューやキューパートを保存する際のデフォルトとして用いられます。Store コマンドで異なる値を指定した場合、これらのタイミングは上書きされます。また、キューの値は Sequence Sheet でいつでも変更できます。
Cue Timings 設定を開くには、以下の手順に従ってください
- Menu を押すか、コントロールバーの歯車アイコン(
 )をタップします
 - Preference and Timings をタップします。
- Cue をタップしてください。

このメニューには3つの異なる設定グループがあります。Cue Timings には、キューのフェードとディレイ、およびトランジションに対するデフォルトのタイミング設定があります。Preset Timings は、前述の Feature Group Timings です。MIB Preferences は、デフォルトのMIB設定を行うために使用します。詳しくは Move In Black を参照してください。
Playback Timing
一部の設定では、キューが Go+ 以外のコマンドによって呼び出されたときに用いられるデフォルトの再生タイミングを指定します。
ここで設定されたタイムは、他に何も指定されていない場合に用いられるデフォルトのタイミングになります。コマンドで別の一時的な値を指定すれば、いつでもそれを使用できます。例えば、Goto Cue 5 Fade 2 とすると、デフォルト設定に関係なく2秒のフェードが使用されます。
Cue Timings 設定を開くには、以下の手順に従ってください。
- Menu を押すか、コントロールバーの歯車アイコン()をタップします。
- Preference and Timings をタップします。
- Timings をタップしてください。
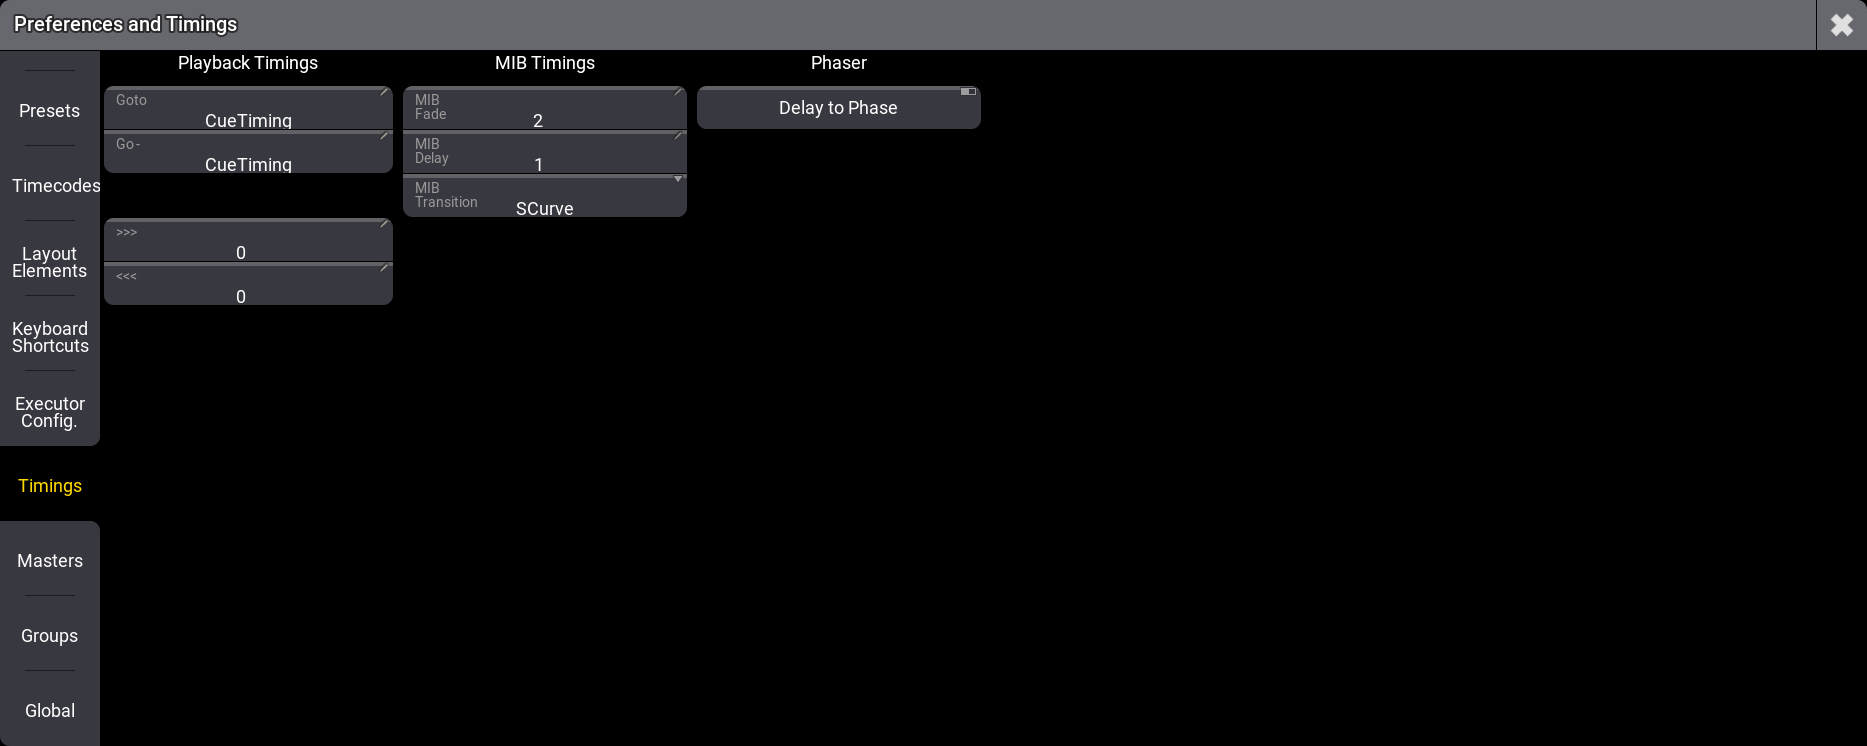
Playback Timings グループには、Goto、Go-、>>>、および <<< 機能の設定が含まれています。
これらの機能を用いる際のデフォルトとして、特定のタイムを設定できます。特定のタイムの代わりに CueTiming を選択すると、キューに保存されているタイムが使用されます。
Cue Transition
キューパートのプロパティ Transition で、あるキューから別のキューへとフェードする際に値がとるパスを変更できます。Transition は、キューパートごとに設定できます。
9種類の Transition フォームを利用できます。以下では、これらをイメージで表しています。
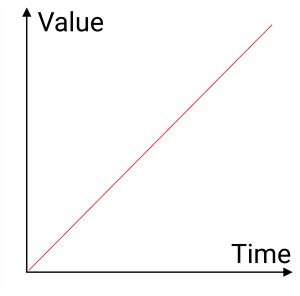
- Linear:
デフォルトの Transition です。値の加減速は行いません。
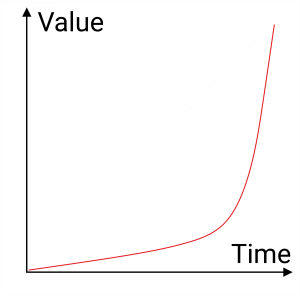
- Slow:
緩やかな加速と急減速を用います。
- Slow+:
これは、Slow を誇張したものです。
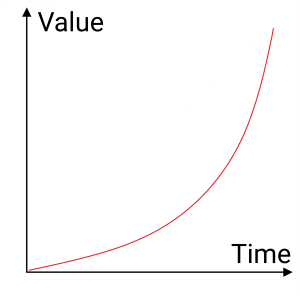
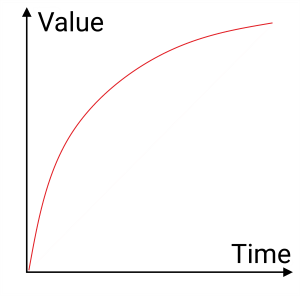
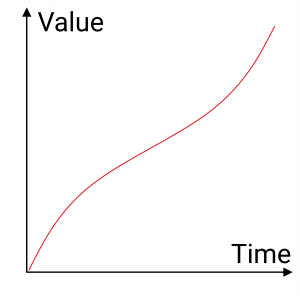
- Fast:
急加速と緩やかな減速を用います。
- Fast+:
これは、Fast を誇張したものです。

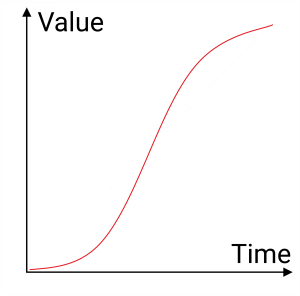
- SCurve:
緩やかな加速と減速を用います。
- Swing-:
急加速と急減速を用います。
- Swing:
これは、Swing- を誇張したものです。遷移の途中で値の変化が緩やかになります。
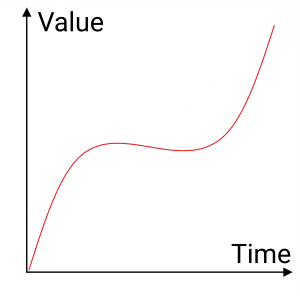
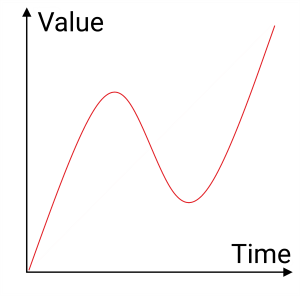
- Swing+:
これは、Swing を誇張したものです。途中で値が逆戻りしてから、再び加速します。