Sequence Sheet
| grandMA3 ユーザマニュアル » キューとシーケンス » Sequence Sheet | Version 2.2 |
各シーケンスを確認するのに最もよいのは Sequence プールです。
またシーケンスのキューを確認するには、Sequence Sheet が最適です。
シートでは、キューとキューパートが行として表示され、さまざまなキュー設定が列項目になっています。各項目の説明については後述を参照くださ い。
このシートの目的は、シーケンスのキューを確認することです。また、アクティブなキューには緑枠が表示されます。フェード実行中に、キューのフェードやディレイはプログレスバーで視覚化されます。
シートは、Add Window ポップアップでビューのウィンドウとして作成することも、Sequence プールのオブジェクトを編集して一時的なポップアップとして表示することもできます。
シートには、多くのマーカや色が表示されます。これらについては、カラーインジケータ を参照してください。
シートには、値のトラッキング・セクションを表示できます。このセクションには、保存されているすべてのアトリビュート値が表示されます。これは、キューを経てアトリビュートがどのように変化していくかを見るのにとても役立ちます。これらの値は、シートで直接編集することもできます。
シート内のほとんどの値は直接編集できます。これは、ショーの見た目に影響を与える場合があります。例えばキューが作られると、そのフェードおよびディレイタイムが保存されますが、他に何も指定していないと、デフォルトのタイミングが用いられます。キュー・タイミングは、このシートで編集できます。
このシートをタップしてフォーカスすると、エンコーダ・ツールバーが変化して、キューのタイミングを簡単に編集できるようになります。このツールバーについては 後述 を参照してください。
シーケンスの OffCue に対して Trig Type が設定されていると、Wrap Around は無効になります。シーケンスの Wrap Around を有効にすると、OffCue の Trig Type が削除されます。
タイトルバー
タイトルバーの左端にはMAのロゴがあり、これをタップするとシートの設定が開きます。詳しくは 後述 を参照してください。
ロゴの隣に表示されているのは、シーケンス番号と名前です。アクティブなワールド(ワールド1ではない場合)に関する情報は、シーケンス番号と名前の下に表示されます。
一部のボタンは、タイトルバーの右側に配置できます。これは、ウィンドウの設定でタイトルバーを編集することで指定できます。詳しくは タイトルバーの設定 を参照してください。
シートのメインパート
タイトルバーの下にあるメインパートは、行と列からなるシートです。
Sequence Sheet Settings には Condensed Timing というオプションがあり、シートでキュー・タイミングをどのように表示するかを指定できます。値のフェードイン(上昇)とフェードアウト(下降)の両者に対してフェードとディレイがあるため、キューのフェードとディレイに関するタイムは実際には4種類になります。Condensed 表示では、タイムがスラッシュ(/)で区切られ、2列で表示されます。スラッシュの左側は InFade 値、右側は OutFade 値です。以下の一覧では、Condensed 表示でない場合の列項目について述べています。詳しくは キュー・タイミング を参照してください。
列項目の順序や表示状態を変更し、列セットとして保存したり、動的に編集したりでききます。詳しくは 調節可能な列項目 を参照してください。
以下は、シートの各列項目についての簡単な説明です。
- Lock:
このセルを編集すると、"UL" が追加または削除されます。これは User Locked を意味し、キューの内容と設定が変更されないように保護します。"PL" は Position Locked を意味し、削除できないシステムロックです。 - No:
キュー番号です。 - Part:
キューパート番号です。 - Name:
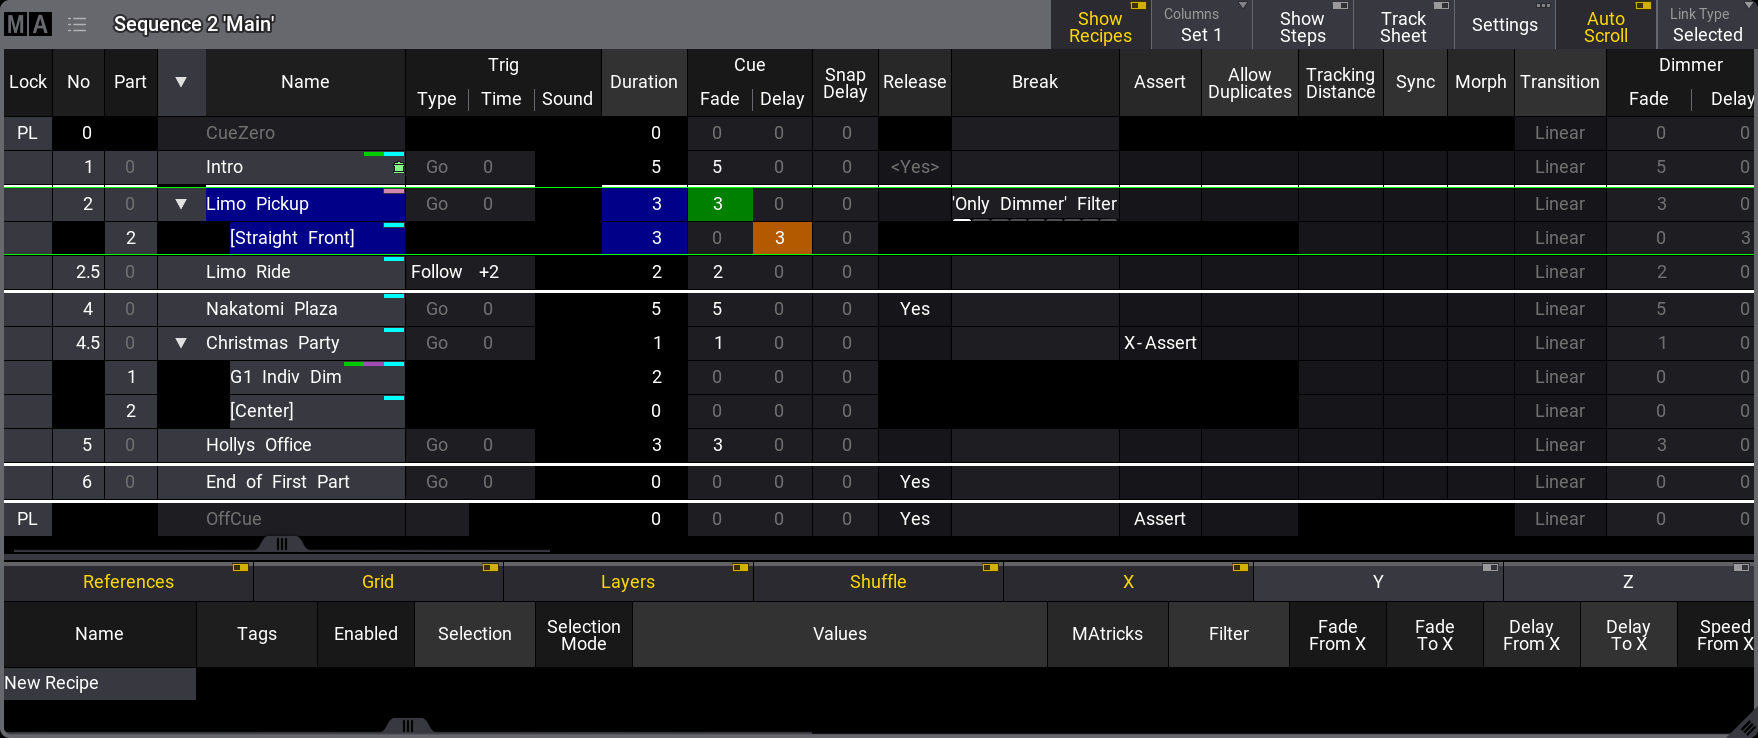
キュー(パート)の名前です。キューがパートキューを持つ場合、パートを開閉するための矢印が表示されます。上の画面例では、キュー2と4.5にキューパートがあり、それらが見えるように展開されています。 - Trig Type:
以下の5種類のトリガー・タイプがあります。このセルを編集すると、選択のためのポップアップが開きます。
- Go:
キューをトリガーするには、有効なコマンド(Go+、Goto、Go-、>>>、<<<、Kill)が必要です。 - Time:
前キューがトリガーされてから、設定された時間後にキューがトリガーされます。これは、Trig Time 列で設定します。 - Follow:
前キューの遷移(すべての個別タイミングを含む)が完了したときにトリガーされます。 - Sound:
サウンドによってキューがトリガーされます。Trig Sound 列で、22種類の周波数領域の1つを選択できます。サウンド入力については、Sound ウィンドウ を参照してください。 - BPM:
サウンド入力のビートを用いてキューをトリガーします。これは、複数のキューがBPM(ビート/分)でトリガーされている場合に便利です。
- Go:
- Trig Time:
ここに保存された値は、Trig Type が Time の場合にのみ用いられます。
トリガーが Time の場合、セル内のタイムが使用されます。前キューがトリガーされると、このタイムのカウントダウンが始まります。前キューが "Follow" トリガーを使用している場合、フォローキューがトリガーされると、キューのカウントダウンが開始されます。 - Trig Sound:
Trig Type が Sound の場合、キューをトリガーするために用いられるサウンドを指定します。 - Duration:
キュータイム全体の遷移タイムです。最長のフェードタイムとディレイを合わせたものになります。これは、Follow トリガーで用いられます。このセルは編集できません。常に、完全な遷移タイムが表示されます。 - CueIn Fade:
スナップしないアトリビュートや Dimmer 値が上昇する際のフェードタイムです。 - CueIn Delay:
トリガーから CueIn Fade が実際に開始されるまでの遅延・待機タイムです。 - CueOut Fade:
Dimmer 値が下降する際のフェードタイムです。デフォルト値は CueIn Fade タイムと同じです。これは、None 値で CueIn Fade にリンクされています。 - CueOut Delay:
Out Fade に対する遅延です(Dimmer 値のみ)。デフォルト値は、CueIn Delay の値と同じです。 - Snap Delay:
"Snap" アトリビュートの値がいつ変化するかを制御するのに用いされます。 - Release:
このセルを Yes にすると、キューにトラッキング値を解放させます。詳しくは トラッキングとは を参照してください。 - Break:
Break は、トラッキング中のアトリビュートで新しい値をブロックします。セルを編集すると Assignment Editor ポップアップが開き、フィルタやワールドを選択できます。選択したフィルタやワールドは、Break によってブロックされるものを指定します。詳しくは Break を参照してください。 - Assert:
Assert を用いると、トラッキング値が、キューに保存された値であるかのように優先されます。以下の3つの選択肢があります。- None:
トラッキング値はアサートされません。 - Assert:
トラッキング値は、キューに保存された値であるかのように優先されます。値は、それが元々保存されていたキューのタイミングを用いてアサートされます。 - X-Assert:
Assert と似ていますが、トラッキング値は、X-Assert が設定されているキューのタイミングでアサートされます。
- None:
- Allow Duplicates:
同一キューの複数パートに同じアトリビュートに対する値を含めたい場合に、これを有効にします。複数パートに含まれる Absolute および Relative 値は、最も大きなキューパート番号のものが用いられます。 - Tracking Distance:
値がトラッキングすべきキューの数を設定します。セルが空の場合、変更されるまでトラッキングが行われます。Tracking Distance については、トラッキングとは を参照してください。 - Sync:
フェイザーのフィクスチャを同期させます。例えば、動作中のフェイザーにフィクスチャが加わった場合、すでに動いているフィクスチャにそれらが同期します。詳しくは フェイザー を参照してください。 - Morph:
これが有効になっていて、フィクスチャの Phase が1つのキューから次キューへ変化する場合、それらはトラック上にとどまり、新しい Phase 値にモーフィングします。無効な場合、フィクスチャは新しい Phase 位置へ直接移ります。 - Transition:
フェードの遷移パスを選択できます。さまざまな選択肢については、キュー・タイミング を参照してください。 - "Preset type" Fade:
各プリセットタイプには、その後に "Fade" が付いた名前の列があります。これは、デフォルトとして CueIn Fade を用います。これを変更すると、プリセットタイプのすべての値に対して異なるフェードタイムを設定できます。このプリセットタイプで新しい値を得たすべてのフィクスチャは、アトリビュートに対してこのタイミングを用います。 - "Preset type" Delay:
各プリセットタイプには、その後に "Delay" が付いた名前の列があります。これは、デフォルトとして CueIn Delay を用います。これを変更すると、プリセットタイプのすべての値に対して異なるディレイタイムを設定できます。このプリセットタイプで新しい値を得たすべてのフィクスチャは、このタイミングを用います。 - Command:
コマンドラインに入力されるようなコマンドを、キューに記述できます。キューがトリガーされると、コマンドが有効になっている場合、GlobalMaster、IdleMaster、または Standalone ステーションでコマンドが実行されます。セルを編集すると、Command Editor が開きます。このエディタについては、マクロの作成 を参照してください。 - Command Enabled:
コマンドがある場合、Yes/No 切り替えられます。オプションが感嘆符で囲まれている場合は、Sequence Settings が現在の設定を上書きします。上書きされたオプションは、列のヘッダに表示されます。 - Command Delay:
キューがトリガーされてからコマンドが実行されるまでの間に遅延を追加します。上述の Command を参照してください。 - Note:
キューに対して複数行の注記を追加できます。詳しくは ノート を参照してください。 - MIB Preference:
MIB機能に対するキューの適合性を指定します。詳しくは Move In Black を参照してください。 - MIB Mode:
MIBのモードです。これは、MIBが可能な場合にのみ編集できます。詳しくは Move In Black を参照してください。 - MIB Target:
可能な場合にMIBを実行するキューを指定します。これは、MIBが可能な場合にのみ編集できます。詳しくは Move In Black を参照してください。 - MIB MultiStep:
MIBにおいてフェイザーがどのように動作するかを指定します。これは、MIBが可能な場合にのみ編集できます。詳しくは Move In Black を参照してください。 - MIB Fade:
MIBのフェードタイムです。これは、MIBが可能な場合にのみ編集できます。詳しくは Move In Black を参照してください。 - MIB Delay:
MIBのディレイタイムです。これは、MIBが可能な場合にのみ編集できます。詳しくは Move In Black を参照してください。 - Indiv Fade:
個別フェード(Individual Fade)です。個別に保存されたフェードタイムを持つアトリビュートについて、そのタイムを表示します。このセルは編集できません。 - Indiv Delay:
個別ディレイ(Individual Delay)です。個別に保存されたディレイタイムを持つアトリビュートについて、そのタイムを表示します。このセルは編集できません。 - Indiv Duration:
個別持続タイム(Individual Duration)です。個別に保存されたフェードとディレイタイムを持つアトリビュートについて、その全体的なタイムを表示します。このセルは編集できません。 - Speed Master:
キューやキューパートに Speed マスターを割り当てることができます。キューやキューパートのスピードは、割り当てられた Speed マスターによってのみ制御されます。シーケンスに割り当てられている Speed マスターの優先度は低く、別の Speed マスターが割り当てられたキューやキューパートには影響しません。 - Speed Scale:
これは、キューやキューパートのスピードをスケーリングするために使用できます。キューやキューパートに割り当てたスピード・スケールは、シーケンスに割り当てられているものよりも優先されます。 - Appearance:
キューやキューパートにアピアランスを割り当てることができます。これは、アピアランスの表示方法を指定する CuePart Appearance という Sequence Sheet 設定に関連付けられています。詳しくは 後述 を参照してください。 - Individual Timing:
これは、一般的なキュー・タイミング(Cue Fade、Cue Delay)と個別キュー・タイミング(Indiv Fade、Indiv Delay)の優先順位に影響します。以下の選択肢があります。- Default:
個別タイミングは、一般的なキュー・タイミングよりも優先されます。 - Normalized:
一般的なキュー・タイミングは、個別タイミングの最大タイムとして設定されます。個別タイミングに範囲が設定されている場合、これらの値は、対応する一般的なキュー・タイミングによって設定された新しい最大タイムに合わせて調整されます。
- Default:
- Tags:
キューにはタグを割り当てられます。詳しくは タグ を参照してください。
背景が明/暗灰色のセルはすべて編集可能で、その値を変更できます。背景が黒のセルは編集できません。
Track Sheet モードe
Sequence Sheet は、Track Sheet モードにすることができます。これは、Sequence Sheet Settings やタイトルバーのボタンで変更できます。
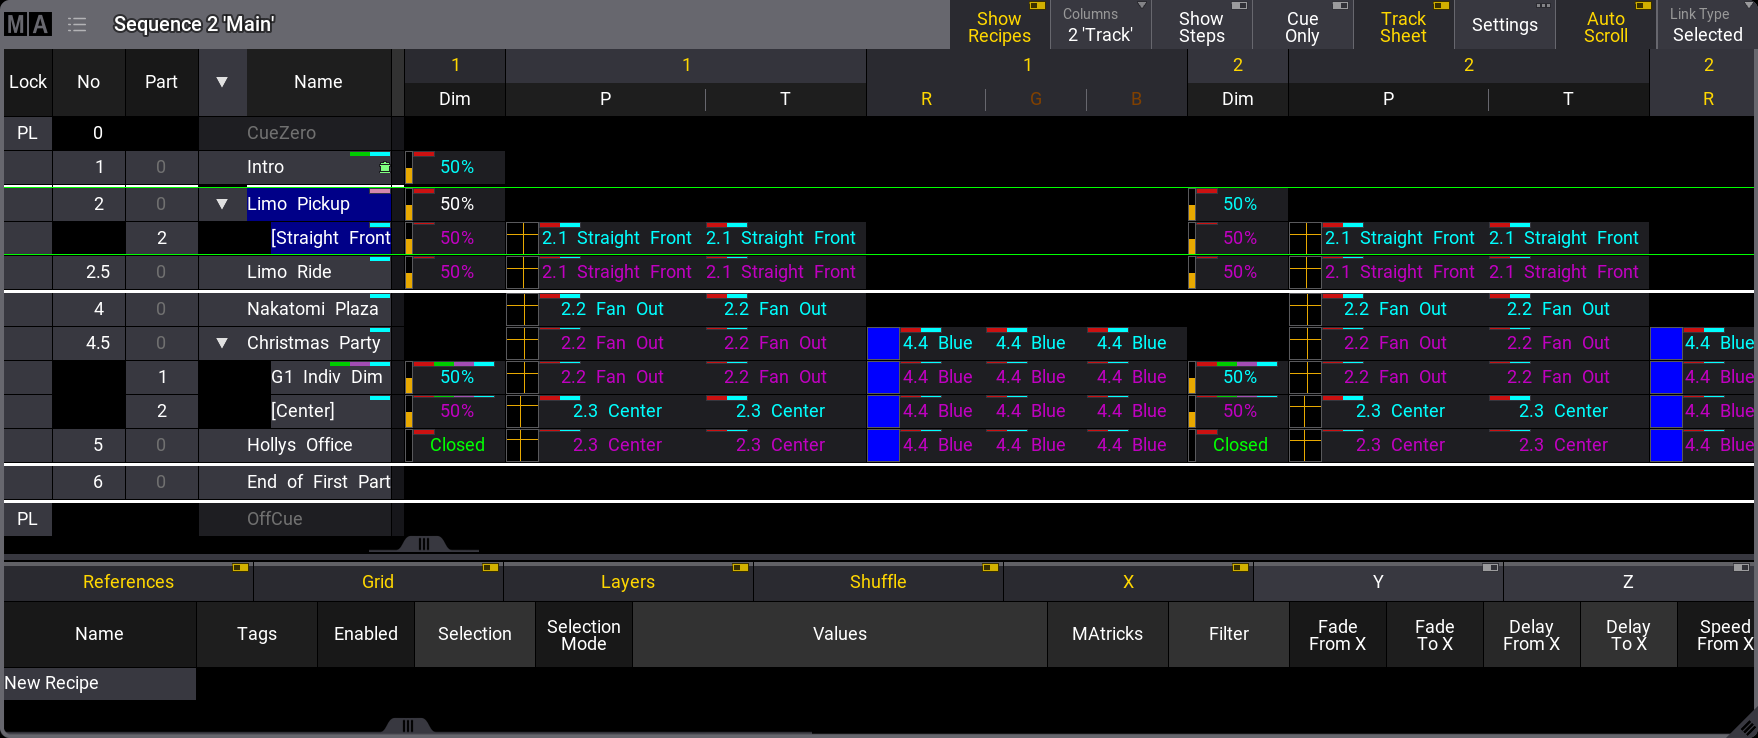
このモードでは、シート設定の Columns 設定で異なるセレクションを使用できます。上の画面例では、タイトルバーにも Columns 設定が表示されています。
Track Sheet モードでは、シートの右側に列にアトリビュート・データが表示されます。
アトリビュート値やマーカは、トラッキングなどの状態によって異なる色で表示されます。色やマーカについては、色表示 を参照してください。またトラッキングについては、トラッキングとは を参照してください。
値はシートで編集できます。Cue Only は、Sequence Sheet Settings やタイトルバーのボタンで有効にできます(Track Sheet がオンの場合に表示される追加ボタン)。これによって、編集された値は Cue Only ルール にしたがいます。
複数パートを持つキューを展開してすべてのパートを表示させると、どこにどのような値が保存されているかが簡単に分かります。キューが折りたたまれて1行だけの表示になると、この1行中にパートの値が表示され、それがどのパートに由来するかを示すテキストが右下隅に小さく表示されます。
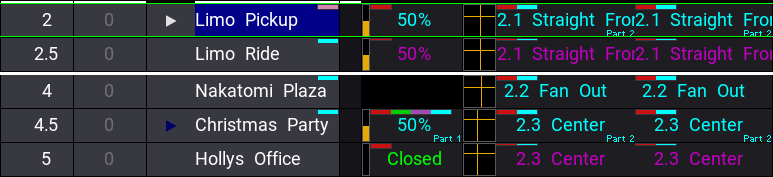
この例は、上の画面例と同じキュー2と4.5です。唯一の違いは、キューが折りたたまれて1行のみ表示されていることです。小さな文字で Pan と Tilt の値がパート2から取得され、キュー4.5の Dimmer がパート1から取得されていることが分かります。
レイヤ・ツールバー は、Sequence Sheet Settings でオンにできます。これは、他のレイヤの値を編集・確認したい場合、非常に役立ちます。
値を編集すると電卓が開き、Presets、Channel Sets、Specials から新しい値を選択したり、値を入力したりできます。
Track Sheet 電卓 の Specials タブには、変更内容を指定したり、Block、Unblock、Extract Presets にアクセスしたりするための特別なボタンがあります。
Extract Presets では、プリセットへのリンクを取り除き、現在のプリセット値がキューに直接保存されます。
上書きされたキュー・タイミング
キュー・タイミングは、Executor Time または手動クロスフェードによって上書きされる可能性があります。この場合、ヘッダに黄色のテキストが表示され、保存されたタイムの横に感嘆符が追加されます。
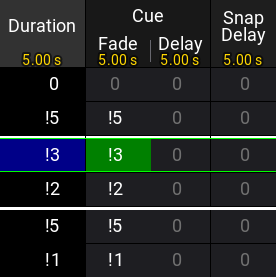
Executor Time については、キュー・タイミング を参照してください。
Sequence Sheet Settings
シートには多くの設定があります。それらには、ウィンドウの左上隅にあるMAロゴをタップすることでアクセスできます。
それらの中には、他のウィンドウと共有される一般的な設定もあります。詳しくは ウィンドウの設定 を参照してください。
Sequence Sheet Settings には、Display、Mask、および Columns という3つのタブがあります。
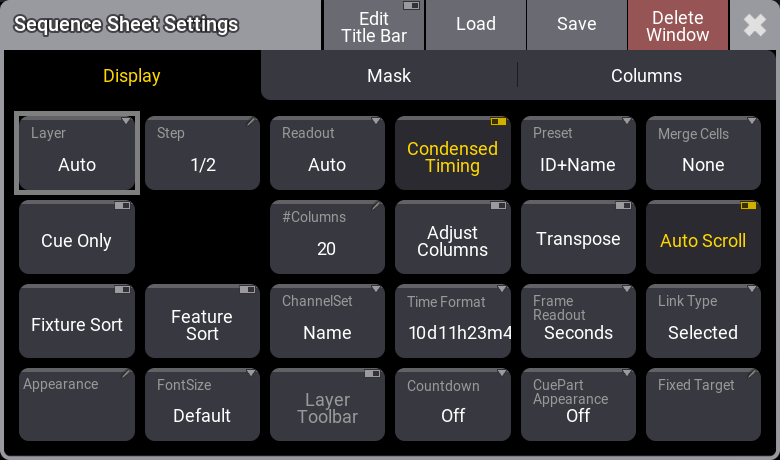
以下は、Sequence Sheet の Display 設定についての簡単な説明です。
- Layer:
ウィンドウに表示するレイヤを選択します。スワイプボタンでレイヤ一覧が開きます。特別なプロパティとして Auto があります。これを選択すると、ウィンドウは エンコーダバー で選択されたレイヤに追従します。 - Cue Only:
値を編集する際に Cue Only 機能をオン/オフにするかどうかを指定します。 - Fixture Sort:
このオン/オフボタンは、フィクスチャのソートを有効にします。フィクスチャは、それを表示するシートの上部または左側で、選択順にソートされます。 - Appearance:
これをタップすると Select Appearance ポップアップが開き、定義されているすべてのアピアランスと、新しいアピアランスを作成するオプションが表示されます。アピアランスを選択すると、それがウィンドウに適用されます。 - Step:
表示するステップを選択します。ステップは フェイザー で使用されます。これは、電卓ポップアップを開くプロパティ入力ボタンです。 - Settings:
これはタイトルバー編集時にのみ表示されます。 この設定により、タイトルバーに Settings ボタンを表示するか非表示にするかが決まります。Settings ボタンをタップすると、オブジェクトの設定画面が開きます。例えば、Sequence Sheet のタイトルバーにある Settings ボタンをタップすると、シーケンスの設定が開きます。 - Feature Sort:
フィーチャのソートを有効にします。選択されたフィーチャは、シート内で他のフィーチャよりも前に移動します。 - Font Size:
ウィンドウ内のフォントサイズを選択します。スワイプボタンをクリックすると、10〜32のサイズリストが表示されます。また、Default プロパティもあります。これは18に相当します。 - Readout:
フィクスチャ・アトリビュート値の表記法を選択します。スワイプボタンで、以下の選択肢を含むリストが開きます。- Auto:
シートは、エンコーダバー で選択された表記法に従います。 - Natural:
各アトリビュートには Natural な表記法が定義されています。これは Attribute Definition で定義されます。このオプションを選択すると、アトリビュートに定義されているさまざまな表記法が表示されます。 - Percent:
0〜100の範囲です。 - PercentFine:
0.00〜100.00の範囲です。 - Physical:
フィクスチャタイプ定義で指定された物理的範囲を使用します。 - Decimal8:
10進数で0〜255の範囲です。 - Decimal16:
10進数で0〜65,535の範囲です。 - Decimal24:
10進数で0〜16,777,215の範囲です。 - Hex8:
16進数で00〜FFの範囲です。 - Hex16:
16進数で00〜FFFFの範囲です。 - Hex24:
16進数で00〜FFFFFFの範囲です。
- Auto:
- #Columns:
シートに表示する列数を指定します。DMX Sheet 以外のすべてのシートでは、Transpose と Adjust Columns 設定をオンにする必要があります。 - ChannelSet:
チャンネルセットに含まれる値の表記方法を指定します。以下の選択肢があります。- Value:
値だけを表示します。 - Value + Name:
値とチャンネルセット名を表示します。 - Name:
チャンネルセット名だけを表示します。
- Value:
- Layer Toolbar:
種々のレイヤ下部にある レイヤ・ツールバー の表示/非表示を切り替えます。 - Condensed Timing:
キュー・タイミング列を結合して表示するか、4つタイミング列すべてを表示するかを切り替えます。 - Adjust Columns:
このオン/オフボタンを用いると、シートの列幅がウィンドウのサイズと列数に合わせて調整されます。 - Time Format:
ウィンドウのタイム形式を指定します。ユーザプロファイル とは異なる形式を選択できます。 - Countdown:
フェード中に、キュー・タイミングのカウントダウンを表示できます。この設定には、以下の3つの選択肢があります。- Off:
カウントダウンは、どのタイミング列にも表示されません。設定タイムが常に表示されます。 - Duration:
キュー遷移中、Duration 列にカウントダウンが表示されます。 - All:
キュー遷移中、Duration およびキュー・タイミング列にカウントダウンが表示されます。
- Off:
- Preset:
シート内でプリセット情報をどのように表示するかを指定します。以下の3要素を組み合わせた6つのプロパティがあります。- ID:
プリセットのID番号を表示します。 - Name:
プリセットの名前を表示します。 - Value:
プリセットに保存されている値を表示します。
- ID:
- Transpose:
ウィンドウ内の列と行を反転します。 - Frame Readout:
このウィンドウに対するフレームの表記法を指定します。ユーザプロファイル のデフォルト設定を上書きできます。 - CuePart Appearance:
キューパートのアピアランスが、シートでどのように表示されるかを指定します。選択肢は以下の通りです。- Off:
キューパートのアピアランスは表示されません。 - Number:
アピアランスは、No (キュー番号)列にのみ表示されます。 - Num+Name:
アピアランスは、No と Name 列に表示されます。 - All:
アピアランスは、すべての列に表示されます。
- Off:
- Merge Cells:
隣接するセルの値が同じで、それらが同じフィーチャやフィーチャグループに属している場合、1つのセルを結合して表示できます。例えば、R、G、Bの値がすべて100の場合、それらが結合されて1つだけ表示されます。- None:
セルは結合されません。 - Feature:
2つ以上の隣接するフィーチャの値が同じ場合、それらを結合して表示します。 - Feature Group:
2つ以上の隣接するフィーチャグループの値が同じ場合、それらを結合して表示します。
- None:
- Auto Scroll:
このオン/オフボタンは、自動スクロール機能を有効にします。シートやグリッドをスクロールしながら、アクティブなオブジェクトがウィンドウ内に表示されたままになります。 - Link Type:
この設定は、シートに表示されるシーケンスを指定します。
以下の3種類の選択肢があります。- Fixed:
特定のシーケンスからの情報が表示されます。選択は Sheet Settings で行います。Fixed Target 設定については後述をご覧ください。また、Assign や Sequence キーワードを用いてシートのタイトルバーをタップすることでも設定できます。 - Selected:
選択されているシーケンスからの情報が表示されます。 - LastGo:
トリガーコマンド(<<<、 >>>、Go+、Go-、Goto、Load、On、Select、Top、Temp、Flash、Toggle On、Pause)を最後に受け取ったシーケンスが自動的に表示されます。これは、実行中のタイムコード記録からシーケンスがトリガーされる場合も含みます。Sequence Settings で Include Link Last Go 設定をオフにすると、シーケンスを LastGo から除外できます。LastGo は、同じユーザプロファイルによってトリガーされたシーケンスだけを表示します。
- Fixed:
- Fixed Target:
Link Type が Fixed の場合、シートに表示されるシーケンスを指定します。タップすると、Assignment Editor ポップアップが開き、シーケンスを選択できます。
Sequence Sheet に対する Mask 設定は以下の通りです。
- Color Mode:
Color Readout を RGB または CMY に切り替えます。デフォルト値は、User Profile Settings に従います。ユーザプロファイルの設定は "<>" で囲まれて表示されます。 - Feature Graphic:
シート内の各フィーチャの横にある小さなグラフィックの表示/非表示を切り替えます。 - Filter:
既存のフィルタを選んで、ウィンドウの内容をフィルタリングできます。 - Filter Toolbar:
シートの内容をフィルタリングするために使用できるフィルタ・ツールバーを表示/非表示にします。 - Line Height:
シート内の行の行の高さを指定します。有効な値は1〜12です。また、内容を表示するために可能な限り小さな高さを選択する Auto オプションもあります。 - Selection Only:
プログラマで現在選択されていないフィクスチャを非表示にするためのマスク機能です。Track Sheet がオンの場合に有効です。 - Show Command Test:
キューをアクティブすることなく、キューに保存されているコマンドをテストできます。 これをオンにすると、コマンドを含む Command セルに再生アイコン( ) が表示されます。このアイコンをタップすると、キューのコマンドが実行されます。
 - Show Notes:
選択されているキューに対する注記(Note)を、シートの下部に表示するかどうかを切り替えます。 詳しくは ノート を参照してください。 - Show Recipes:
シート下部のキューレシピの表示/非表示を切り替えます。詳しくは キュー・レシピ を参照してください。 - Show Steps:
シート内のキュー・ステップの表示/非表示を切り替えます。Track Sheet がオンの場合に便利です。 - Track Sheet:
シートの各アトリビュートに対する値とトラッキング情報の表示/非表示を切り替えます。
最後に、Columns というタブがあります。これによって、Sequence Sheet の列や列セットを編集できます。詳しくは 調節可能な列項目 を参照してください。
シーケンス編集ツールバー
Sequence Sheet をタップするとフォーカスが移り、エンコーダ・ツールバーが変化します。

キューに対する種々の設定を含むいくつかのページがあります。ページは、ツールバーの左上隅にある Pages スワイプボタンで変更できます(上の画面例を参照)。
ツールバーの一番上の行では、キューの選択を行えます。またキュー実行のためのプレイバック・コントロールもあります。詳しくは キューの再生 を参照してください。
エンコーダの2つのリングを回すと、シートで選択されているキューの各値が変化します。
下段はデュアルエンコーダの外側リング、中段は内側リングです。