タイムコード・ショーの作成
|
grandMA3 ユーザマニュアル » タイムコード・ショー » タイムコード・ショーの作成
|
Version 2.2 |
タイムコード・ショーを作成するには、基本的に2つの方法があります。タイムコード・イベントは、記録することも、手動で追加することもできます。
2つのワークフローは、組み合わせることができます。
Timecode プールにタイムコード・ショーを作成する必要があります。新しいショーを追加するには、空のプール・オブジェクトに対して保存または編集操作を行ってください。
これによって、空のタイムコード・ショーが作成されます。
このショーは、デフォルト設定で作成されています。タイムコード・ショーと、ビューアやスロットなどのタイムコード要素に関連する設定は数多くあります。詳しくは タイムコードの設定 を参照してください。
プール・オブジェクトで Edit アクションが用いると、ポップアップ・エディタが表示され、Setup がアクティブになっている Timecode Viewer のように機能します。
ポップアップ・エディタの左側のツールバーには、Setup 有効時に Timecode Viewer で使用できるツールがいくつか表示されません。そのため、Timecode Viewer を使用する方が適切かもしれません。
タイムソース
最も重要な要素の一つは、タイムソースです。 各タイムコード・ショーには TC Slot という設定があります(タイムコードの設定 を参照)。これは "Internal" またはいずれかのタイムコード・スロットになります。 詳しくは タイムコード・スロット を参照してください。
内部的に実行されている場合は、タイムコード・ショーへの Go コマンドで実行できます。これにより、ショーは再生モードになり、タイムを実行します。ショーの再生アクションには、Timecode Viewer ウィンドウの下部にある再生ツールバーから簡単にアクセスできます。このツールバーには再生ボタン(![]() )も含まれています。詳しくは Timecode Viewer を参照してください。
)も含まれています。詳しくは Timecode Viewer を参照してください。
タイムソースがタイムコード・スロットの1つである場合、タイムコード・ショーは再生モードになっている必要があります。その後、タイムコード・スロットでタイムを生成したり、外部ソースでタイムコード・スロットでタイムを実行したりできます。
新しいタイムコード・ショーは、最初は内部タイムソースを使用するように設定されます。タイムコード・ショーで外部ソースを使用する場合は、それを設定し、タイムコード・ショーが関連するタイムコード・スロットをリッスンするように設定する必要があります。外部ソースの設定方法については、外部接続 を参照してください。
タイムコード・ショーの記録
タイムコード・ショーは、Record キーワード で記録できます。また、Setup が有効な場合、Timecode Viewer の下部にある再生ツールバーにクイックアクセス・ボタン(![]() )が表示されます。
)が表示されます。
記録モードが有効で、選択したタイム信号が再生中の場合、エクゼキュータ・アクションが関連するトラックのショーに自動的に追加されます。これにはフェーダの動きも含まれ、さまざまなイベントがトラックに追加されます。各トラックはターゲットを表しています。ターゲット・オブジェクトには、シーケンス、プリセット、サウンド、グループマスター、マスター、その他のタイムコード・ショーやスロットが含まれます。
このためには、オブジェクトがエクゼキュータに割り当てられ、それらが有効なタイムコード・ショーのターゲット・オブジェクトであることが必要です。有効なオブジェクトについては、Tracks を参照してください。
記録は、停止ボタン(![]() )や Timecode プール・オブジェクトの Off コマンドで停止できます。
)や Timecode プール・オブジェクトの Off コマンドで停止できます。
記録されたイベントは、記録後に編集できます。
デフォルトでは、トラックは同じ トラックグループ と同じ タイム範囲 に追加されます。
Timecode Settings で Record Remote Events が有効で、Playback and Record が All Events に設定されている場合、キューやその他の有効なアクションをトリガーするイベントが自動的にタイムコード・ショーに追加されます。これらの設定では、タイムコード・ショー内のキューによってトリガーされたイベントも記録されます(例: フォローキュー、キュー・コマンド)。
手動によるイベントの追加
イベントは手動でトラックに追加できます。トラックは既に存在している必要があり、手動で作成できます。トラックは、トラックグループ内に存在している必要があります。トラックグループは空のショー内に作成し、その後トラックを追加できます。
|
| 制限 |
| サブトラックは、手動で作成できません。 |
トラックグループの追加
トラックグループを手動で作成するには、以下のようにします。
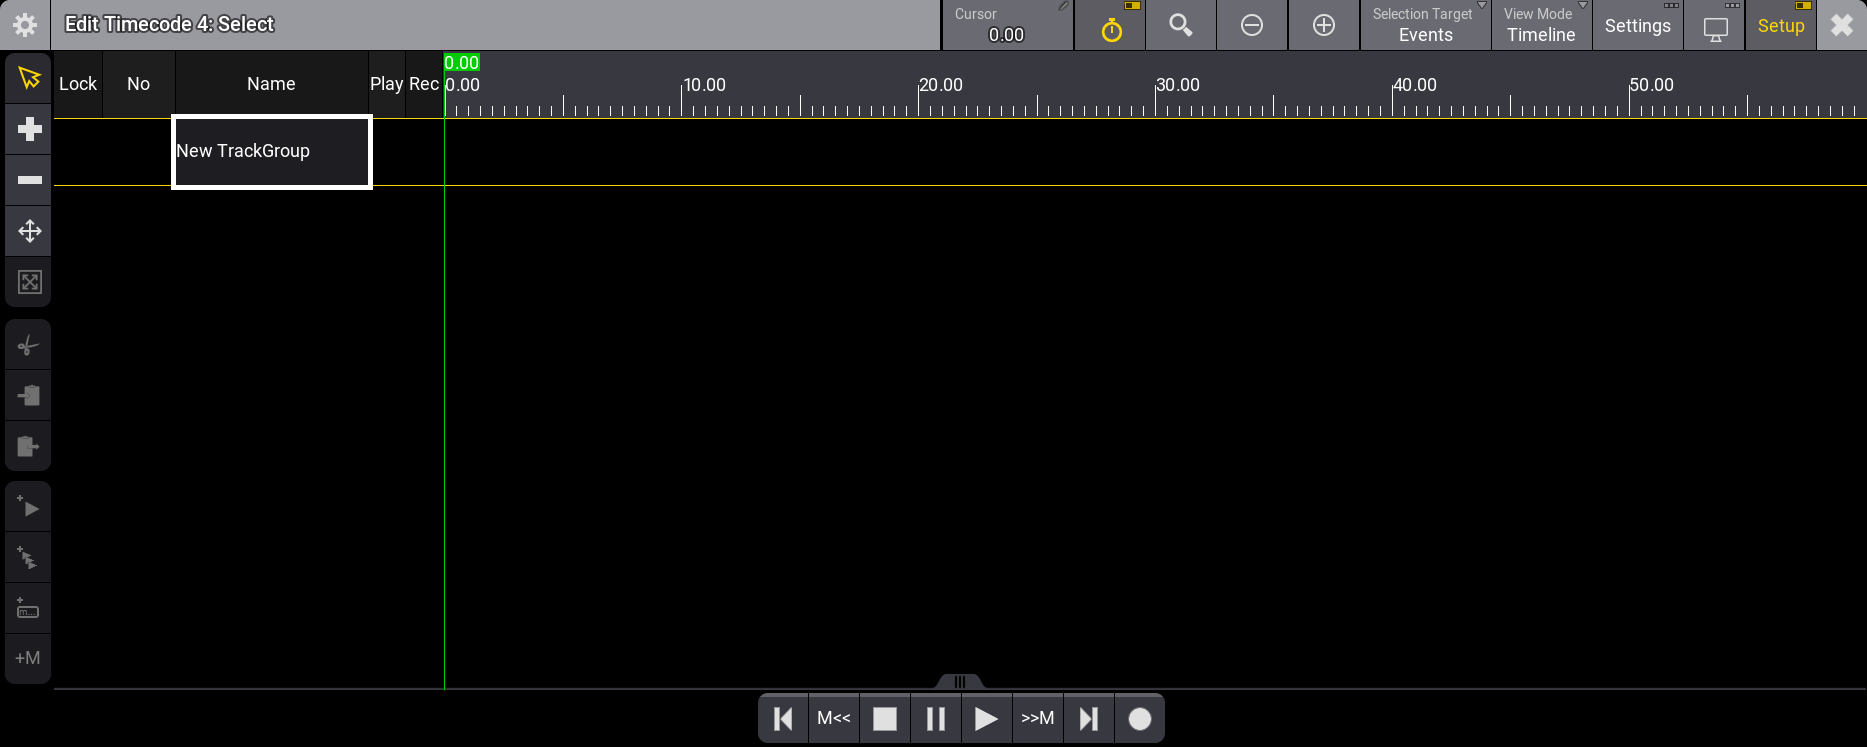
- Timecode Viewer が表示されていることを確認して、Setup を有効にします。
- ビューアに選択されたタイムコード・ショーを表示させ、正しいショーを選択するか、Timecode Settings で正しいタイムコード・ショーを選択することによって、ビューアが正しいタイムコード・ショーを表示されるようにします。
- New Track Group 長押しします。
新しいトラックグループが追加されました。右向きの白い三角形( )をタップすることで、トラックグループを展開することができます。これによって、タイム範囲を持つトラックがすでに1つあることが分かります。
トラックグループにトラックを追加
トラックグループにトラックを追加するには、以下のようにします。
- Timecode Viewer が表示されていることを確認して、Setup を有効にします。
- ビューアに選択されたタイムコード・ショーを表示させ、正しいショーを選択するか、Timecode Settings で正しいタイムコード・ショーを選択することによって、ビューアが正しいタイムコード・ショーを表示されるようにします。
- 目的の トラックグループ を展開します。
- New Track を長押しします。
トラックグループに新しいトラックが追加されました。
- 次に、トラックの Target セルを編集すると、Assignment Editor ポップアップが開きます。
- エディタの上部にあるタブのいずれかをタップして、目的のオブジェクト・タイプを選択します。
- 一覧から目的のターゲット・オブジェクトを選択してください。
これで、トラックはイベントの準備が整いました。
ステップ5〜7は、目的のターゲットを編集するためにも使用できます。ただし、これによってトラック内の既存イベントが壊れることに注意してください。
トラックに単一のイベントを追加
選択したトラックに単一のイベントを追加できます。イベントを追加するには、2つの方法があります。どちらの方法でも開始位置は同じです。
1つ目は、緑のカーソルです。
- Timecode Viewer が表示されていることを確認して、Setup を有効にします。
- ビューアに選択されたタイムコード・ショーを表示させ、正しいショーを選択するか、Timecode Settings で正しいタイムコード・ショーを選択することによって、ビューアが正しいタイムコード・ショーを表示されるようにします。
- 目的の トラックグループ を展開します。
- 目的の トラック を選択します。
- タイトルバーの Selection Target をタップするか、設定を開いて設定を変更することで、Selection Target が Events になっていることを確認してください。
Setup が有効な Timecode Viewer を使用している場合は、
 アイコンをタップしてイベントを Selection Target として選択することができます。
最初の方法は、緑のカーソルを用いることです。
- カーソルを目的のタイムに移動します。カーソルを移動するには、タイムライン上でカーソルを長押しするか、タイムコード・エンコーダバー を使用します。
- 左側のツールバーで
 をタップします。これにより、デフォルトのイベントがトラックに追加されます。
すべてのイベントが揃うまで、これら2つのステップを繰り返すことができます。
2番目の方法は、トラックをタップすることです。
- 左側のツールバーで Add ツール(
 )を有効にします。
 - イベントが発生するトラックをタップします。
必要なイベントがすべて揃うまで、ステップ7を繰り返します。
|
|
重要 |
| 手動で作成されたキュー・イベントは、Playback and Record が Manual Events の場合のみ、フォローキュー、タイムキュー、またはキュー・コマンドをトリガーします。詳しくは タイムコードの設定 を参照してください。 |
トラックに複数のイベントを追加
選択したトラックに複数のイベントを追加できます。
- Timecode Viewer が表示されていることを確認して、Setup を有効にします。
- ビューアに選択されたタイムコード・ショーを表示させ、正しいショーを選択するか、Timecode Settings で正しいタイムコード・ショーを選択することによって、ビューアが正しいタイムコード・ショーを表示されるようにします。
- 目的の トラックグループ を展開します。
- 目的の トラック を選択します。
- タイトルバーの Selection Target をタップするか、設定を開いて設定を変更することで、Selection Target が Events になっていることを確認してください。
Setup が有効な Timecode Viewer を使用している場合は、 アイコンをタップしてイベントを Selection Target として選択することができます。
- カーソルを目的のタイムに移動します。カーソルを移動するには、タイムライン上でカーソルを長押しするか、タイムコード・エンコーダバー を使用します。
- 左側のツールバーで
 をタップします。Add multiple events ポップアップが開きます。
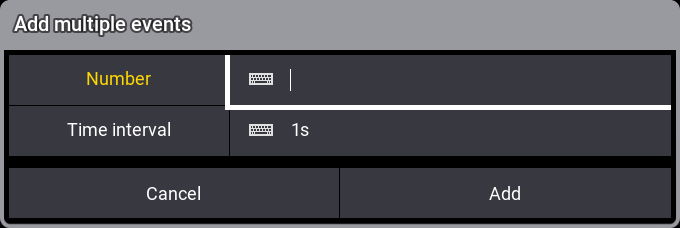
- 希望するイベントの数(Number)を入力します。
- イベント間の時間間隔(Time interval)を変更します。
- Add をタップしてください。
これにより、カーソル位置からの間隔で、デフォルトのイベント数をタイムラインに追加します。
|
|
重要 |
| 手動で作成されたキュー・イベントは、Playback and Record が Manual Events の場合のみ、フォローキュー、タイムキュー、またはキュー・コマンドをトリガーします。詳しくは タイムコードの設定 を参照してください。 |