タイムコードの設定
| grandMA3 ユーザマニュアル » タイムコード » タイムコードの設定 | Version 2.2 |
Timecode Settings
Timecode Settings を開くには、Timecode Viewer ウィンドウのタイトルバーにある Settings をタップするか、Edit (EditSetting キーワード)を2回押して、Timecode プール・オブジェクトをタップします。
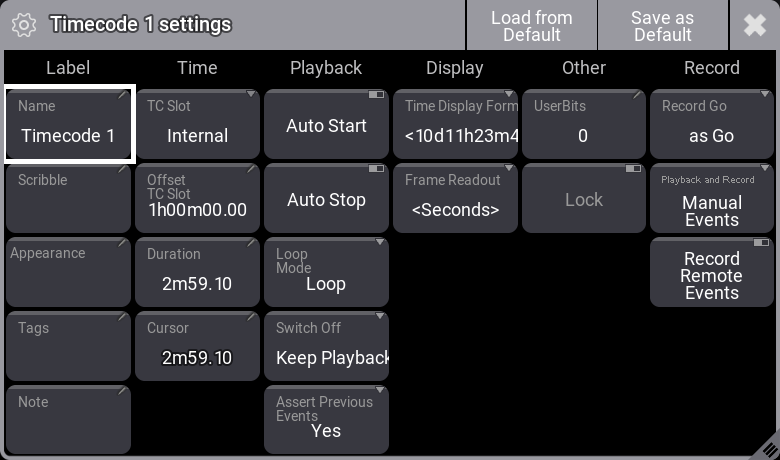
設定は、さまざまなセクションに分かれています。
Label
以下は、Label セクションの設定の簡単な説明です。
- Name:
タイムコード・ショーの名前です。 - Scribble:
タイムコード・ショーにスクリブルを追加できます。詳しくは スクリブル を参照してください。 - Appearance:
タイムコード・ショーにアピアランスを追加できます。詳しくは アピアランス を参照してください。 - Tags:
タイムコード・ショーにタグを追加できます。詳しくは タグ を参照してください。 - Notes:
タイムコード・ショーに注記を追加できます。詳しくは ノート を参照してください。
Time
以下は、Time セクションの設定の簡単な説明です。
- TC Slot:
タイムコード・ショーのタイムソースを指定します。以下の選択肢があります。- <Internal>:
タイムコード・ショーは内部タイミングを使用ます。タイムコード・スロットに接続されていません。 - <Selected>:
タイムコード・ショーを、選択したタイムコード・スロットにリンクします。 - TCSlot 1 〜 TCSlot 8:
特定のタイムコード・スロットを、このタイムコード・ショーのソースとして設定します。
- <Internal>:
- Offet TC Slot:
タップして電卓を開き、タイムコード・スロットのオフセットを設定します。
タイムコード・ショーに内部タイムコード以外のスロットが設定されている場合、Timecode Viewer のタイトルバーに Offset TC Slot ボタンが表示されます。
タイムコード・スロットにオフセットが設定されている場合、タイムコード・ショー全体がそのオフセットに合わせて送られます。
例えば、タイムラインのイベントが 1m00.0 に追加され、選択したタイムコード・スロットに 1h00m00.0 のオフセットが設定されている場合、入力タイムコード信号が 1h01m00.0 に達したときにイベントがトリガーされます。
ミュージカルなどで1時間のショーをプログラムする場合、1時間のタイムコード・ショーではなく、幕やナンバーごとにタイムコード・ショーを用意するのがよいでしょう。
例えば、保存した最初の曲のタイムコード・ショーではタイムコード・スロットに 1h00m00.0 のオフセットを設定し、次の曲の2番目のタイムコード・ショーでは 2h00m00.0 のオフセットを設定します。 - Duration:
タップして電卓を開き、タイムコード・ショー記録の長さを設定します。Auto Start と Auto Stop 機能を用いる場合は、実際のショーに合わせて長さを設定することをお勧めします。これらの機能については後述を参照してください。長さを設定すると、受信したタイム範囲外のショーの Auto Start/Stop を防げます。 - Cursor:
タイムライン上の現在の位置にカーソルを表示します。タップすると電卓が開き、新しい位置を入力できます。
|
|
ヒント |
| 選択されているタイムコード・スロットのアピアランスによって、Cursor ボタンの背景色が変わります。詳しくは タイムコード・スロットとは を参照してください。 |
Playback
以下は、Playback セクションの設定の簡単な説明です。
- Auto Start:
ショーのタイム範囲内でタイム信号を受信したとき、タイムコード・ショーを自動的に開始します。 - Auto Stop:
タイム信号が停止したとき、タイムコード表示も自動的に停止します。 - Loop Mode:
Internal タイム(上述の TC Slot 設定を参照)を使用してショーで何が起こるかを指定し、タイムコード・ショーの終わりに達します。- Loop:
タイムコード・ショーが、最初から最後まで繰り返し再生されます。タイムコード・ショーを停止するには、プレイバック・ツールバーの停止ボタンを押します。 - Pause:
タイムコード・ショーは最後で休止します。プレイバック・ツールバーの開始ボタンを押すと、タイムコード・ショーが最初から再開します。 - Off:
タイムコード・ショーは、繰り返しも休止もしません。
- Loop:
- Switch Off:
タイムコード・ショーがオフになったときにプレイバックで何が起こるかを指定します。- Playbacks Off:
タイムコード・ショーによって開始されたすべてのプレイバックをオフにします。 - Keep Playbacks:
タイムコード・ショーによって開始されたプレイバックをオフにしません。
- Playbacks Off:
- Assert Previous Events:
Yes に設定すると、カーソルの前のイベントがアサートされます。
Display
以下は、Display セクションの設定の簡単な説明です。
- Time Display Format:
タイムの表示形式を指定します。以下のオプションがあります。
- Default:
これは User Profile Settings の Time Readout に従います。詳しくは ユーザ設定 を参照してください。 - 10d11h23m45:
文字を区切りとして、日、時間、分、秒に分割されます。 - 251h23m45:
文字を区切りとして、時間、分、秒に分割されます。時間が1日を超えると、数値が24より大きくなることがあります。 - 10.11:23:45:
ドットとコロンを区切りとして、日、時間、分、秒に分割されます。 - 251:23:45:
コロンを区切りとして、時間、分、秒に分割されます。時間が1日を超えると、数値が24より大きくなることがあります。
- Default:
- Frame Readout:
フレームの表示形式を指定します。以下の選択肢があります。- Default:
User Profile Settings の Frame Readout に従います。詳しくは ユーザ設定 を参照してください。 - Seconds:
フレームを秒単位で表示します。 - 24 fps, 25 fps, 30 fps, and 60 fps:
これは、表示されるフレームレートを外部ソースに合わせるために使用できます。実際に受信される信号には影響しません。

ヒント Frame Readout (24、25、30、60 fps)を使用する場合、端数はコロンで、秒の小数部はドットによって区切られます。 - Default:
Other
以下は、Other セクションの設定の簡単な説明です。
- User bits:
タイムコードには、フレームごとに32ビットの ユーザビット (4ビット×8ブロック)があります。
これを用いると、例えば、ユーザビット1はライト、ユーザビット2はパイロというように、タイムコード信号にマークを付けられます。これは、内部タイムコード・ソースを用いている場合は使用できません。
|
|
重要 |
| タイムコード供給元から指示がない限り、ユーザビットを変更しないでください。 ユーザビットが変更され、タイムコード供給元がそれを認識できない場合、タイムコード信号は受信されなくなります。 |
- Lock:
有効にすると、タイムコード・ショーは編集や削除ができなくなり、再生やコピーだけが可能となります。
Record
以下は、Record セクションの設定の簡単な説明です。
- Record Go:
タイムコード・ショーが Go アクションを記録する際に、それをどのように記録するかを指定します。手動でイベントを追加する場合には関係ありません。- as Go:
イベントは、キューをトリガーするがそれをアサートしない Go+ アクションとして記録されます。 - as Goto(Status):
イベントは、キューをアサートする Goto アクションとして記録されます。
- as Go:
- Playback and Record:
再生および記録されるイベントの種類を指定します。
- Manual Events:
ユーザがトリガーしたアクションだけが記録・再生されます。例えば、フォローキューは記録も再生もされません。タイムコード・ショーの記録後にキュー内のコマンドに加えられた変更は、タイムコード・ショーの再生時に反映されます。これは、Playback and Record のデフォルトです。 - All Events:
すべてのイベントが記録・再生されます。View Mode が Text や Both の Execute Command 列のセルには "---" と表示され、タイムコード・ショー内のキュー・コマンドの実行は上書きできないことを示しています。キュー・コマンドは記録されますが、タイムコード・ショーの記録後にキュー内のコマンドに変更を加えても、その変更はタイムコード・ショーには反映されません。
- Manual Events:
- Record Remote Events:
リモート・アクションによってトリガーされた再生アクションを記録するかどうかを指定します。これを有効にすると、Global 設定の Timecode Events Recording From 設定の状態に関係なく、すべてのリモート・イベントが記録されます。
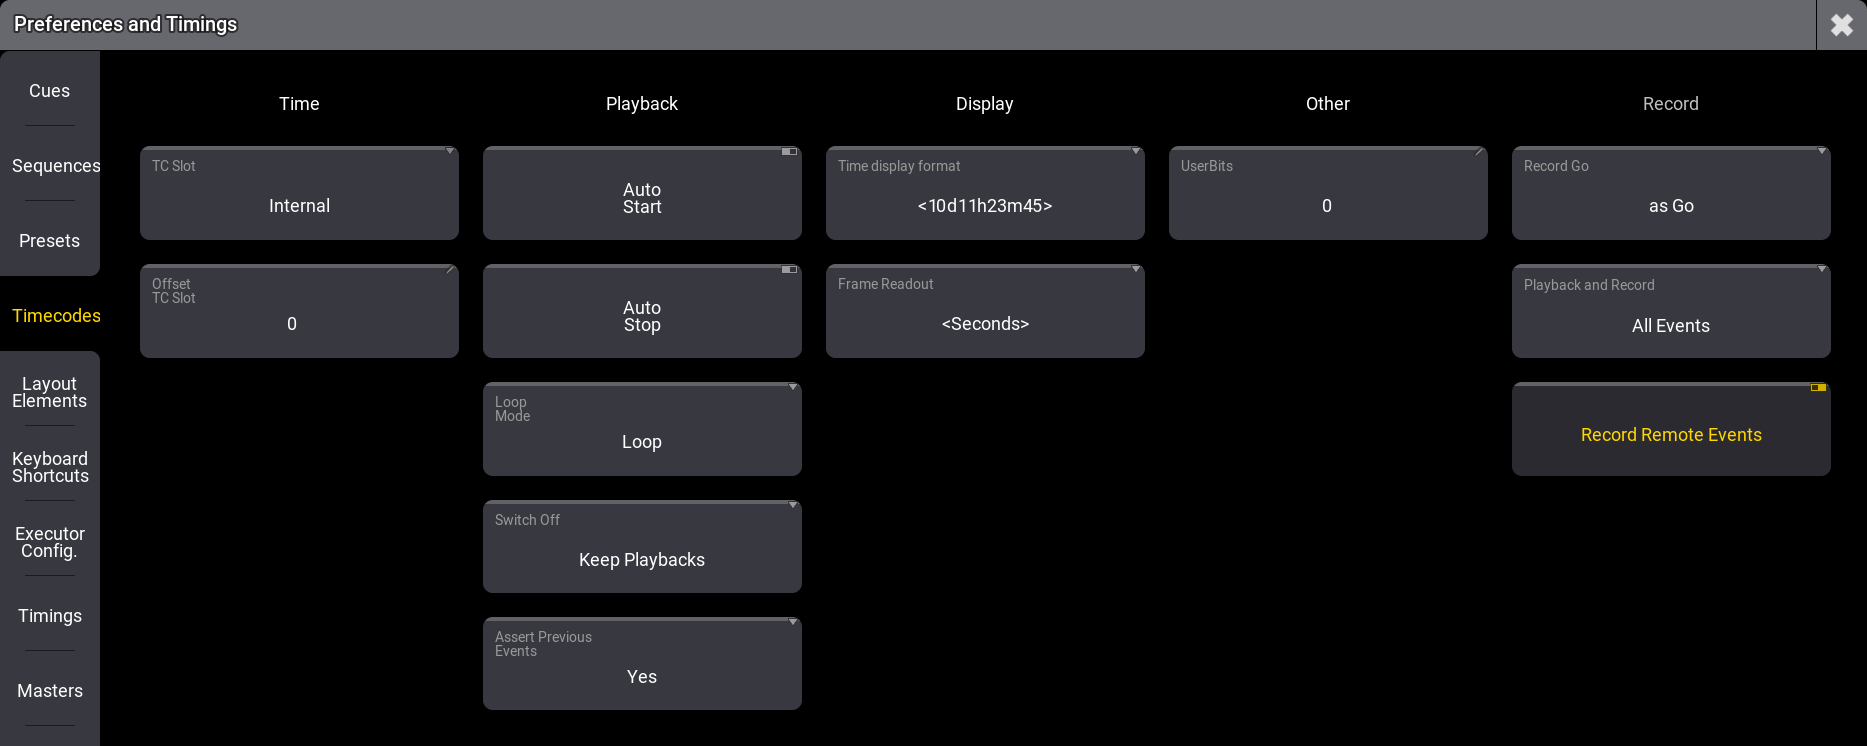
Preference and Timing の Timecode 設定
Preference and Timing メニューには、上で説明した多くの設定があります。
メニューを開くには、Control Bar の歯車アイコン(![]() )をタップするか、Menu を押します。
そして、Preference and Timing をタップし、Timecode をタップしてください。
)をタップするか、Menu を押します。
そして、Preference and Timing をタップし、Timecode をタップしてください。
ここで表示される設定は、新しいタイムコード・ショーを作成するときに使用されるデフォルトです。
設定については 上述 を参照してください。
Preference and Timing の Global 設定
メニューを開くには、Control Bar の歯車アイコン(![]() )をタップするか、Menu を押します。そして、Preference and Timing をタップし、Global をタップしてください。
)をタップするか、Menu を押します。そして、Preference and Timing をタップし、Global をタップしてください。
このメニューには、Timecode Events Recording From という設定が1つだけあります。これには2つの選択肢があります。
- All Users:
セッション内にあるすべてのユーザからの再生アクションを記録します。 - Single User:
タイムコード記録を開始したユーザの再生アクションだけを記録します。これがデフォルトです。