共通のウィンドウ設定
| grandMA3 ユーザマニュアル » ウィンドウ、ビュー、およびメニュー » 共通のウィンドウ設定 | Version 2.2 |
すべてのウィンドウには設定があります。
タイトルバーやタイトル部分にあるMAロゴをタップすると、設定にアクセスできます。
設定内容はウィンドウによって異なります。設定は、種々のセクションにまとめられ、タブで表示されています。
Fixture Sheet に対する Display セクションは以下のようになります。
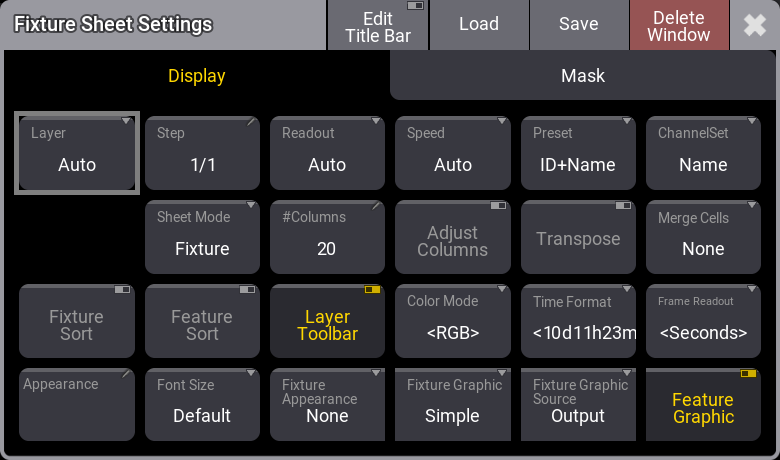
Settings のタイトルバーには、いくつかの共通ボタンがあります。赤い Delete Window ボタンを押すと、そのウィンドウが画面から削除されます。![]() では、この設定ポップアップが閉じます。
では、この設定ポップアップが閉じます。
Save ボタンは、現在の設定をユーザ・プリファレンスとして保存します。また Load ボタンは、保存されているプリファレンスを読み込むのに用いられます。プリファレンスの保存や読み込みについては、後述 を参照してください。
タブの数はウィンドウによって異なります。一部のウィンドウには多くの設定がありますが、より少ない設定しかないものもあります。
設定を変更しても、Settings ポップアップは閉じません。
一部の設定では、そのためのプロパティをリスト表示する小さな選択ポップアップが開きます。
Display / Sheet
このタブには、ウィンドウが情報を表示する方法についての設定があります。ここでの設定は、ウィンドウによって大きく異なります。特定のウィンドウに固有の設定については、そのウィンドウに関するトピックで述べられています。
以下は、2つ以上のウィンドウに共通する設定の一覧です。
- 2 Finger Edit:
このトグルボタンは、2本指ジェスチャまたは右クリックによるオブジェクトの編集を可能にします。 - #Columns:
この入力ボタンは、シートに表示する列数を設定します(DMX Sheet を除いて、Transpose と Adjust Columns 設定をオンにする必要があります)。 - Adjust Columns:
ウィンドウサイズと列数に合うように、シートの列幅を調整します。 - Appearance:
タップすると Select Appearance ポップアップが開き、定義されているすべてのアピアランスがリスト表示されます。アピアランスの新規作成も可能です。いずれかを選ぶと、そのアピアランスがウィンドウに適用されます。 - Auto Scroll:
このオン/オフボタンは、自動スクロール機能を有効にします。シートやグリッドをスクロールしながら、アクティブなオブジェクトがウィンドウ内に表示されたままになります。 - Channel Set:
チャンネルセットに含まれる値の表記方法を指定します。以下の選択肢があります。- Value:
値だけを表示します。 - Value + Name:
値とチャンネルセット名を表示します。 - Name:
チャンネルセット名だけを表示します。
- Value:
- Color Mode:
Color Readout を RGB か CMY に切り替えます。デフォルト値は、User Profile Settings に従います。ユーザプロファイルの設定は "<>" で囲まれて表示されます。 - Cue Only:
値を編集する際に Cue Only 機能をオン/オフを指定します。この設定は、Track Sheet モードの Sequence Sheet および Content Sheet に有効です。 - Executors:
エクゼキュータの表示/非表示を切り替えます。エクゼキュータが非表示でラベルが表示されている場合、レターボックス画面のプレイバックバーに表示されるエクゼキュータ・ラベルと同じ外観になります。この設定は、Playback ウィンドウ と Xkeys ウィンドウ で有効です。 - Feature Graphic:
フィーチャを表示するシートで、各フィーチャの横にある小さなグラフィックを表示/非表示にします。 - Feature Sort:
フィーチャのソートを有効にします。選択されたフィーチャは、それを表示するシート内で他のフィーチャよりも前に移動します。 - Fixed Target:
Link Type が Fixed の場合、シートに表示されるシーケンスを指定します。タップすると、シーケンスを選択できる Assignment Editor ポップアップが開きます。 - Fixture Appearance:
シート上でフィクスチャのアピアランスがどのように表示されるかを指定します。以下の3つのオプションがあります。以下の3つの選択肢があります。- None:
フィクスチャのアピアランスは表示されません。 - Enabled:
フィクスチャタイプのアピアランスが表示されます。 - Graphic:
出力に合わせて、アピアランスが色付きの背景で表示されます。
- None:
- Fixture Graphic:
フィクスチャ・グラフィックを表示するシートで、Name 列の前に表示するグラフィックを指定します。Name 列のサイズを非常に小さくすると、グラフィックは非表示になります。この設定には以下の選択肢があります。- None:
グラフィックを表示しません。 - Flip:
Position アトリビュートを持つフィクスチャに対して、Name 列の左側にフリップ・インジケータだけを表示します。インジケータ内の矩形の位置は、フィクスチャが現在どのフリップ領域にあるかを示しています。 - Simple:
Color と Dimmer 値の組み合わせによる単純な四角形を Name 列の左側に表示します。 - Gobo:
Simple グラフィックにゴボイメージを組み合わせて表示します。一度に1つのゴボホイールのゴボしか表示されません。どのゴボが表示されるかは、ゴボホイールの順番で決まります。例えば、ゴボ1が Open に設定されている場合は、ゴボ2のものが表示されます。
- None:
- Fixture Sort:
このオン/オフボタンは、フィクスチャのソートを有効にします。フィクスチャは、それを表示するシートの上部または左側で、選択順にソートされます。 - Font Size:
ウィンドウ内のフォントサイズを選択します。スワイプボタンをクリックすると、10〜32のサイズリストが表示されます。また、Default プロパティもあります。これは18に相当します。 - Frame Readout:
このウィンドウに対するフレームの表記法を指定します。ユーザプロファイル のデフォルト設定を上書きできます。 - Labels:
ラベルの表示/非表示を切り替えるオン/オフボタンです。この設定は、Playback ウィンドウ と Xkeys ウィンドウ で有効です。 - Layer:
ウィンドウに表示するレイヤを選択します。レイヤのリストを開くスワイプボタンです。Auto という特殊なプロパティを選ぶと、エンコーダバー で選択されているレイヤにしたがいます。 - Layer Toolbar:
種々のレイヤ下部にある レイヤ・ツールバー の表示/非表示を切り替えます。 - Link Type:
シートに表示されるシーケンスを指定します。
以下の3つのタイプを選択できます。- Fixed:
シートには特定のシーケンスの情報が表示されます。選択は Sheet Settings で行います。Fixed Target 設定については上述を参照してください。また、Assign および Sequence キーワードを用いて、シートのタイトルバーをタップすることでも設定できます。 - Selected:
選択されているシーケンスからの情報が表示されます。 - LastGo:
トリガーコマンド(<<<、>>>、Go+、Go-、Goto、Load、On、Select、Top、Temp、Flash、Toggle On、Pause)を最後に受け取ったシーケンスが自動的に表示されます。これは、実行中のタイムコード記録からシーケンスがトリガーされる場合も含みます。Sequence Settings で Include Link Last Go 設定をオフにすると、シーケンスを LastGo から除外できます。LastGo は、同じユーザプロファイルによってトリガーされたシーケンスだけを表示します。
- Fixed:
- Merge Cells:
隣接するセルの値が同じで、それらが同じフィーチャやフィーチャグループに属している場合、1つのセルを結合して表示できます。例えば、R、G、Bの値がすべて100の場合、それらが結合されて1つだけ表示されます。- None:
セルは結合されません。 - Feature:
2つ以上の隣接するフィーチャの値が同じ場合、それらを結合して表示します。 - Feature Group:
2つ以上の隣接するフィーチャグループの値が同じ場合、それらを結合して表示します。
- None:
- Page:
ウィンドウが関連付けられているエクゼキュータ・ページを変更するために使用します。 この設定は、Playback ウィンドウ、command wing Bar ウィンドウ、および Xkeys ウィンドウ で有効です。 - Preset:
シート内でプリセット情報をどのように表示するかを指定します。これら3つの要素を組み合わせた6つのプロパティがあります。- ID:
プリセットのID番号を表示します。 - Name:
プリセットの名前を表示します。 - Value:
プリセットに保存されている値を表示します。
- ID:
- Readout:
フィクスチャ・アトリビュート値の表記法を選択します。スワイプボタンで、以下の選択肢を含むリストが開きます。- Auto:
シートは、エンコーダバー で選択された表記法に従います。 - Natural:
各アトリビュートには Natural な表記法が定義されています。これは Attribute Definition で定義されます。このオプションを選択すると、アトリビュートに定義されているさまざまな表記法が表示されます。 - Percent:
0〜100の範囲です。 - PercentFine:
0.00〜100.00の範囲です。 - Physical:
フィクスチャタイプ定義で指定された物理的範囲を使用します。 - Decimal8:
10進数で0〜255の範囲です。 - Decimal16:
10進数で0〜65,535の範囲です。 - Decimal24:
10進数で0〜16,777,215の範囲です。 - Hex8:
16進数で00〜FFの範囲です。 - Hex16:
16進数で00〜FFFFの範囲です。 - Hex24:
16進数で00〜FFFFFFの範囲です。
- Auto:
- Setup:
ウィンドウを Setup モードに変更し、ウィンドウ要素の内容や設定を操作できるようになります。 - Sheet Mode:
シートの見た目を変更します。以下の4つのモードがあります。- Fixture:
フィクスチャを行、アトリビュートを列とする行列として表示します。 - Channel:
フィクスチャを、Dimmer アトリビュートのセルとし表示します。 - Dimmer+:
Channel モードに似ていますが、選択したフィーチャグループのアトリビュートも表示されます。IDが連続していない場合や、フィクスチャIDを持たないフィクスチャの IDType が変わった場合、灰色の区切り線が表示されます。このモードでは、フィクスチャのグラフィック表示は可能ですが、フィーチャのグラフィック表示はされません。 - Sheet/Filter:
Dimmer+ と似ていますが、シート設定の Mask タブでフィルタが指定されていない限り、すべてのアトリビュートが表示されます。
- Fixture:
- Show Grand Master:
ウィンドウ内の Grand Master Section の表示/非表示を切り替えます。これは、Custom Master Section ウィンドウ、command wing Bar ウィンドウ、および Encoder Bar ウィンドウ で有効です。 - Show Master Area または Show Master Section:
ウィンドウ内の Master エリアの表示/非表示を切り替えます。これは、Custom Master Section ウィンドウ と command wing Bar ウィンドウ で有効です。 - Show Title Bar / Title Bar:
ウィンドウのタイトルバーの表示/非表示を切り替えます。デフォルトではオンになっています。オフの場合、コントロール・エリアで両方の MA キーを押すことでタイトルバーを一時的に表示できます。grandMA3 onPC の場合、Windows では Ctrl + Alt、Mac では Ctrl + Option を押すことでタイトルバーを一時的に表示できます。これは、Clock Viewer、Encoder Bar ウィンドウ、および Layout Viewer で有効です。 - Speed:
スピード値の表記法を設定します。選択肢には、Auto (User Profile 設定にしたがう)、Hertz、BPM (ビート/分)、および Seconds があります。この設定は、Fixture Sheet と Phaser Editor で有効です。 - Step:
表示するステップを選択します。ステップは フェイザー で用いられます。 プロパティ入力ボタンで、電卓ポップアップが開きます。この設定は、Fixture Sheet と Sequence Sheet で有効です。 - Time Format:
ウィンドウのタイム形式を指定します。ユーザプロファイルのデフォルト とは異なる形式を選択できます。この設定は、Fixture Sheet と Sequence Sheet で有効です。 - Transpose:
ウィンドウ内の列と行を入れ替えます。 - View Mode:
ビュー内で、さまざまなデータや情報の表示方法を指定します。モードは、設定やウィンドウのタイトルバーで変更できます。
Agenda Viewer には、Sheet、Year、Month、Week、および Day という表示モードがあります。
Phaser Editor には、Auto、2D、1D、および Sheet という表示モードがあります。
Sound Viewer には、Wave、Sound、および Beat という表示モードがあります。
Timecode View には、Text、Timeline、および Both という表示モードがあります。
- Wing ID:
ウィンドウに表示するウィングを指定します。この設定をタップすると、小さな Select WingID ポップアップが開き、目的のウィングを選択できます。この設定は、command wing Bar ウィンドウ と Playback ウィンドウ で有効です。
|
|
ヒント |
| Show Title Bar 設定を持つウィンドウを全画面表示にするには、Configure Display ポップアップ で他のすべての表示要素を非表示にしてから、ウィンドウ設定の Show Title Bar をオフにします。 |
Pool Settings
ほとんどのプールに共通する設定がいくつかあります。一部のプールに固有の設定もあります。Group プールやプリセットプールには、各プール・オブジェクト上部にある色付きバーに関する3つの追加設定があります。sMArt View はプールのように動作し、Pool Settings の多くを共有しています。
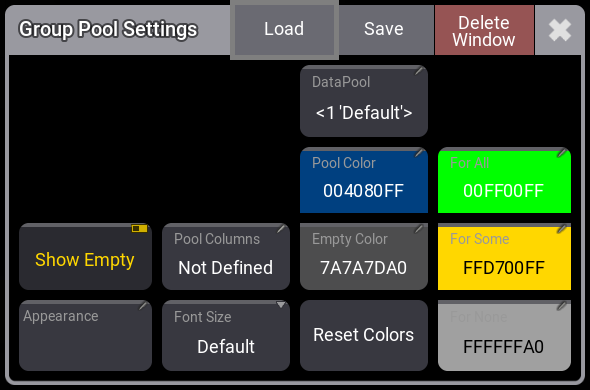
以下は、プールの一般的な設定です。
- Show Empty:
空のプール・オブジェクトの表示/非表示を切り替えます。 - Appearance:
アピアランスは、プール・オブジェクトの背後に用いられます。 - Pool Columns:
ウィンドウ内のプール・オブジェクトの列数を指定します。ウィンドウのサイズは変更されません。ウィンドウが列数よりも広い場合、余分なスペースは黒(デフォルト)で表示されます。ウィンドウが列数よりも小さい場合、プール・ウィンドウは横方向にスクロールできます。列数が設定されていると、タイトル・フィールドの右上隅に アイコンが表示されます。
Not Defined 値は、ウィンドウのサイズが変更されても、それに合わせて幅が動的に設定されます。
Take Current Width では、ウィンドウの現在のサイズに合わせて幅が設定されます。サイズが変更されても、幅は動的に変更されません。 - Font Size:
プール・オブジェクトのフォントサイズです。10〜32の間で、いくつかのサイズを選べます。Default は18に相当します。 - DataPool (一部のプールでのみ利用可能):
プール・ウィンドウがどのデータプールからデータを表示するかを指定します。これによって、異なるデータプールからのオブジェクトを表示するプールを作れます。例えば、デフォルトのデータプールによる Group プール・ウィンドウの隣に、異なるデータプールのグループを表示する別の Group プール・ウィンドウを表示できます。 - Pool Color:
プールのタイトル・ボタンの色です。 - Empty Color:
空のプール・オブジェクトの色です。 - Reset Colors:
デフォルトのカラー・テーマの色に戻します。 - Use Object Action:
有効にすると、選択したプール・アクションの代わりに、選択したオブジェクト・アクションが実行されます。Use Object Action が有効になっているプール・ウィンドウには (+) が表示されます。プール・オブジェクトでは、選択したオブジェクト・アクションの設定が、オブジェクトの前面に明灰色のアイコンで表示されます。オブジェクト・アクションが None に設定されている場合、プール・オブジェクトの上に灰色のオーバーレイが表示されます。
データプール番号は、プール・タイトルボタンの右下隅に表示されます。この番号は、プール・ウィンドウが種々のデータプールの表示に対応していて、ショーに複数のデータプールがある場合にのみ表示されます。
プリセットプールや Group プールには、以下のものも含まれます。
- For All:
この色は、選択されているすべてのフィクスチャがそのプリセットを利用できる場合に用いられます。 - For Some:
この色は、選択されているフィクスチャの一部がプリセットを使用できる場合に用いられます。 - For None:
この色は、選択されているフィクスチャがそのプリセットを利用できない場合や、選択されているフィクスチャがグループにない場合に用いられます。
色に関する設定をタップすると、Edit Color ポップアップが開きます。
タイトルバーのボタンは、他のウィンドウ設定のものと同じです(上述を参照)。
プールのデフォルト・アクション
これは、コマンドラインで(関連する)キーワードを指定せずに、プール・オブジェクトがタップされた際に実行されるデフォルトのアクションを指定します。
プールには、以下のアクションのいくつか設定できます(利用可能なアクションは、プールの種類によって異なります)。
- At (
 ):
):
プログラマにセレクションがない場合、プリセットをタップしても何もしません。プログラマにセレクションがある場合、プリセットをタップすると、それがプログラマに呼び出されます。 - Call(
 ) - フィルタに対するデフォルト・アクション:
タップされたプール・オブジェクトを呼び出します。 - SelFix/At (
 ) - プリセットに対するデフォルト・アクション:
プログラマにセレクションがない場合、プリセットをタップすると、それを利用できるフィクスチャが選択されます。もう一度タップすると、プリセットがプログラマに呼び出されます。
プログラマにセレクションがある場合、プリセットを初めてタップすると、それがプログラマに呼び出されます。 - SelFix/Extract (
 ):
):
SelFix/At と同様に動作しますが、プリセット参照をプログラマに呼び出す代わりに、値がプログラマに抽出されて呼び出されます。 - Select (
 ) - シーケンスに対するデフォルト・アクション:
プール・オブジェクトをタップすると、それが選択されます。 - Toggle (
 ):
):
プール・オブジェクトをタップすると、現在の再生状態に応じて、それを再生したりオフにしたりします。 - Go+ (
 ):
):
プール・オブジェクトの再生を開始するか、シーケンスの次キューに移ります。 - Flash (
 ):
):
プール・オブジェクトがタップされている間、Flash されます。Flash ではフェードタイムが無視されます。 - Temp (
 ):
):
プール・オブジェクトが押されている間、それを再生します。Temp ではフェードタイムが考慮されます。 - Top (
 ):
):
Timecode プール・オブジェクトを先頭から再開します。 - Pause (
 ):
):
Timecode プール・オブジェクトを休止します。もう一度タップすると再生されます。 - Off (
 ):
):
Timecode プール・オブジェクトの記録を停止し、再生時に一時停止します。 - Goto (
 ):
):
ポップアップを開き、Sequence プール・オブジェクトから特定のキューを再生します。 - Load (
 ):
):
ポップアップを開き、Sequence プール・オブジェクトから特定のキューを読み込みます。 - None ():
プール・オブジェクトをタップしても、アクションはトリガーされません。
プールのタイトル・オブジェクトの右上隅にある小さなアイコンは、デフォルトのアクションを示します。

プリファレンスの保存と読み込み
ウィンドウやプールごとに、プリファレンスを保存および読み込むことができます。これらの設定は、ユーザプロファイルに保存されます。したがって、ユーザプロファイルのエクスポート/インポートには、これらの設定も含まれます。
Save をタップすると、Save Preferences ポップアップが開きます。
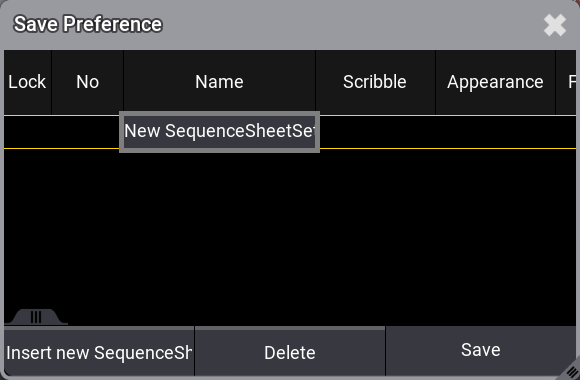
プリファレンスの新規保存
- Settings ポップアップを開きます。
- タイトルバーの Save をタップします。
- Insert new [タイプ] をタップします。このボタンはウィンドウによって少し変わります。タイプは、挿入される設定を示しています。
- Name 欄を編集して、名前を付けます。
- Preference ポップアップで Save をタップしてください。
|
|
ヒント |
| プリファレンスを新規保存する場合、それがまだ存在せず、"New ..." にフォーカスがあるため、OK をタップするだけで保存できます。 |
プリファレンスの更新
- Settings ポップアップを開きます。
- タイトルバーの Save をタップします。
- 一覧で目的のプリファレンスをタップします。
- Preference ポップアップで Save をタップしてください。
プリファレンスの読み込み
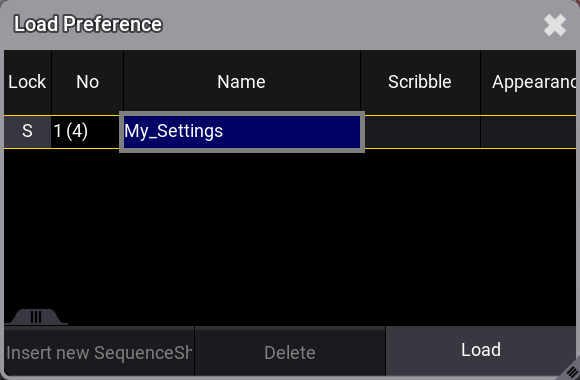
- Settings ポップアップを開きます。
- タイトルバーの Load をタップします。
- 目的のプリファレンスを選択します。
- Preference ポップアップで Load をタップしてください。
プリファレンスの削除
- Settings ポップアップを開きます。
- タイトルバーの Save をタップします。
- 目的のプリファレンスを選択します。
- Preference ポップアップで Delete をタップしてください。
- 右上隅にある
 をタップしてポップアップを閉じます。